Teeter Totter: Week 1 Cutting

It’s the first day of a fresh new month. The year is still young; meanwhile, the change of seasons brings a sense of newness that inspires. I hope you are soaking it in!
On the dock this May is a beginner-friendly sew-along, chock full of triangles. That’s an unusual combination, no? Beginner + triangles? Well, this tossed triangle style is certainly not fussy. No need to agonize over perfect fabric combinations either. Just pull a stack of happy fabrics, cut and sew!
To find out how to join the Teeter Totter sew-along, click over to the master sew-along post. It’s a digital pattern, so you can grab it in a flash and sew right along.
Week 1: Cutting
Hopefully you already have a copy of the Teeter Totter quilt pattern and have been thinking about your background fabric choice. Will you use a neutral background, like the pattern cover quilt, or opt for a colored background in ombré or one consistent colored fabric? I’m very curious to see what catches your fancy. This week we do the bulk of the cutting. I hope you can use your fabric stash for those triangle fabrics!
Step 1: Order/Select Background
Even if you’re just getting the pattern now, it’s not too late to join in. You can order precut fabric rolls for your background fabric. Thanks to precut rolls, you can skep Step 2 and move on to selecting triangle fabrics! For Teeter Totter quilt you need 1 1/2” wide precut fabric rolls. Two rolls is plenty for a throw sized quilt. Search for Honey Bun rolls from Moda or Skinny Strips from Kona. Here are some options for precut strips from my sponsor shops:

Congratulations are in order to the winners of our Kick-off Giveaway: @Brynqultz in the USA and @FrancisPaul61 in Europe! Both winners score two precut rolls of 1 1/2” strips and a charm pack for their triangle fabrics. Thanks to @FatQuarterShop and @NannoCreative!
I’ve decided to sew my cool purple fabric pull, with an ombre colored background. I’m using just four solid colors in my ombre background, as opposed to the seven colors suggested in the pattern. Hmmm - - - how much yardage will I need in each color?

The pattern tells me how many total width-of-fabric background strips are needed for a throw quilt with consistent background fabric. I divided that number by four, to figure out how many strips I’ll need in each color. Then I figured out how much yardage that would require and reordered a few colors as needed. Purple reinforcements arrive tomorrow!
Step 2: Cut Background Strips
This step is pretty straightforward. Cut the required number of background strips for your intended size quilt: baby or throw. At this point we’re only cutting full-width-of-fabric strips. Cut with your yardage still folded in half, as it was on the bolt (see photo below), and selvedges aligned. Make tidy stacks of the folded 1 1/2” strips, ready and waiting for upcoming tasks.

Yesterday I started cutting width-of-fabric strips while chatting on the phone with a good friend. Can you spot my mistake? OOOPS! I cut 2 1/2” wide strips instead of 1 1/2” strips. Yikes! Good thing I already ordered more fabric in this color. Fingers crossed that I still have enough.

Step 3: Select Triangle fabrics
Now comes the fun part - triangle fabrics! With its tossed triangle layout, Teeter Totter mixes all fabrics randomly. How your fabrics look in a stack is pretty much how they’ll look in the quilt. If you like the fabrics together, they’re good! Trust yourself to pull a stack of fabrics from your stash and go for it!
That said, I can give you some tips if you’d like to create a quilt like the Teeter Totter cover quilt.
Use solids or near-solids for about 30% of the triangles
Choose prints that are brightly colored with small-scale motifs
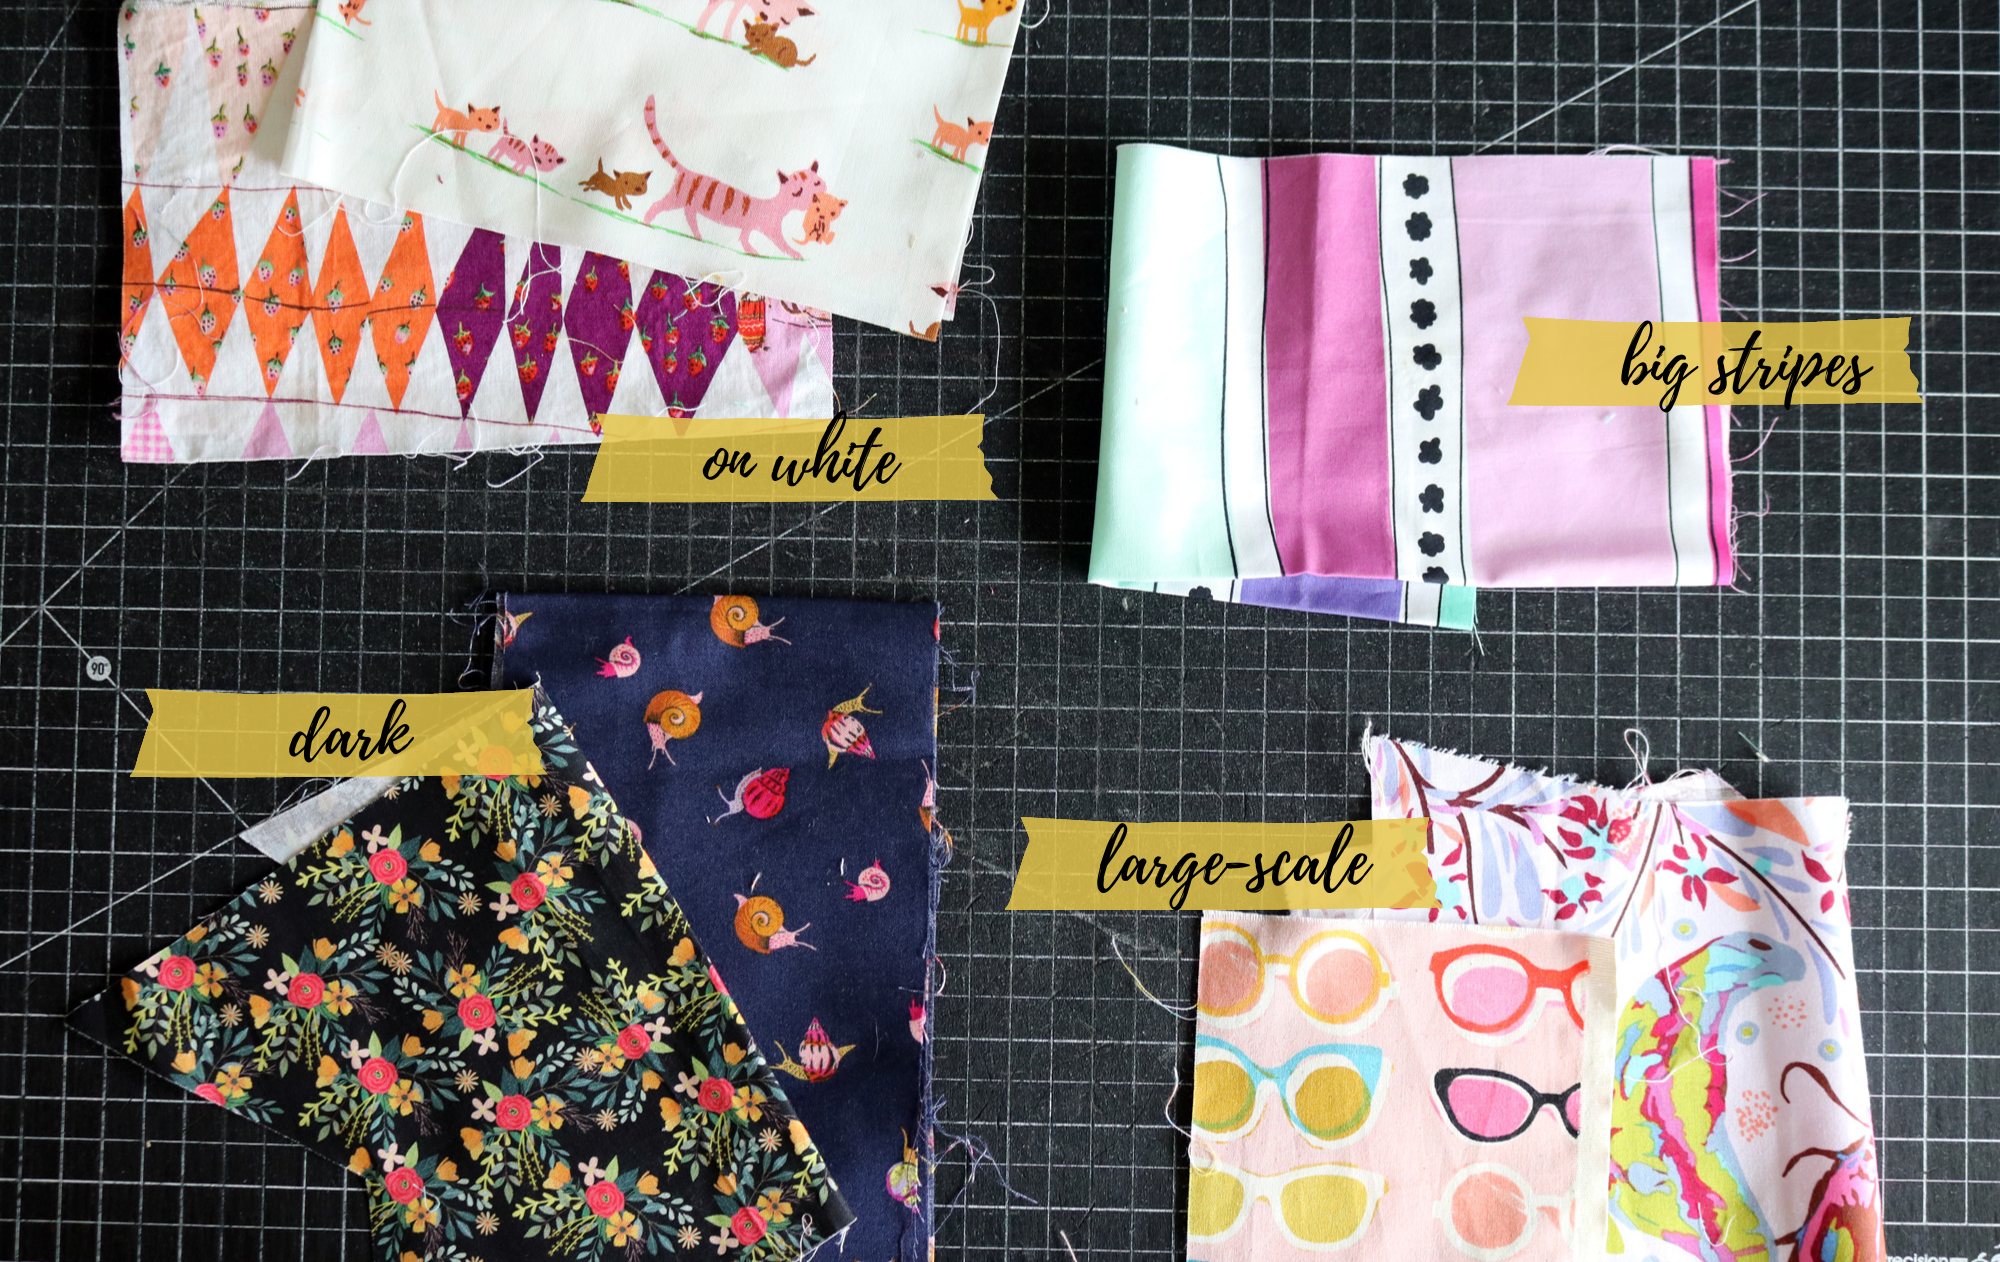
Avoid
Prints on white backgrounds (assuming you’re using white sashing)
Big, fat stripes - when cut up and sewn into Teeter Totter, they will visually disrupt the sashing pattern
Prints on dark backgrounds
Large-scale prints - large motifs are lost when cut up as triangles
Got triangle scraps? Follow the tips on pattern page 4 for sorting and sizing triangle scraps. Keep in mind that you don't have to use every single triangle scrap, indiscriminately. You probably don’t have enough triangles for the whole quilt, so you could begin by choosing a color scheme and some key fabrics. Then rifle through your triangle scraps to find suitable candidates to include.
Step 4: Cut Squares
Ok, we’ve chosen fabrics for the quilt and cut width-of-fabric strips for the background. Now it’s time to cut squares. These squares will become the triangles in Teeter Totter. And, yes, you can use charm squares instead! They’re perfect.

Follow the pattern to cut as many squares as needed for your intended quilt size: baby or throw. Note that the correct number of squares for the throw size is 132 (an early version of the pattern included the incorrect count in one section). If you are working with stash fabrics, as I am, don’t be shy about peeking into your scrap drawers to add in on-color scraps in the right size. Extra variety ups the charm factor!
Step 5: Slice Triangles
Easy-peasy - slice your squares in half on diagonal. Now you have triangles and are ready-to-sew!

Next week we’ll start whipping out batches of Teeter Totter blocks. If you are chomping at the bit, we won’t blame you for chain-piecing your first blocks this week (wink).
Week 1 Sew-Along Goal: Cutting
Stacks of background strips and sassy triangles will be a lovely sight on your cutting table.
Weekly Giveaway
Share to win!
This week share a photo of your fabrics with hashtag #TeeterTotterQuilt.
Your photo enters you into a giveaway for a Willoughby Quilt Kit by Tales of Cloth. This is Jodi’s brand-new pattern, and you get the paper pieces and acrylic cutting set too!
Willoughby is the best of both worlds. The EPP is relaxed and fun and enjoyed in all the little moments where you want to be more present, but once the blocks are done, you just want to be done! Willoughby allows you to trim your EPP blocks square, and machine sew them into the quilt top in an afternoon! Win-win!
Winner will be announced next week and giveaway is open worldwide.
good luck, friends!


