8 Ideas for Making a Quilt Backing
If you find yourself losing steam after your patchwork quilt top is made, you’re not alone. The chore of creating a quilt backing fabric is often not nearly as enticing as starting a new project.
But wait! Finishing that quilt is going to be soooo rewarding. Here are some ideas to help you push on to make that quilt backing.
Remember - your quilt back should be 2-4” larger than the quilt top in all four directions.

No. 1 - Use Wide back Fabric
This no-sew alternative is my go-to for large quilts, think twin-size and bigger. With bed quilts the backing fabric is rarely appreciated. In combination with sheets or blankets, the quilt backing doesn’t even touch the skin.
Wide backing fabrics make the cheapest and easiest quilt backing. The only downside? Selection is limited. Ask your local quilt shop to stock wide back fabrics or shop online. Fat Quarter Shop has one of the largest selections I’ve seen.
Wide back fabrics are usually 108” wide. That’s probably large enough for the longest side of your quilt. Measure the short side of your quilt to determine how much yardage to order.
Example: 88" x 98" queen quilt. The short side is 88”. Buy 2 2/3 yards for 96” of wide back fabric.
No. 2 - Use a Flat Sheet
A high quality flat bed sheet may be large enough to serve as your quilt back. This is another no-sew alternative, which is more likely to be available locally. Look for 100% cotton sateen. Do not buy a stretchy sheet fabric, such as jersey or “t-shirt” fabric.
Before basting your quilt sandwich, check that your sewing machine will sew easily through the bed sheet. Make a small test quilt sandwich and give it a go. Sometimes a sheet's tight weave resists quilting. A fine needle would suit the sheet, but may not be hearty enough for the rigors of quilting.
No. 3 - Buy Yardage
For most throw quilts, the backing fabric is seen and felt almost as often as the quilt top. Using one, truly special fabric for the backing can really enhance your enjoyment of the finished quilt.

Regular quilting cotton yardage is 42-44” wide. For this approach, you’ll have to buy enough yardage to sew two large pieces together. When you sew the yardage together, you’ll have a piece approximately 80” wide.
Example: 60" x 68" throw quilt. The long side is 68”, which will work with the 80” joined-yardage width. Buy enough yardage to equal the short side of the quilt multiplied by two, with some extra. 60” x 2 = 120”. Buy 3 3/4 yards for 135” of backing fabric.
No. 4 - Simple Pieced Backing
Another nice way to make a quilt back style is with two different fabrics. Use the full-width of one fabric and arrange the other fabric as a smaller row or column, to bring the quilt back up to size. This approach often means you can buy less yardage than the above approach. The small row or column can be pieced so that there is not a bunch of extra fabric left over.
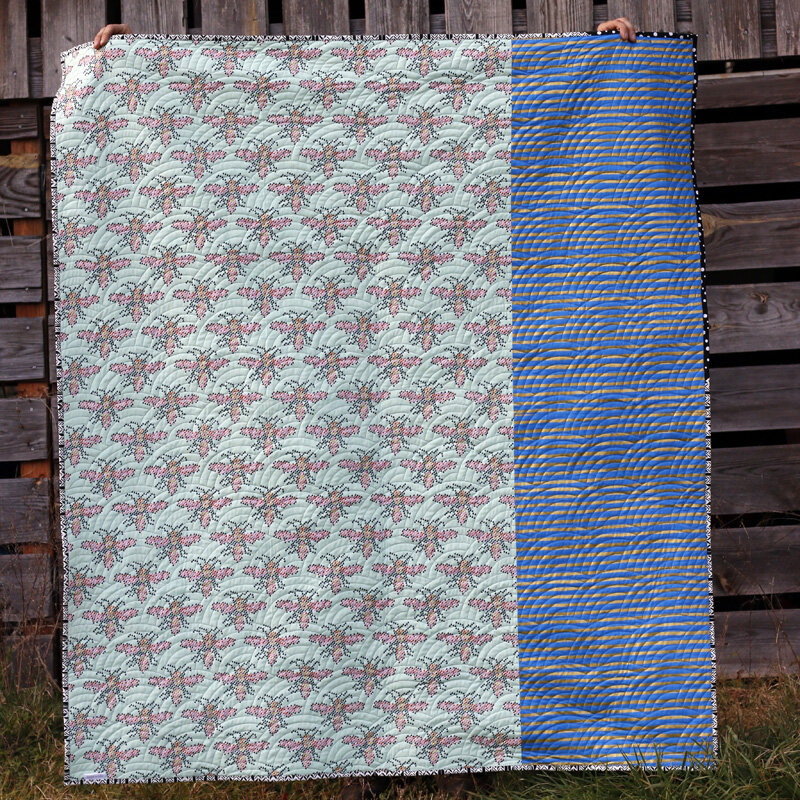
Example: 60" x 68" throw quilt. Buy 2 yards of the main fabric (the bee fabric above). That provides a cut of fabric 42” wide and 72” long. Buy 1 1/3 yards of the column fabric (stripe fabric above). Cut it in half to yield (2) 24” x width-of-fabric sections. Connect them to create a long column and then join the column to the main fabric.
No. 5 - Puzzle Together Fabrics on Hand
Is your fabric stash getting a little unwieldy? Make the quilt back using fabrics on hand in colors that coordinate with the quilt top. This is a great way to use fabrics that have been hanging around for awhile or ones that are more fun whole, rather than chopped up for patchwork.
Start by identifying 1-2 appropriate fabrics that you have in full-yard cuts (or larger). Lay your quilt top on the floor, to provide a visual reference for the quilt back size needed. Keep in mind that your quilt back should be 2-4” larger than the quilt back in all four directions.

Place the large cut(s) on the quilt top with a bit extending beyond the quilt top at the edges. Then add smaller cuts to fill in the gaps for your quilt backing.
Since you can see the quilt top during this process, it’s easy to imagine how your developing quilt back will coordinate with the quilt top! When I create a quilt back this way, I don’t even half to measure the quilt top. Score!
No. 6 - Make a Consistent Grid
Did you buy way too much fabric for your quilt top? Use any leftovers on the quilt back! In contrast to the improvisational puzzle method, here the quilt back is made up of consistently-sized fabric cuts. Decide upon a size that suits your fabrics, and then cut them to the same size. Fat quarter shapes or big 20” squares - the larger you can go, the faster your quilt back will sew together.
How many fabric cuts do you need? Well, that depends upon your quilt top, of course. Simple multiplication will reveal the answer when you are working in a straightforward grid.
No. 7 - Use up Extra Blocks
If you’ve made a few more quilt blocks than you actually needed for your quilt top, incorporate them into the quilt back. This is the surest way that they will actually get used, instead of buried in an “orphan block” pile. Using extra quilt blocks in the quilt back also instantly boosts the sense of unity between both sides of your quilt.

When I use extra quilt blocks for the quilt back, I like to design the backing on the floor using the Puzzle approach from No. 5. The quilt blocks become part of the puzzle!

If you have smaller blocks or lots of blocks, start by sewing them together, perhaps with sashing. This makes the blocks a large puzzle piece. Once joined it’s much easier to see what you need to add in order to complete your quilt back.
No. 8 - Compose a Statement
Do you have more energy for creating that quilt back than you thought? Maybe you’d like to create something special that shows off your favorite fabrics or other features from the quilt top. Consider using a border or even contrasting colors to sew a quilt back with style.
Here are some examples of my quilts, back and front, where the quilt back makes more of a statement.


I hope this list has sparked your imagination. If you think about it, making the quilt back is actually an opportunity to sew another quilt in fabrics/colors that coordinate with your first one. Sure, sometimes it’s nice to just do something easy and move on to the next project. Other times you might enjoy lingering over that quilt back construction if you give yourself the space to be creative.
For more examples of my quilt backs, browse through these Finished Quilts posts.
Happy quilting!