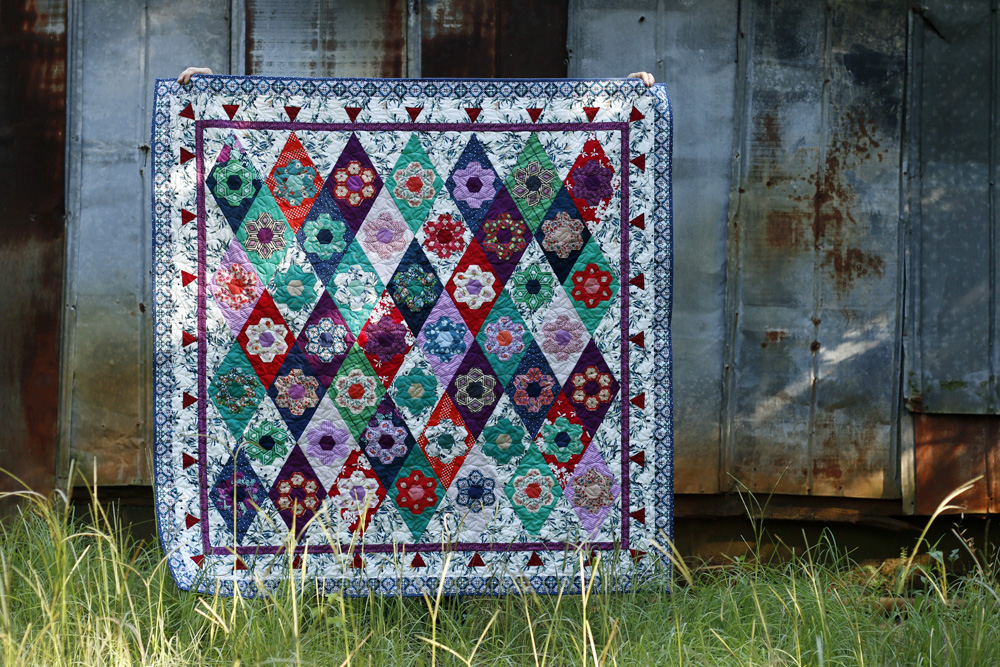
Kingfisher Stitch-Along: Borders
This post is part of the Kingfisher Stitch-Along series. This free, portable project combines English paper piecing, applique and traditional piecing. I'm co-hosting with Jodi of Tales of Cloth. Get all the details here.
Welcome back! Today I'm sharing the last piece of your Kingfisher Stitch-Along puzzle. Borders!
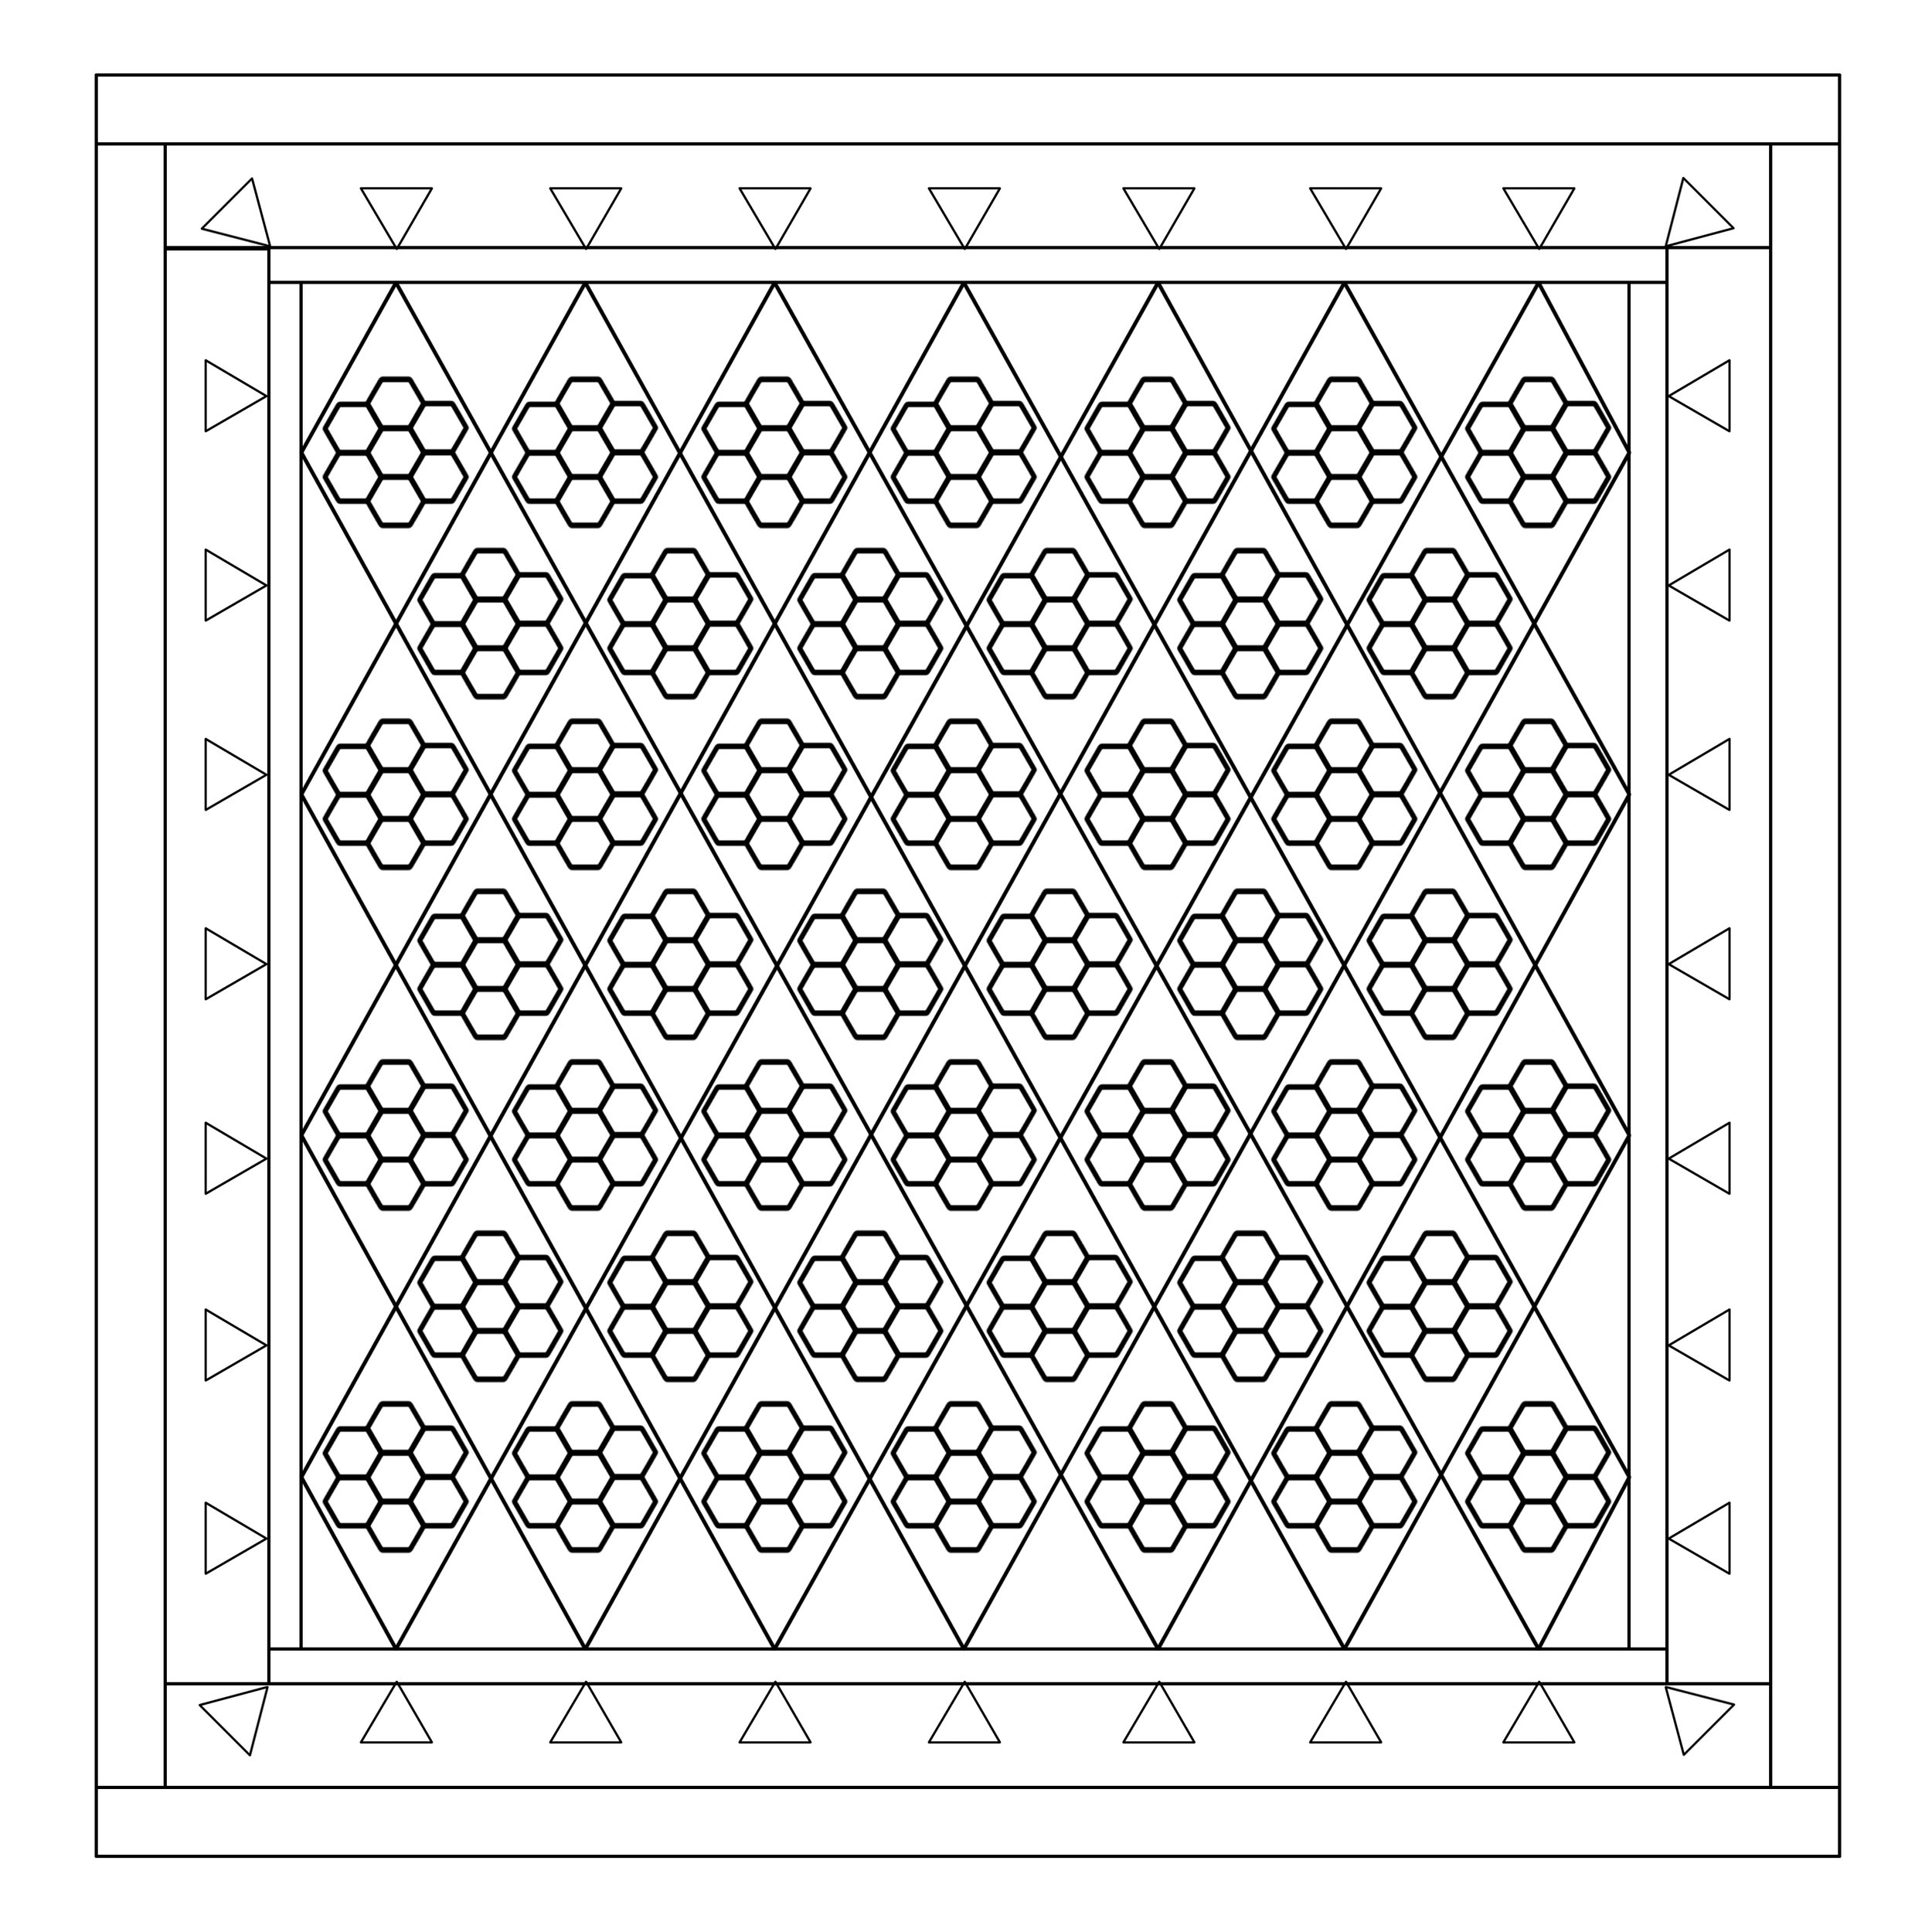
Jodi and I designed the Kingfisher with three, simple fabric borders adorned with triangle applique. They bring the quilt up to a nice throw size without much fuss. Here's a refresher on the materials:
Border 1: ¼ yard for pieced strips
Border 2: 1 ⅔ yard for continuous strips, ⅔ yard for pieced strips
Border 3: 1 ⅔ yard for continuous strips, ½ yard for pieced strips
Triangles: (32) 2.5" fabric squares and (32) 2" equilateral triangle paper pieces
Here we go...

Measure Quilt Center
Joining diamonds is tricky. Little differences in seam allowances can really add up. Rather than adding borders that are supposed to fit, why not make borders that fit your actual work in progress?
To that end, let's start by measuring your quilt center. Don't measure at the very edges of the exposed bias, which may have excess fullness. Instead, measure across a row of diamond points. The points will help you keep your tape straight! Measure all four sides of the quilt. If they measure differently, average the results to find your best length.

My quilt measured 48.5" square.
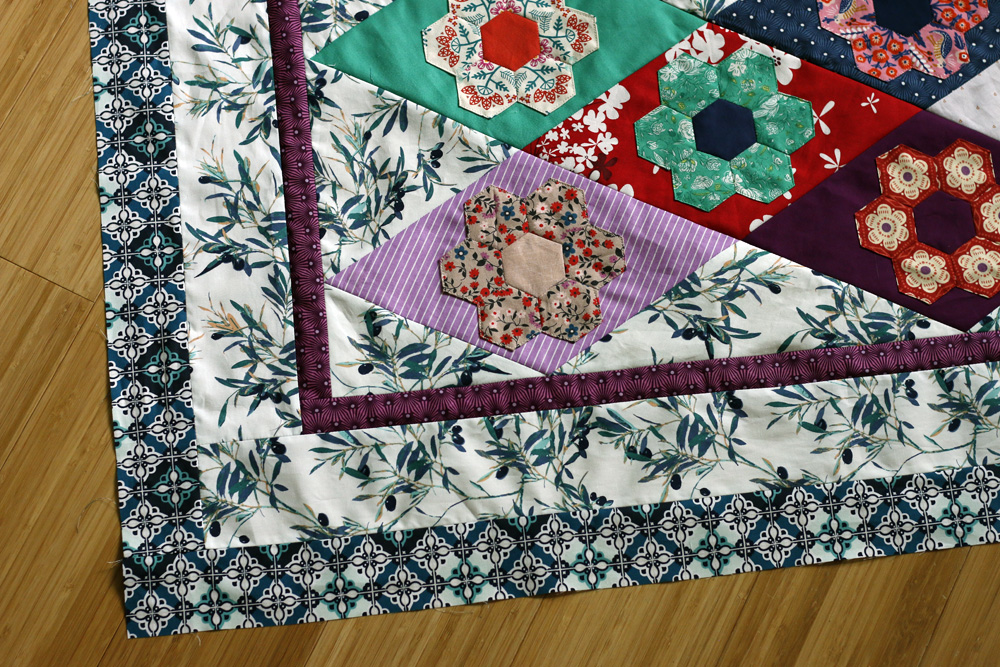
Border #1
This is the thinnest border, nearest to the quilt center. Cut (6) 1.5" width-of-fabric strips from 42" wide fabric. Remove selvedges. Then, cut 2 of the strips in half, yielding 4 half-length strips.

Join the half-length strips to your full-length strips to make 4 extra-long Border 1 strips. Press seams.
Now, cut two of the Border 1 strips to the length of your quilt center. For me that's 1.5" x 48.5". Sew these strips to opposite sides of the quilt center. Press seams.
Next, cut the remaining two Border 1 strips to the length of your quilt center, plus 2. This is your Border 1 size. Make a note of it. I'll cut mine 1.5" x 50.5". Sew strips to exposed quilt center and press seams.

Border 1 is attached!
Border Sewing Tips
Always use pins when attaching borders. Pins help fabrics feed evenly so that these long seams don't shift as you sew. If you still have trouble with shifting, use a walking foot attachment.

Sometimes I don't create sized borders. Instead, I often attach too-long border strips and cut off excess fabric after pressing seams. When working with exposed bias, as with our quilt center, it is better to cut sized borders. Use as many pins as necessary to evenly distribute excess fullness prior to sewing the long border seam. With this extra effort you'll avoid wavy-border syndrome!
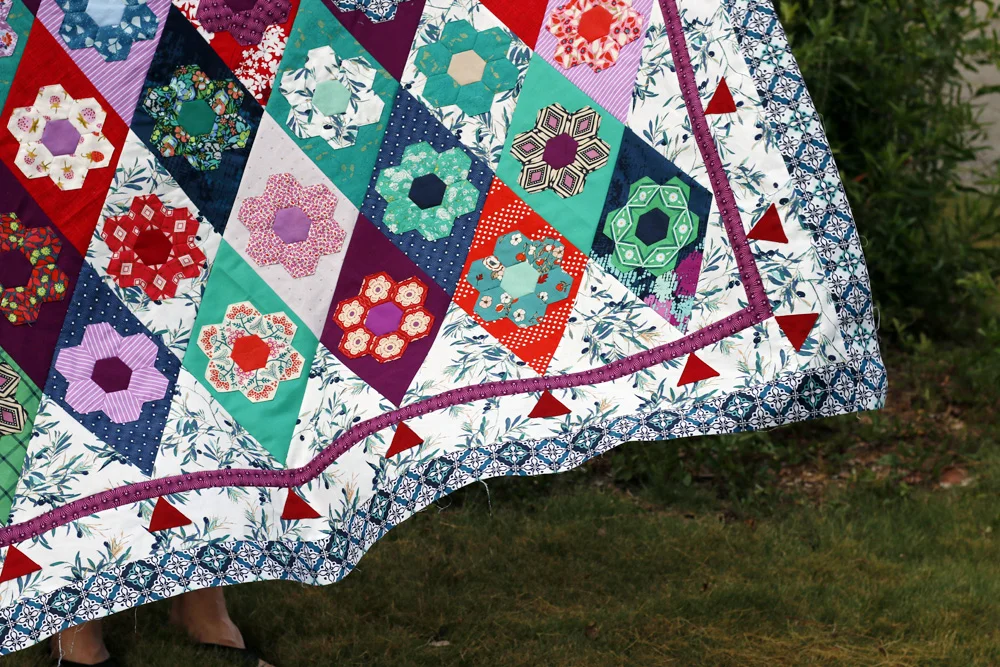
Border #2
This is the wide border, upon which your triangles will be appliqued. Create two Border 2 strips that measure 3.5" x Border 1 size. For example, my Border 1 size was 50.5". I'll cut (2) Border 2 strips from my 1 2/3 yardage that measure 3.5" x 50.5". Sew these strips to opposite sides of the work in progress. Press seams.

Next, cut the remaining two Border 2 strips to Border 1 size, plus 6. This is your Border 2 size. Make a note of it. I'll cut mine 3.5" x 56.5". Sew strips to exposed Border 1 and press seams.

Border 2 is attached!
Border #3
This is the final, outer border. Create two Border 3 strips that measure 2.5" x Border 2 size. For example, my Border 2 size was 56.5". I'll cut (2) Border 3 strips from my 1 2/3 yardage that measure 2.5" x 56.5". Sew these strips to opposite sides of the work in progress. Press seams.
Next, cut the remaining two Border 3 strips to Border 2 size, plus 4. I'll cut mine 2.5" x 60.5". Sew strips to exposed Border 2 and press seams.
Border 3 is attached!
Triangle Applique
Locate 32 triangle paper pieces and your 2.5" fabric squares. Using your preferred English paper piecing basting techniques, baste the triangles. Press thoroughly. At the triangle tips, seam allowances will stick out, showing from the right side. While pressing, tuck these seam allowances out of sight and secure with a little stick glue. Remove papers.
Pin triangles to the quilt top and applique via hand or via machine, as desired. Each triangle tip should touch Border 1 with the triangle base floating in Border 2. For placement, start working at the bottom of the quilt top, along fat partial diamonds.

Place a triangle at the corner. Place the next triangle at the bottom point of your first full diamond. It's as if the triangle is a little tassel hanging from the diamond! Continue placing triangles across the quilt, one at each full diamond point. Triangle placement at the quilt top mirrors the quilt bottom.

Along the sides of the quilt, the triangles do not correspond with diamond points. Instead, measure and place triangles evenly, mirroring placement at the bottom/top of the quilt. One triangle belongs at each quilt corner and seven along each quilt side. Along the side of the quilt, place the first triangle 4" from the corner triangle. Then, place triangles every 6.75". Place the last triangle at 4" from the corner triangle.
Please let me know if you have any questions!