how to Enlarge a Backing for Longarm Quilting
It's a pretty common scenario. You prepared a backing for your quilt top, with plans to quilt it at home. Now you've decided to send it out for longarm quilting, but the backing is slightly too small. What to do?
The Problem
When we prepare a backing for home quilting, most of us make the backing about 4" wider than the quilt top in each direction. That gives us 2" of excess backing all the way around the quilt, providing helpful wiggle room when centering the quilt during basting. You're also happy to have that extra 2" all the way around when you're quilting at the edges of the quilt. It gives you something to hold onto!
If you've looked into longarm quilting services, you'll notice that backings must be bigger than you usually make them. Most longarmers ask for a backing that is 8-10" larger than the quilt top in each direction, which provides 4-5" of excess backing all the way around the quilt. We ask for 8" larger, which is outlined at Quilting Services Process.
Your backing was all ready to go for home quilting. You don't want to add fabric in a way that will look awkward. So, buy a new backing? Trim down the quilt top? Eeek - stop! Let's talk this through.
The Longarm Set Up
First, why does longarm quilting require a bigger backing?
When you send a quilt to be longarm quilted, you don't have to baste the quilt. That's the longarmer's job! He or she will start by attaching the backing to the longarm rollers. Then the backing and quilt top are added, with the layers basted while suspended taut between roller bars. Yes, it's awesome.

The backing is visible on the top roller bar. It is a scrap quilt with many small squares being used as a quilt back. Notice the red basting stitch line. That is the edge of the actual quilt top. There is about 4" of excess backing/batting to the left of the red basting stitch line.
When your quilt is being quilted, heavy duty clips grasp the excess backing and batting to hold the edges of the quilt taut. This ensures even stitch quality all the way to the edges of your quilt. Many patterns have to be stitched off the edge of the quilt, onto the batting. This Baptist fan extends a good 2" beyond the edge of the quilt top, for example.
We're working with a large machine head that may be computerized and must be sure to have enough room for the pattern to stitch out without hitting those clips. At the bottom and top of the quilt, the sewing machine can't reach very close to the roller bars, so we must have excess backing to allow us to space the quilt away from those obstacles.
In short, the literal obstacles required for longarm quilting (roller bars, clips, machine head) require a larger backing. A human needs about 2" to hold onto when quilting at the edges of a quilt. A longarm machine needs about 4" to hold onto when quilting those edges!
How to Enlarge the Backing
Ok, so you understand why your backing must be bigger, but what should you do? Here's the thing - your backing IS large enough as far as the finished quilt is concerned. What you need is more edge-grabbing fabric - fabric that will be trimmed away when quilting is complete.
Just add fabric strips all the way around your backing to enlarge it slightly!
If your backing needs to grow by just 4" in each direction, you can enlarge your backing with scrap yardage. For example, you have a 90" square quilt and a 94" square backing. It must be 98" to be longarm quilted. Add 2" to each side of the quilt back to bring it up to size! Be sure to add fabric on all four sides of the quilt so that the real quilt backing remains centered. At the end, your edge strips will definitely get trimmed away!

Step 1: Prepare Edge Strips
Cut strips 3" wide. 3" gives you a little extra width to work with. Piece them together until they are longer than necessary for all four quilt edges. Backstitch when you join strips so that these seams won't pull open when the quilt is suspended for longarm quilting.
Step 2: Use Walking Foot
If you have a walking foot, use it when attaching your edge strips to the quilt back. This will help these extra-long seams feed evenly. (Same thing for avoiding wavy border syndrome!)

Step 3: Find Center
Fold the quilt back in half to find center along one raw edge. Place a pin to mark center. Now fold your edge strip in half to find center. Match the edge strip center to the quilt back center. Pin pieces right sides together at center.
Step 4: Sew from Center Out
Attach the edge stitch with a normal 1/4" seam, sewing from the center out. Backstitch at the end to secure stitch line. Then, return to center and sew from the center out in the opposite direction. Piecing a long seam in this manner helps it attach nicely.

Attach opposite edge strips in this manner. Trim excess edge strip fabric. Then, press seams. Attach remaining edge strips, again sewing each long seam from the center out. Trim excess and press.
Voila! An enlarged quilt back!
And you used up scrap yardage to boot.
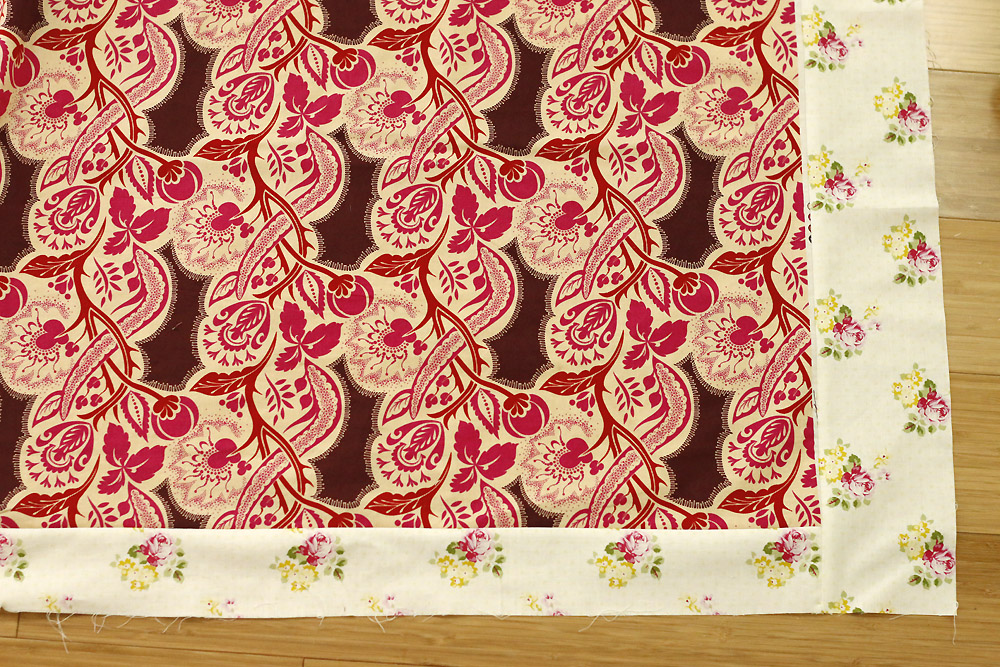
This backing did not need an equal amount added on each side. You can adjust your strip size as necessary, of course.
p.s. Some longarmers may not appreciate this solution as it requires them to be thoughtful about centering the quilt during the basting process. If you're not sure, check with your longarmer first. Here at Stitched in Color Quilting Services, we're happy to help you use the backing you intended if at all possible!