Penny Patch: Sew & Assemble Blocks!
This post is part of a series {Penny Patch} a Beginner’s Quilt-Along. You can join in anytime, even if you’re not a beginner!
Please see this page for links to all posts, and join us on Flickr to share your questions and work-in-progress!
 Greetings, Penny Patchers! This week we finish up those blocks. Since by the looks of our Flickr group, so many of you are already finished with blocks, I decided to post the quilt top assembly directions today too. After today's post, our next quilt-along post is the quilt top link party on November 29th. I love seeing the top come together!!! Definitely the best part.
So, let's review. You've been making 4-Penny Patch blocks a la this tutorial. The number of blocks needed depends on what size quilt you're making. Here's the stats from the quilt design post:
If you're making the Baby Quilt, your quilt will have 7 columns and 9 rows, a 7 x 9 setting requiring 63 blocks. 31 of those blocks will be simple squares and 32 of those blocks will be 4-penny patches. The first row should start with a 4-penny patch.
If you're making the Throw Quilt, your quilt will have 10 columns and 12 rows, a 10 x 12 setting requiring 120 blocks, 60 of each kind (simple squares and 4-penny patches).
If you're making the Twin Quilt, your quilt will have 11 columns and 15 rows, a 11 x 15 setting requiring 165 blocks. 83 of those blocks will be simple squares and 84 of those blocks will be 4-penny patches. The first row should start with a 4-penny patch.
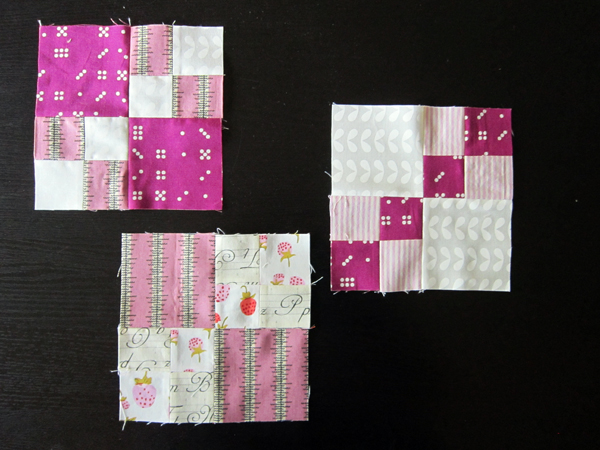
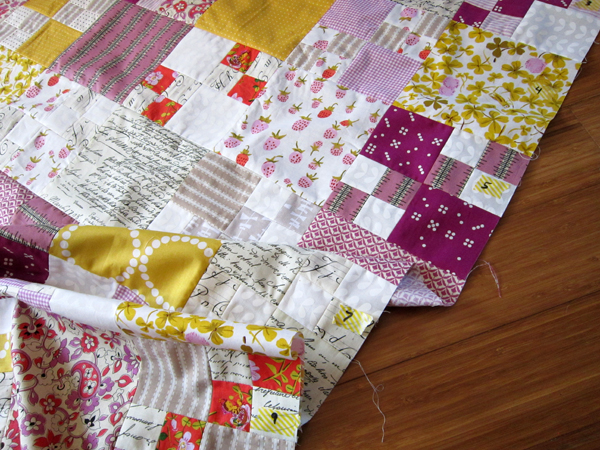
When I make my 4-Penny Patch blocks, I prefer to make all my blocks in the same formation, with the tiny 4-patches in the upper right and lower left quadrants. When the quilt is assembled all the little squares will line up to form one long diagonal string.
Assemble Blocks
Step 1: Arrange Quilt
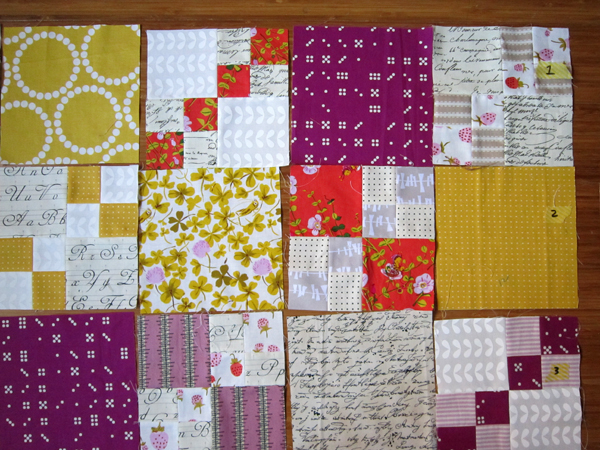
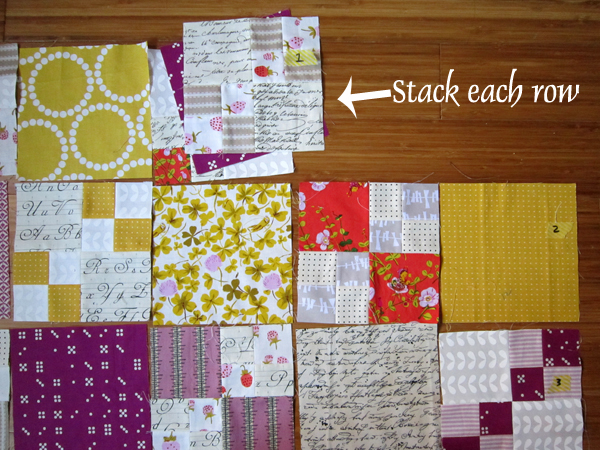
Find a big space on the floor or use a design wall (batting tacked to the wall works temporarily!) to lay out your entire quilt. Alternate between simple squares and 4-penny patches. Remember if you're making a baby or twin sized quilt, your first block in the first row must be a 4-penny patch. The next row would start with a simple square blocks, so that the 2 different styles of blocks are laid out in a checkerboard arrangement.
Specific block placement is up to you! There is no right or wrong here. There is just what looks good to you. I tend to move blocks around a lot, playing musical blocks until things feel balanced. Watch especially that your darker colors and/or "pop" colors are evenly spread out in the quilt. And, try to avoid allowing same-colors to fall into straight line formations. Scatter, scatter! Live with it for a day or an hour (whatever is realistic). Seeing your layout with fresh eyes can really help!!!
Step 2: Stack Rows
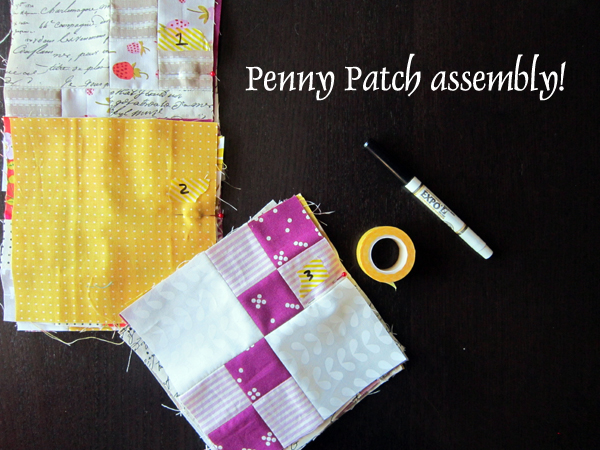
When you're satisfied with block placement, it's time to stack and pick up your quilt. First place a bit of masking tape on the far-right block in each row. Number the rows by writing on the masking tape.
Now, working one row at a time, pick up the far-right labeled block and place it on the next block over to the left. Pick up the stack again and place it on the next block over just as before. Continue stacking up row 1, moving left and always keeping the labeled block on top. After stacking the entire row, place a pin at the right side of the stacked raw edges. This pin holds your stack together and also marks the side of the stack. Even if your masking tape label falls off, you'll have a clue as to how to lay out these blocks!
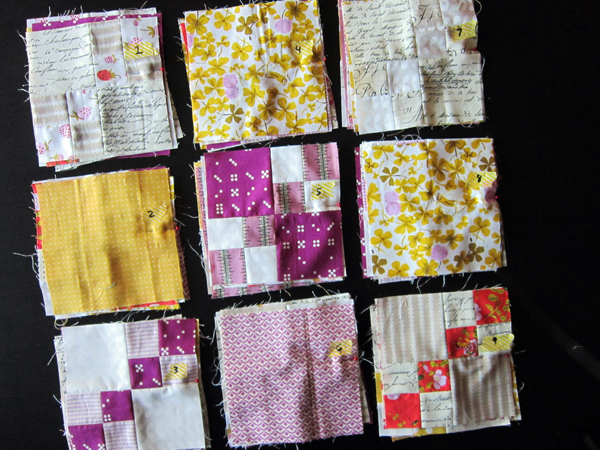
This is a good stopping point if you don't have time to assemble today. Mmm.. pretty, pretty stacks!
Step 3: Join Blocks as Rows
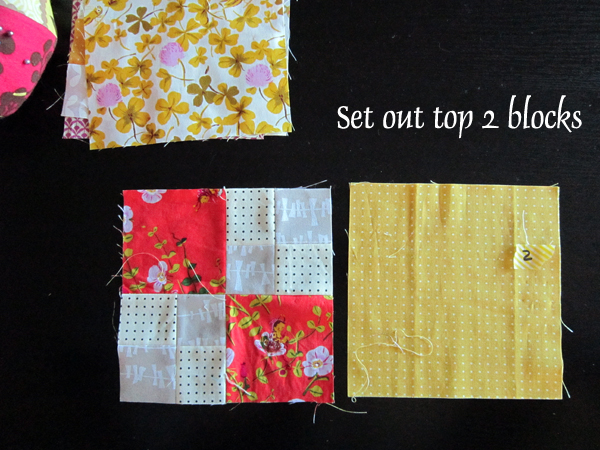
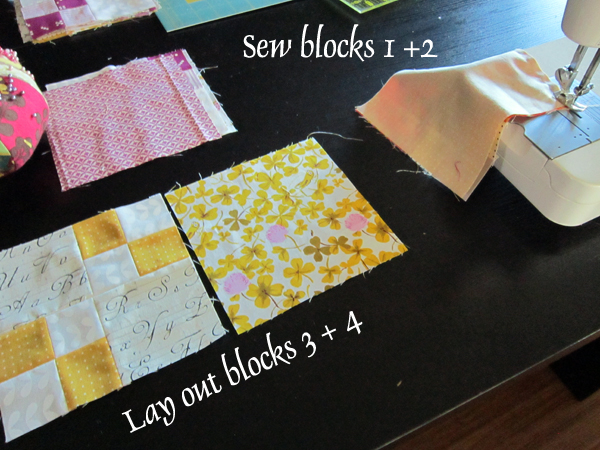
Ready to sew? Ok, start with row 1 (I had already finished row 1, so I'm on row 2). Pick up the top 2 blocks. Lay them on your sewing table with block 1 (the labeled block) on the right and block 2 on the left.
Flip block 1 on top of block 2, with right sides together. Match of the raw edge on the right - that's where you're going to sew.
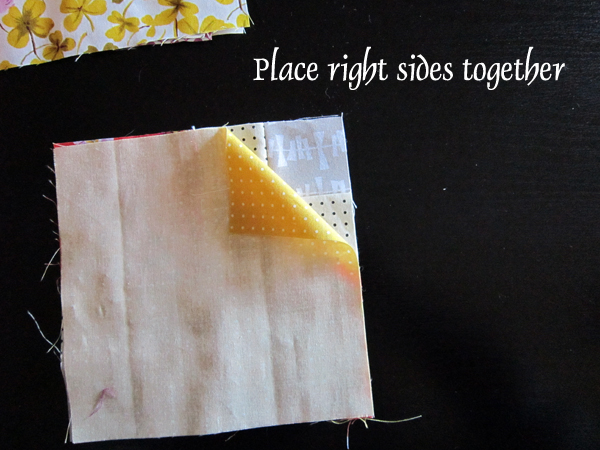
Sew blocks together with a 1/4" seam allowance. Don't cut threads after sewing. Just leave them be at the machine. Now, in the same way, pick up the next 2 blocks in your row stack. Lay them out as before with block 3 on the right and block 4 on the left.
Sew blocks 3 + 4 with a 1/4" seam allowance. Since you didn't cut threads, you can chain piece. You'll sew through "nothing" for a little bit until blocks 3 + 4 go under the presser foot. A little string of thread will connect your block pairs.
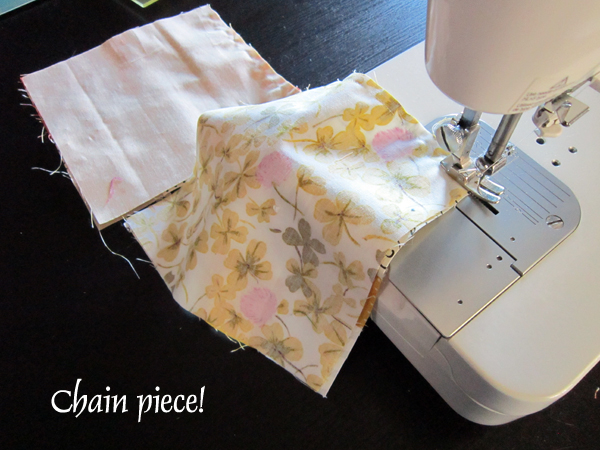
Now pick up your next 2 blocks and repeat. Keep sewing pairs until only one or zero blocks remain. Do not bother pressing any seams yet. For efficiency, press seams only after the entire row is joined.
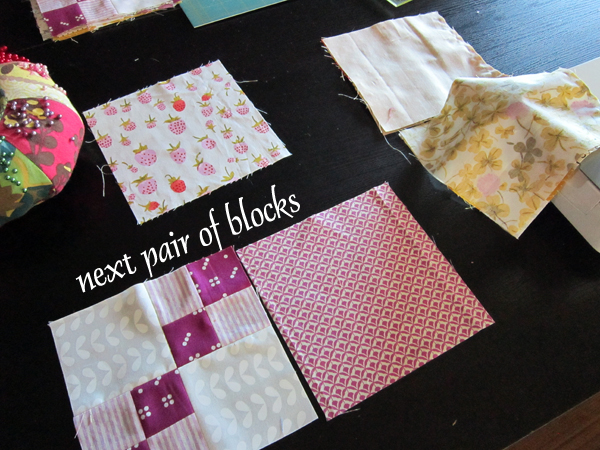
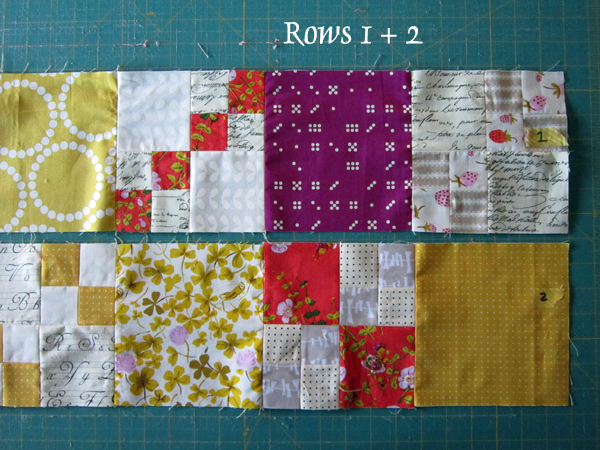
At this point you may choose to cut threads and separate your chained block pairs. If you do, you will need to lay out the pairs in order so that you are ready to sew the next seams. If you are doing the baby quilt, this is what you'll have:
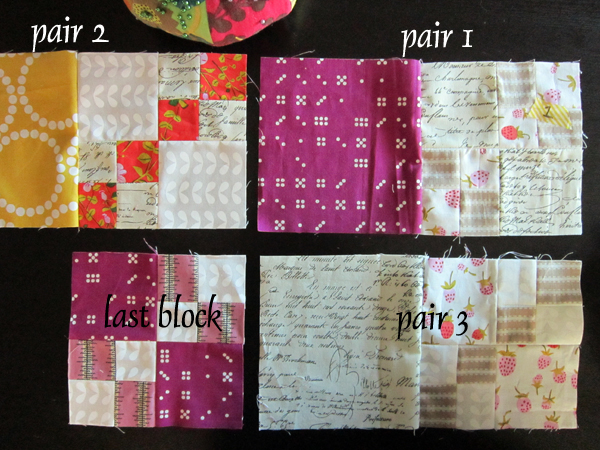
Match raw edges and sew, joining all block pairs and joining longer sets until the row is complete.
If you do not choose to cut all threads and lay out all block pairs, you can free just 2 sets of block pairs at a time and sew them together. Then free 2 more and repeat. When I'm joining long rows, I prefer this option to prevent confusion!
Step 4: Join Rows as Quilt Top
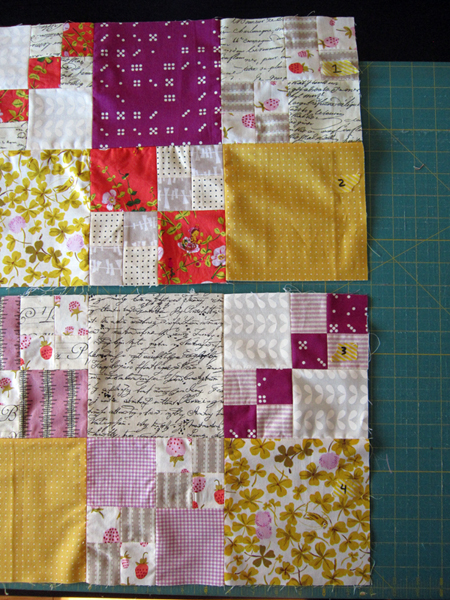
Since your right-most blocks are still labeled, your rows are labeled too! You can assemble rows as you complete them, or wait until all rows are ready at once. When the time is right, lay out row 1 above row 2.
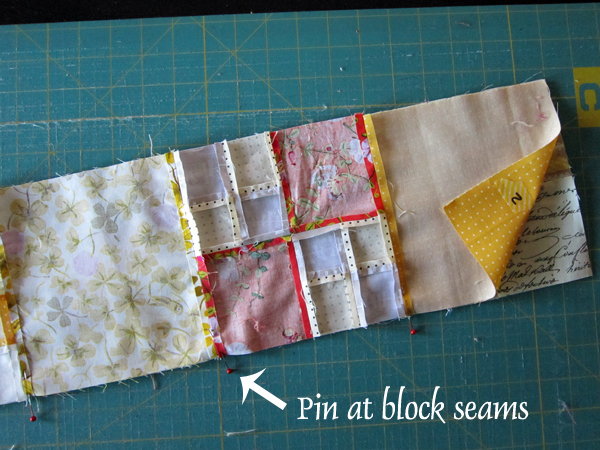
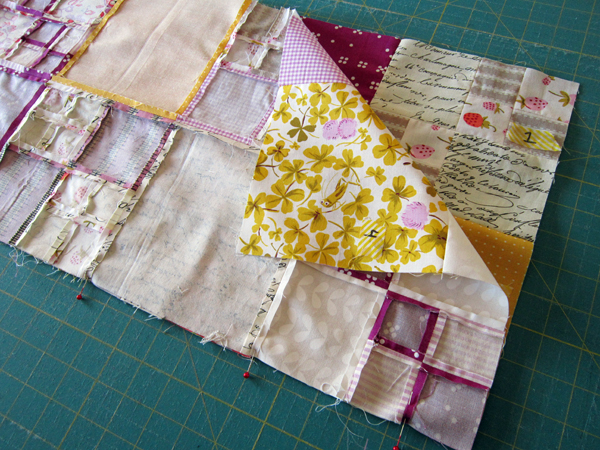
Flip row 2 on top of row 1, with right sides together. Match the seams at each 6" block and place a pin to stabilize. Then, join rows with a 1/4" seam allowance. Sew right up to the pin, removing the pin just before each block seam. If you have a walking foot, using it while joining rows can help them come together more evenly without bunching or miss-matched edges.
Join all rows as pairs, then join row pairs in the same way.
Remember to use pins to match seams! Use more pins if you need to "ease" extra fabric in any spots.
Rejoice! I hope your quilt top will be ready for the November 29th link party! Can't wait to see all the pretty Pennies!!!
Greetings, Penny Patchers! This week we finish up those blocks. Since by the looks of our Flickr group, so many of you are already finished with blocks, I decided to post the quilt top assembly directions today too. After today's post, our next quilt-along post is the quilt top link party on November 29th. I love seeing the top come together!!! Definitely the best part. So, let's review. You've been making 4-Penny Patch blocks a la this tutorial. The number of blocks needed depends on what size quilt you're making. Here's the stats from the quilt design post:
If you're making the Baby Quilt, your quilt will have 7 columns and 9 rows, a 7 x 9 setting requiring 63 blocks. 31 of those blocks will be simple squares and 32 of those blocks will be 4-penny patches. The first row should start with a 4-penny patch.
If you're making the Throw Quilt, your quilt will have 10 columns and 12 rows, a 10 x 12 setting requiring 120 blocks, 60 of each kind (simple squares and 4-penny patches).
If you're making the Twin Quilt, your quilt will have 11 columns and 15 rows, a 11 x 15 setting requiring 165 blocks. 83 of those blocks will be simple squares and 84 of those blocks will be 4-penny patches. The first row should start with a 4-penny patch.
When I make my 4-Penny Patch blocks, I prefer to make all my blocks in the same formation, with the tiny 4-patches in the upper right and lower left quadrants. When the quilt is assembled all the little squares will line up to form one long diagonal string.
Assemble Blocks
Step 1: Arrange Quilt
Find a big space on the floor or use a design wall (batting tacked to the wall works temporarily!) to lay out your entire quilt. Alternate between simple squares and 4-penny patches. Remember if you're making a baby or twin sized quilt, your first block in the first row must be a 4-penny patch. The next row would start with a simple square blocks, so that the 2 different styles of blocks are laid out in a checkerboard arrangement.
Specific block placement is up to you! There is no right or wrong here. There is just what looks good to you. I tend to move blocks around a lot, playing musical blocks until things feel balanced. Watch especially that your darker colors and/or "pop" colors are evenly spread out in the quilt. And, try to avoid allowing same-colors to fall into straight line formations. Scatter, scatter! Live with it for a day or an hour (whatever is realistic). Seeing your layout with fresh eyes can really help!!!
Step 2: Stack Rows
When you're satisfied with block placement, it's time to stack and pick up your quilt. First place a bit of masking tape on the far-right block in each row. Number the rows by writing on the masking tape.
Now, working one row at a time, pick up the far-right labeled block and place it on the next block over to the left. Pick up the stack again and place it on the next block over just as before. Continue stacking up row 1, moving left and always keeping the labeled block on top. After stacking the entire row, place a pin at the right side of the stacked raw edges. This pin holds your stack together and also marks the side of the stack. Even if your masking tape label falls off, you'll have a clue as to how to lay out these blocks!
This is a good stopping point if you don't have time to assemble today. Mmm.. pretty, pretty stacks!
Step 3: Join Blocks as Rows
Ready to sew? Ok, start with row 1 (I had already finished row 1, so I'm on row 2). Pick up the top 2 blocks. Lay them on your sewing table with block 1 (the labeled block) on the right and block 2 on the left.
Flip block 1 on top of block 2, with right sides together. Match of the raw edge on the right - that's where you're going to sew.
Sew blocks together with a 1/4" seam allowance. Don't cut threads after sewing. Just leave them be at the machine. Now, in the same way, pick up the next 2 blocks in your row stack. Lay them out as before with block 3 on the right and block 4 on the left.
Sew blocks 3 + 4 with a 1/4" seam allowance. Since you didn't cut threads, you can chain piece. You'll sew through "nothing" for a little bit until blocks 3 + 4 go under the presser foot. A little string of thread will connect your block pairs.
Now pick up your next 2 blocks and repeat. Keep sewing pairs until only one or zero blocks remain. Do not bother pressing any seams yet. For efficiency, press seams only after the entire row is joined.
At this point you may choose to cut threads and separate your chained block pairs. If you do, you will need to lay out the pairs in order so that you are ready to sew the next seams. If you are doing the baby quilt, this is what you'll have:
Match raw edges and sew, joining all block pairs and joining longer sets until the row is complete.
If you do not choose to cut all threads and lay out all block pairs, you can free just 2 sets of block pairs at a time and sew them together. Then free 2 more and repeat. When I'm joining long rows, I prefer this option to prevent confusion!
Step 4: Join Rows as Quilt Top
Since your right-most blocks are still labeled, your rows are labeled too! You can assemble rows as you complete them, or wait until all rows are ready at once. When the time is right, lay out row 1 above row 2.
Flip row 2 on top of row 1, with right sides together. Match the seams at each 6" block and place a pin to stabilize. Then, join rows with a 1/4" seam allowance. Sew right up to the pin, removing the pin just before each block seam. If you have a walking foot, using it while joining rows can help them come together more evenly without bunching or miss-matched edges.
Join all rows as pairs, then join row pairs in the same way.
Remember to use pins to match seams! Use more pins if you need to "ease" extra fabric in any spots.
Rejoice! I hope your quilt top will be ready for the November 29th link party! Can't wait to see all the pretty Pennies!!!