Penny Patch: Cutting!
This post is part of a series {Penny Patch} a Beginner’s Quilt-Along. You can join in anytime, even if you’re not a beginner!
Please see this page for links to all posts, and join us on Flickr to share your questions and work-in-progress!
 Woohoo, cutting! This post contains a ton of pictures aimed to help beginners. Thanks for your understanding! Be sure not to miss the Cutting Summary at the end of this post!
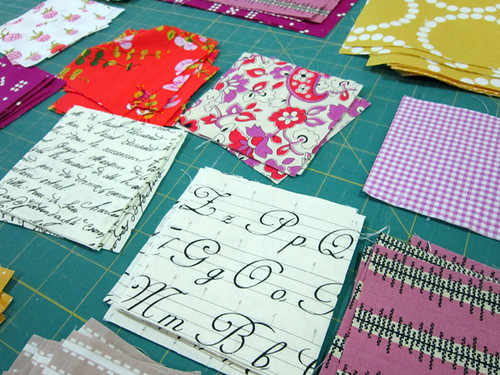
Get out those fat quarters and press them. If you're not sure how many fat quarters you should have for your quilt, see this materials list and this color scheme ideas post.
Step 1: Sort by colors.
Your main colors are A and B. Of the two, B is the color you'd like to use most. Your "pop" color is C. It will appear in small flashes in the quilt. The rest of your fabrics are low-volume, which means they are lighter in color than the others and many feel neutral or "pale". Those making a throw or twin quilt, also have 1-2 mid-value neutrals, which I'll call N. These are not as light as your low-volumes, but still neutral. N adds depth to the quilt.
Step 2: Cut the Straight Edge
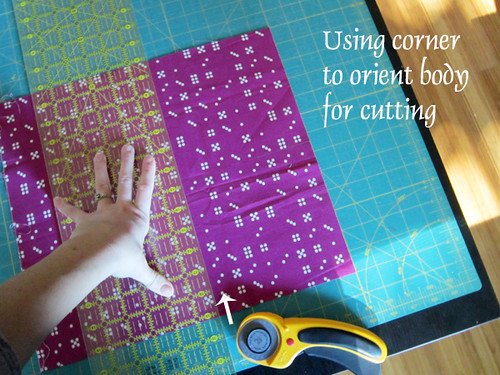
Place your cutting mat towards a corner of your work table so that you can approach the mat from two sides. Never used a rotary cutter before? Please see rotary cutting 101.
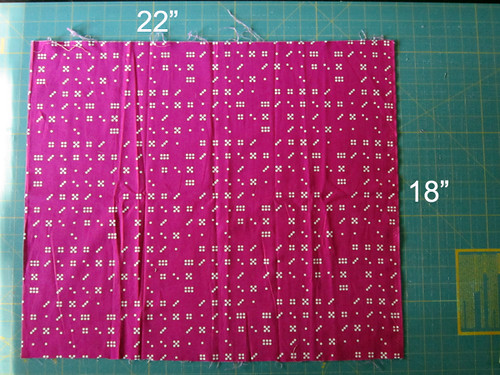
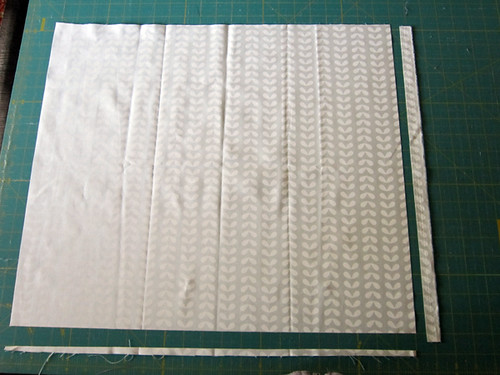
Begin by placing your pressed fabric (wow, I could have done a better job pressing!) on the cutting mat. Orient it as shown with the 22" side horizontal and the 18" side vertical. Throughout the cutting directions, the fat quarter is always oriented in this way. Your fat quarter may actually be slightly smaller if it was prewashed. No worries! We have extra fabric "wiggle room" in this cutting plan, even if your fabric is pre-shrunk.
I am right handed. If you are left-handed, you will be cutting with your left hand and will have to mirror what I am demonstrating.
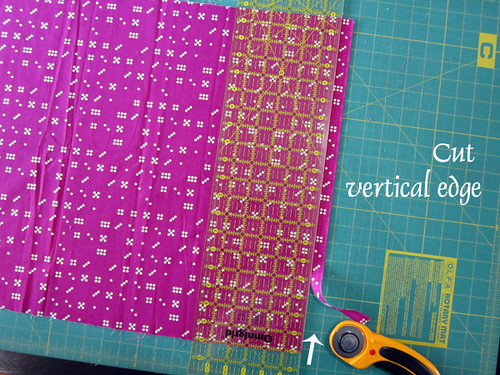
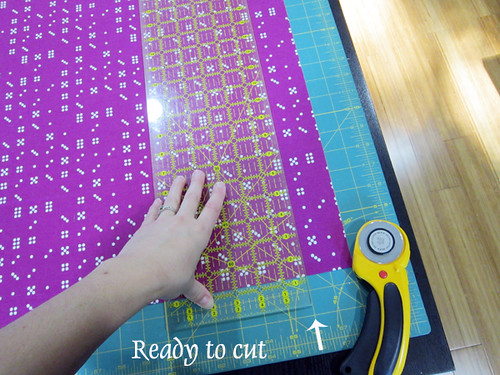
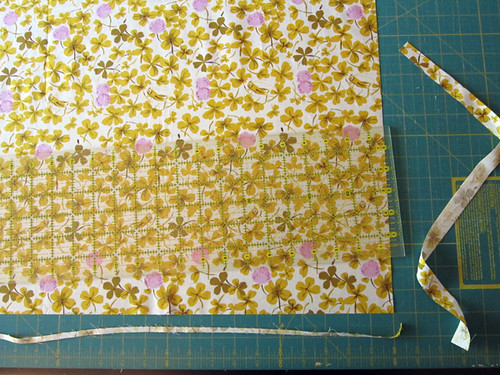
In cutting EACH fat quarter, the first step is to create two nicely trimmed edges. To do so, slide the fabric until the bottom raw edge extends just beyond a horizontal cutting mat line and the right raw edge just beyond a vertical line. In this case, my selvedge is at right, so I slide the fabric until the entire selvedge is past that vertical cutting mat line.
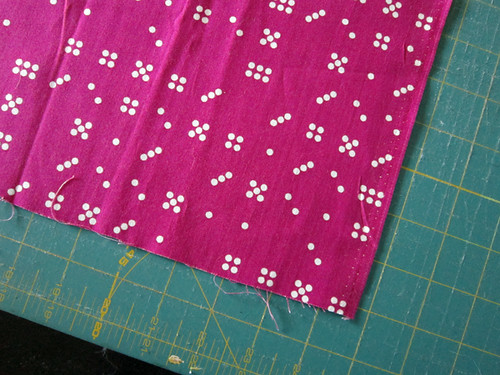
Place your quilting ruler so that its edge matches up with that vertical line. Cut, removing the selvedge and establishing a straight vertical edge.
Now place your quilting ruler horizontally, across the 22" length of the fabric, and match it up with the horizontal line just inside the fabric's raw edge.
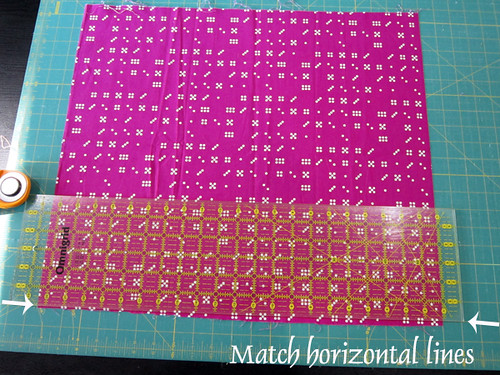
In this example the corner of my table is at my left side. I move around the corner so that I can make this horizontal cut with proper ergonomic reach. Cut, removing raw edge at the bottom of the fat quarter and creating a straight horizontal edge.
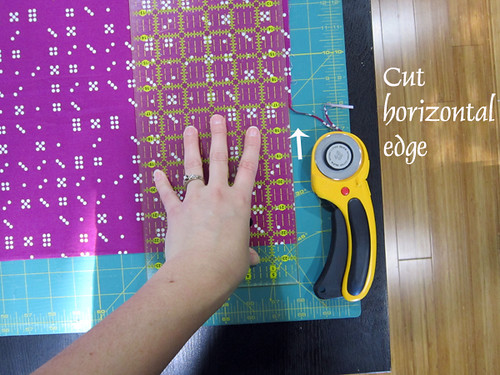
Never try to cut from an angle that feels hard to control! Always move your body or even rotate the cutting mat so that you can approach the fabric from a comfortable angle. Avoid moving the fabric itself, to increase accuracy.
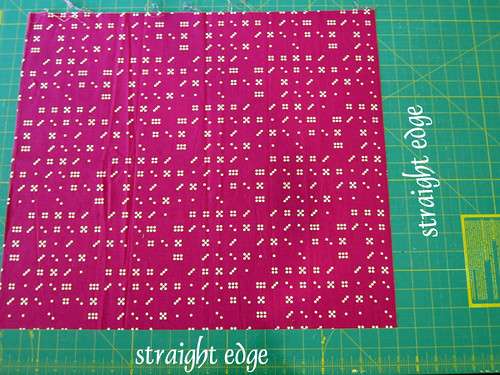
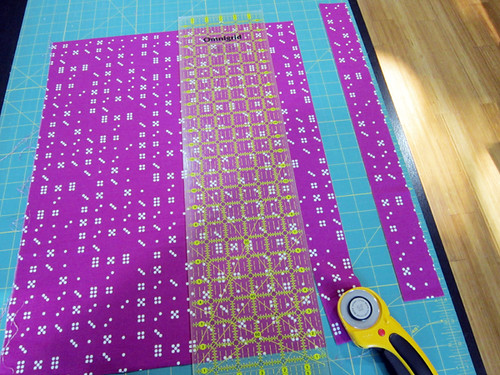
Now the fat quarter has two straight edges: a vertical and a horizontal. If you are left-handed, your vertical edge will be at the left side of your fabric. Since I am right-handed, it is at the right side.
Is your mat too small to fit the entire fat quarter (as with a 12" x 18" cutting mat)? If so, you'll have to fold fabric to trim a bottom straight edge and cut any 22" long cuts. Once those long cuts are made, the remaining cuts will fit on a small mat. For ideas on how to fold fabric for cutting, see this post.
Step 3: Cut A & B fabrics
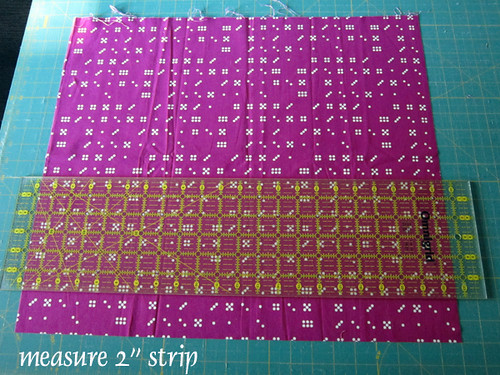
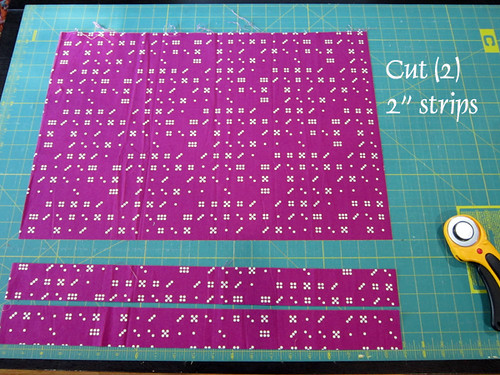
Begin with an A or B colored fabric. First cut (2) 2" strips along the bottom horizontal edge. To do so, place the ruler at a horizontal cutting mat line 2" from the bottom straight edge.
Then move around the corner to position your body ergonomically to cut.
The second 2" strip is cut in the same way.
Each fat quarter yields (2) 2" strips. Set aside.
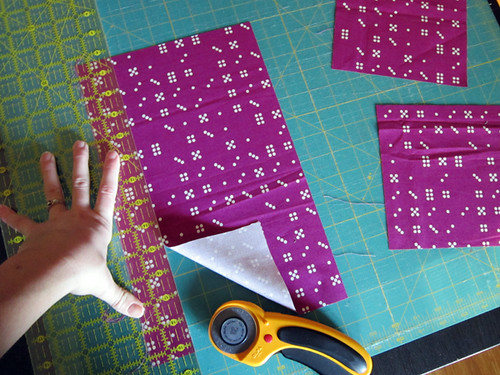
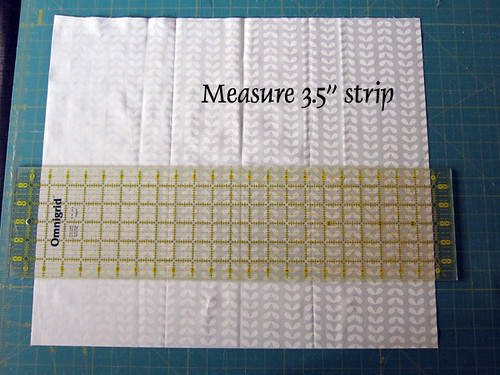
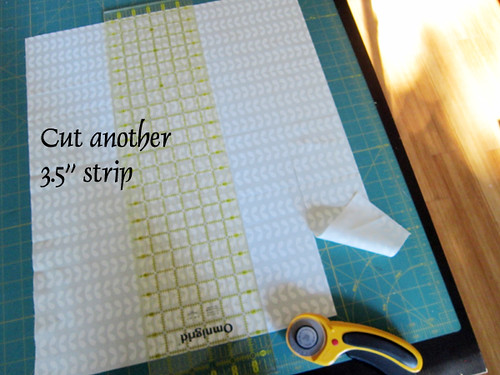
Next cut a 3.5" strip measuring from the vertical straight edge.
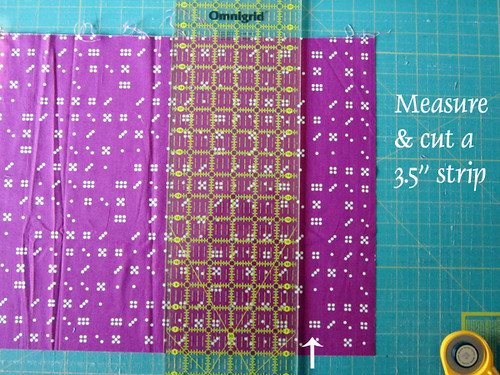
Measure and cut a second 3.5" strip. It will be a total of 7" from the vertical straight edge.
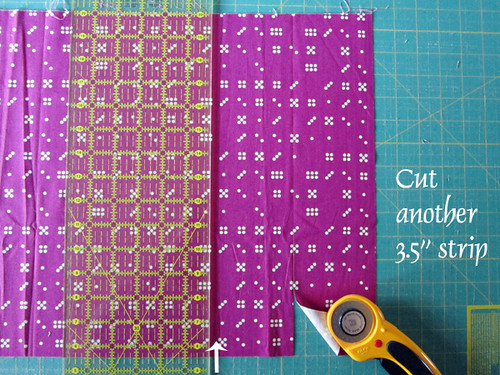
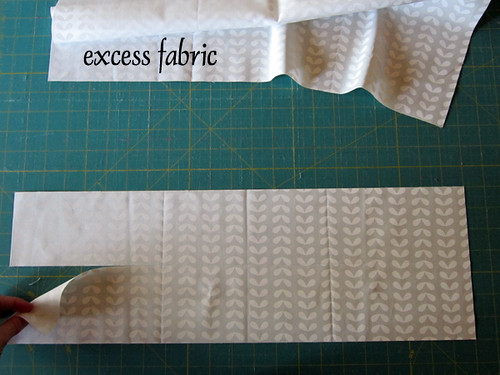
Remove excess fabric, so that only the 3.5" strips remain in your cutting area.
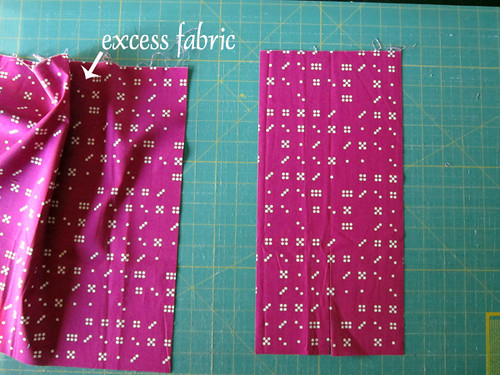
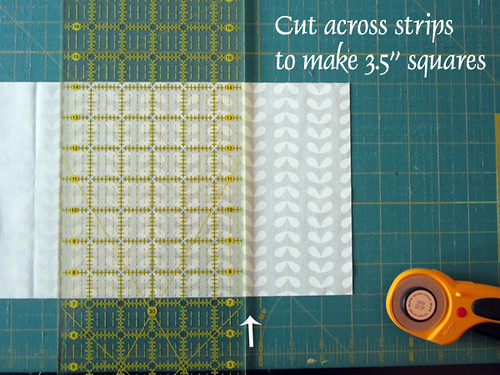
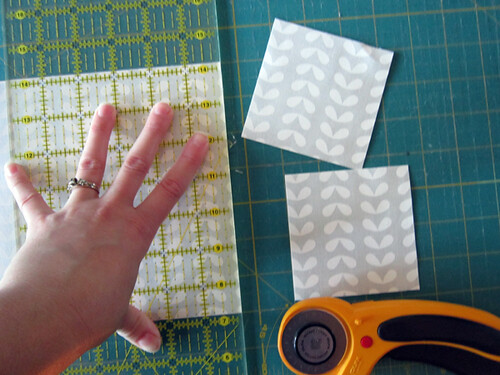
Measuring from the bottom, where you already have a straight edge, cut 3.5" fabric squares. Since the 3.5" strips are side-by-side, each cut will yield (2) 3.5" squares or (1) pair of 3.5" squares. Each pair becomes part of a 4-penny patch block. You need two matching 3.5" squares (i.e. one PAIR) for each 4-penny patch block.
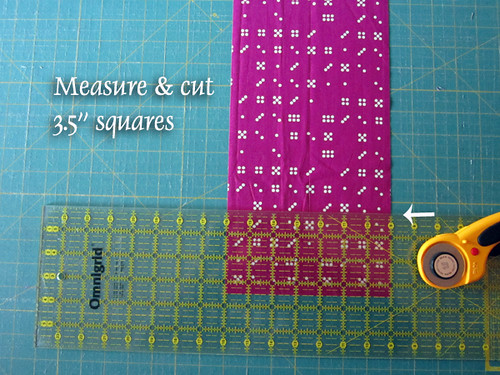
Continuing measuring and cutting at 3.5", creating more 3.5" pairs.
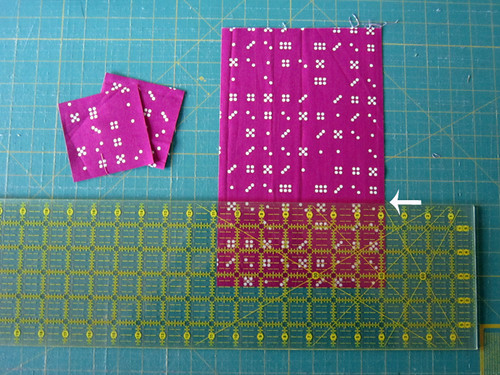
Since this is a short cut, I am able to cut without moving around the corner of a mat. I position my hand like so. But, again, do whatever you need to do to cut from an angle that feels fully in control. Try sliding the mat or, if absolutely necessary, reposition the fabrics so that they are easier to reach.
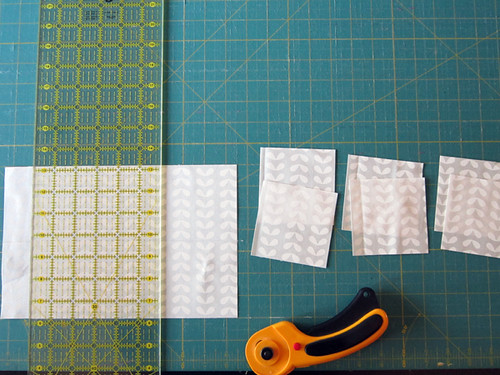
Each fat quarter will yield (3) pairs of 3.5" squares. Set aside.
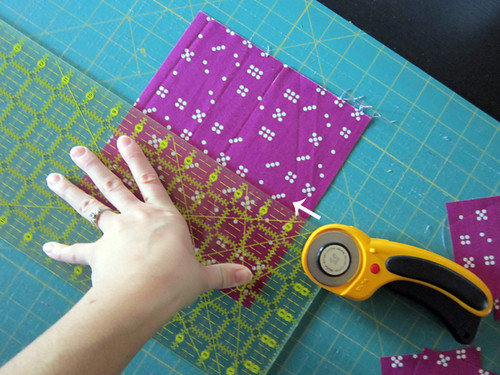
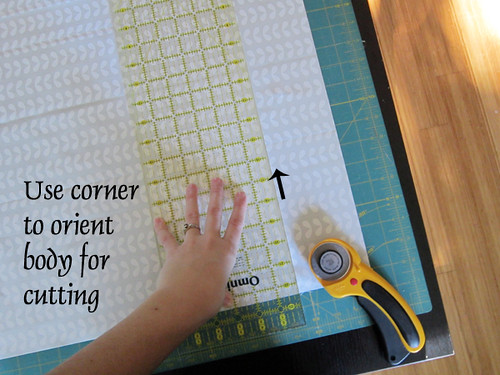
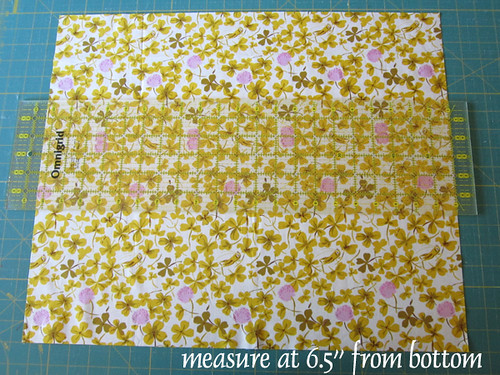
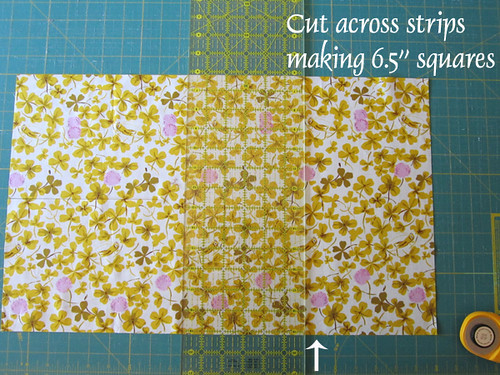
Return the excess fabric to the cutting mat. It measures about 14" square. Match it's vertical and horizontal straight cuts to lines on your cutting mat.

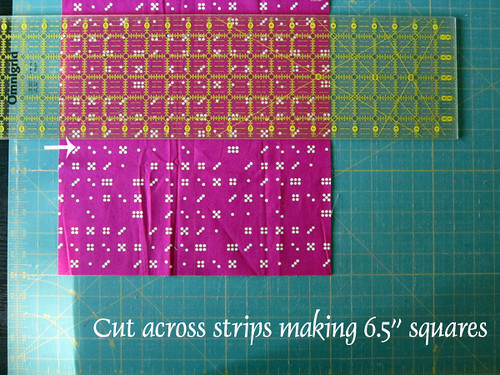
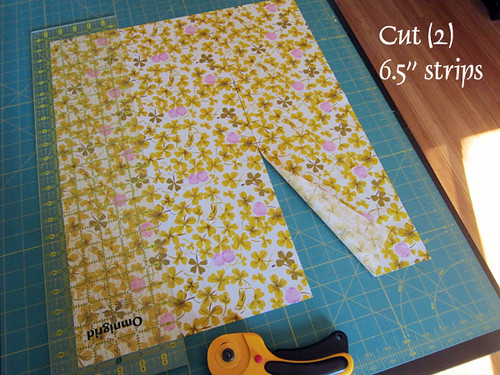
Measuring from the vertical straight edge, cut at 6.5" over.
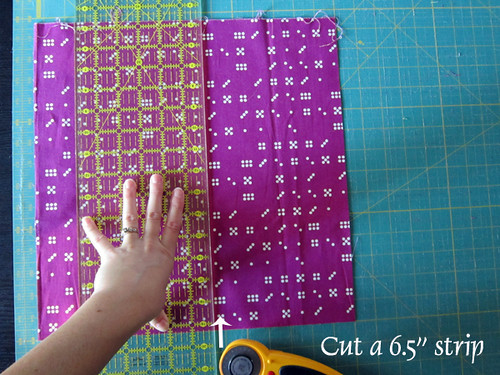
Cut again at 6.5" over, creating two 6.5" strips. Remove narrow waste fabric at left.
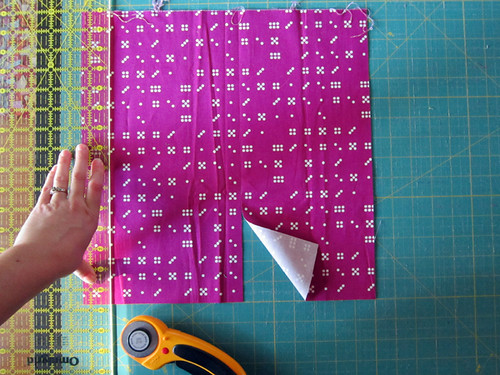
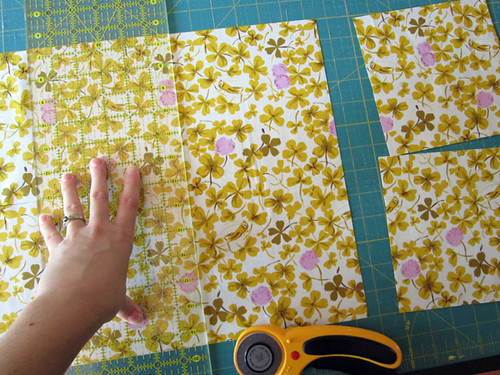
Make a horizontal cut at 6.5" from the bottom straight edge, creating (2) 6.5" squares.
You may want to use the corner of the table to orient yourself for this cut, once again.
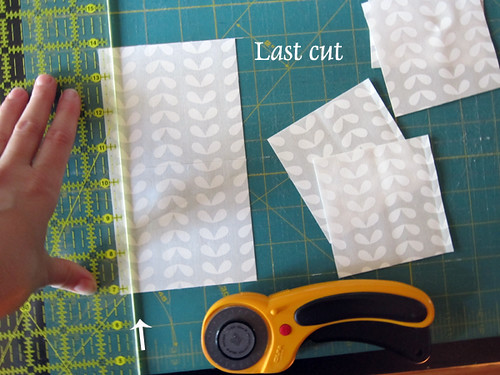
Repeat, so that each fat quarter yields (4) 6.5" squares.
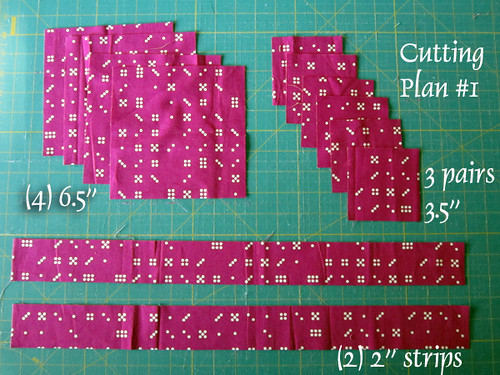
This series of cuts is Cutting Plan #1. It yields: (2) 2" x 22" strips, (3) pairs of 3.5" squares and (4) 6.5" squares.
All color A and color B fabrics can be cut in this way. However, you will NOT need all of the 2" strips and 3.5" squares generated by this cutting plan, especially in color A fabrics. To verify what you need, see the cutting summary at the end of this post. If you want to avoid cutting extra fabrics, you can start by cutting your favorite fabrics first, keep a tally, and stop cutting certain parts of this cutting plan when you reach your quota.
Step 4: Cut Color C
Those making the baby-sized Penny Patch quilt should cut Color C with Cutting Plan#1, demonstrated in Step 3. However, stop cutting after making the 3.5" squares. You do not need any 6.5" squares in color C for the baby-sized Penny Patch quilt.
Those making throw or twin-sized Penny Patch quilts, should cut Color C with the following Cutting Plan #2:
Start, as usual, with trimming for a vertical and horizontal straight edge (see Step 2).
Then place your ruler at 3.5", measuring from the bottom horizontal straight edge.
Move around the corner of your table to cut this 3.5" strip.
Cut a second 3.5" strip in the same way.
Return to the normal side of the table. Remove the excess fabric from above the 3.5" strips.
Now place your ruler at 3.5", measuring from the vertical straight edge.
Cut, creating a pair of 3.5" squares.
Move the ruler to the left 3.5" and cut again. Repeat, creating a series of 3.5" square pairs.
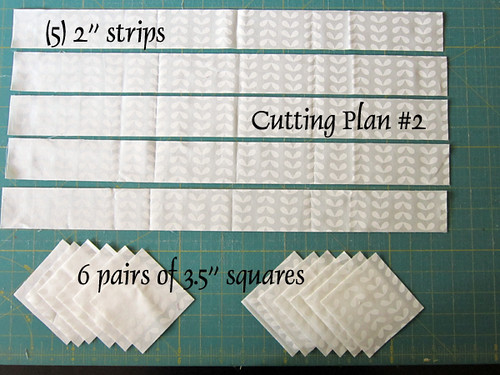
By the last cut, you'll have created (6) pairs of 3.5" squares. Set aside.
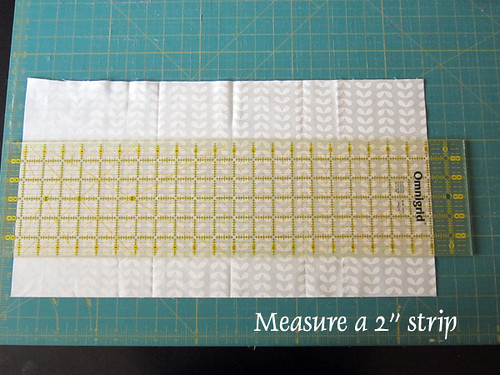
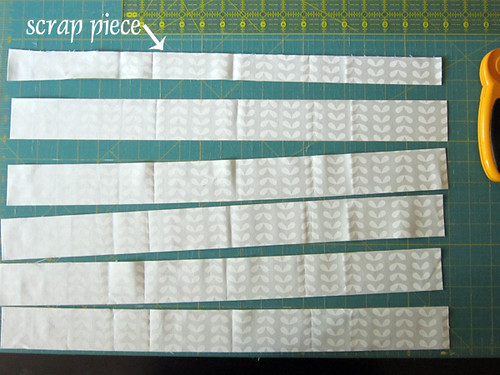
Return the excess fabric to the cutting mat. It measures about 11" x 22". Match it's vertical and horizontal straight cuts to lines on your cutting mat. Measure a 2" strip from the bottom horizontal straight edge.
Again, I walked around the corner of my mat to approach the work from the side. Cut the 2" strip.
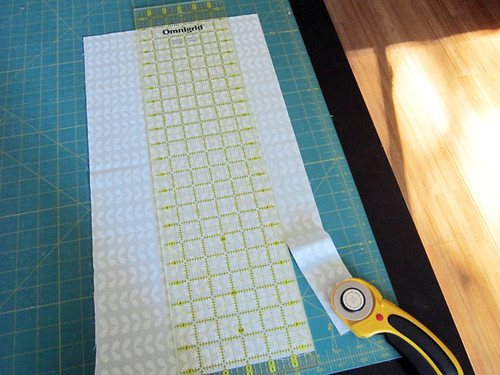
Continue cutting 2" strips.
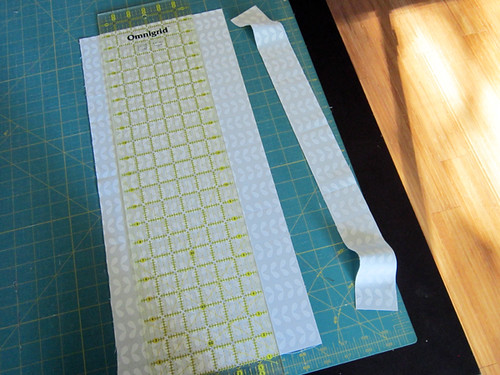
Each fat quarter should yield (5) 2" x 22" strips.
This series of cuts is Cutting Plan #2. It yields: (6) pairs of 3.5" squares and (5) 2" strips.
All color C fabrics can be cut in this way. However, you will NOT need all of the cuts generated by this cutting plan. To verify what you need, see the cutting summary at the end of this post. If you want to avoid cutting extra fabrics, keep a tally and stop when you reach your quota.
Step 5: Cut Low Volumes
When cutting your low volume fat quarters, you will cut some via Cutting Plan #1 and some via Cutting Plan #2. This combination yields many more 3.5" squares and 2" strips than 6.5" squares, which is exactly what you'll need!
for a Baby Penny Patch quilt
Step 6: Cut Fabric N
Note: This step applies to throw and twin-sized Penny Patch quilts only.
Prepare your fabric by trimming a vertical and horizontal straight edge.
Then place your ruler at 6.5", measuring from the bottom horizontal straight edge.
Move around the corner of your table to cut this 6.5" strip. Cut a second 6.5" strip in the same way.
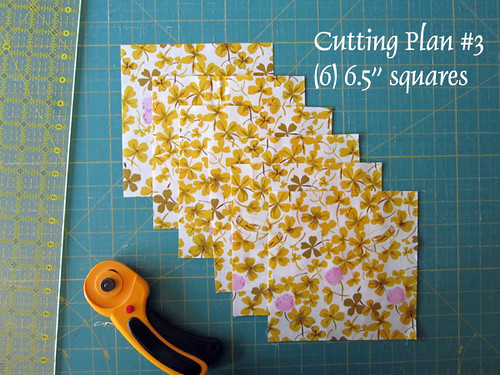
Remove the excess fabric from above the 6.5" strips. Now place your ruler at 6.5", measuring from the vertical straight edge.
Cut, creating a pair of 6.5" squares. Move the ruler to the left 6.5" and cut again.
Repeat one more time, creating a total of (6) of 6.5" square pairs. This Cutting Plan #3 yields (6) 6.5" squares. The throw quilt requires 6 fabric N squares, while the twin requires 8.
::Cutting Summary::
In this cutting list, 2" strips are expected to be about 22" long (cut from a fat quarter). If you are not cutting fat quarters, they need to be at least 16" long for our purposes.
for a Baby Penny Patch quilt
for a Throw Penny Patch quilt
for a Twin Penny Patch quilt
Have fun cutting piles of all your pretty fabrics!
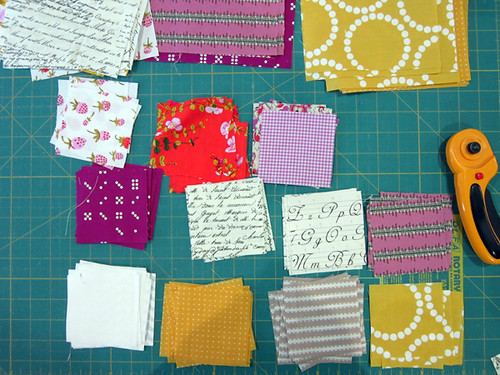
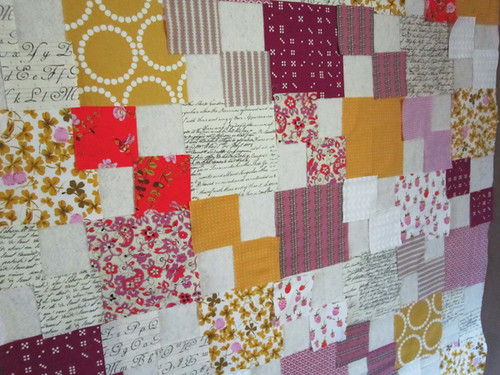
If you have the space, it's really fun to tack your batting for this quilt onto a wall and arrange fabrics in your quilt layout as you cut. (Sorry for the awful pictures. My design wall area almost always has terribly light!) If you are making a baby quilt, remember to start the first row with a 4-penny patch block. Put up all 6.5"squares, spreading fabrics out colors in a pleasing manner. You'll probably have to overlap the edges of your pieces slightly so that they'll fit!
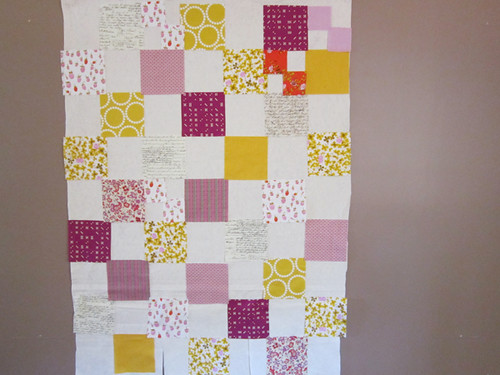
Then add the 3.5" square pairs as shown. Keep your 2" strips near your sewing station for now. We'll start working with those next week!
Woohoo, cutting! This post contains a ton of pictures aimed to help beginners. Thanks for your understanding! Be sure not to miss the Cutting Summary at the end of this post!Get out those fat quarters and press them. If you're not sure how many fat quarters you should have for your quilt, see this materials list and this color scheme ideas post.
Step 1: Sort by colors.
Your main colors are A and B. Of the two, B is the color you'd like to use most. Your "pop" color is C. It will appear in small flashes in the quilt. The rest of your fabrics are low-volume, which means they are lighter in color than the others and many feel neutral or "pale". Those making a throw or twin quilt, also have 1-2 mid-value neutrals, which I'll call N. These are not as light as your low-volumes, but still neutral. N adds depth to the quilt.
Step 2: Cut the Straight Edge
Place your cutting mat towards a corner of your work table so that you can approach the mat from two sides. Never used a rotary cutter before? Please see rotary cutting 101.
Begin by placing your pressed fabric (wow, I could have done a better job pressing!) on the cutting mat. Orient it as shown with the 22" side horizontal and the 18" side vertical. Throughout the cutting directions, the fat quarter is always oriented in this way. Your fat quarter may actually be slightly smaller if it was prewashed. No worries! We have extra fabric "wiggle room" in this cutting plan, even if your fabric is pre-shrunk.
I am right handed. If you are left-handed, you will be cutting with your left hand and will have to mirror what I am demonstrating.
In cutting EACH fat quarter, the first step is to create two nicely trimmed edges. To do so, slide the fabric until the bottom raw edge extends just beyond a horizontal cutting mat line and the right raw edge just beyond a vertical line. In this case, my selvedge is at right, so I slide the fabric until the entire selvedge is past that vertical cutting mat line.
Place your quilting ruler so that its edge matches up with that vertical line. Cut, removing the selvedge and establishing a straight vertical edge.
Now place your quilting ruler horizontally, across the 22" length of the fabric, and match it up with the horizontal line just inside the fabric's raw edge.
In this example the corner of my table is at my left side. I move around the corner so that I can make this horizontal cut with proper ergonomic reach. Cut, removing raw edge at the bottom of the fat quarter and creating a straight horizontal edge.
Never try to cut from an angle that feels hard to control! Always move your body or even rotate the cutting mat so that you can approach the fabric from a comfortable angle. Avoid moving the fabric itself, to increase accuracy.
Now the fat quarter has two straight edges: a vertical and a horizontal. If you are left-handed, your vertical edge will be at the left side of your fabric. Since I am right-handed, it is at the right side.
Is your mat too small to fit the entire fat quarter (as with a 12" x 18" cutting mat)? If so, you'll have to fold fabric to trim a bottom straight edge and cut any 22" long cuts. Once those long cuts are made, the remaining cuts will fit on a small mat. For ideas on how to fold fabric for cutting, see this post.
Step 3: Cut A & B fabrics
Begin with an A or B colored fabric. First cut (2) 2" strips along the bottom horizontal edge. To do so, place the ruler at a horizontal cutting mat line 2" from the bottom straight edge.
Then move around the corner to position your body ergonomically to cut.
The second 2" strip is cut in the same way.
Each fat quarter yields (2) 2" strips. Set aside.
Next cut a 3.5" strip measuring from the vertical straight edge.
Measure and cut a second 3.5" strip. It will be a total of 7" from the vertical straight edge.
Remove excess fabric, so that only the 3.5" strips remain in your cutting area.
Measuring from the bottom, where you already have a straight edge, cut 3.5" fabric squares. Since the 3.5" strips are side-by-side, each cut will yield (2) 3.5" squares or (1) pair of 3.5" squares. Each pair becomes part of a 4-penny patch block. You need two matching 3.5" squares (i.e. one PAIR) for each 4-penny patch block.
Continuing measuring and cutting at 3.5", creating more 3.5" pairs.
Since this is a short cut, I am able to cut without moving around the corner of a mat. I position my hand like so. But, again, do whatever you need to do to cut from an angle that feels fully in control. Try sliding the mat or, if absolutely necessary, reposition the fabrics so that they are easier to reach.
Each fat quarter will yield (3) pairs of 3.5" squares. Set aside.
Return the excess fabric to the cutting mat. It measures about 14" square. Match it's vertical and horizontal straight cuts to lines on your cutting mat.
Measuring from the vertical straight edge, cut at 6.5" over.
Cut again at 6.5" over, creating two 6.5" strips. Remove narrow waste fabric at left.
Make a horizontal cut at 6.5" from the bottom straight edge, creating (2) 6.5" squares.
You may want to use the corner of the table to orient yourself for this cut, once again.
Repeat, so that each fat quarter yields (4) 6.5" squares.
This series of cuts is Cutting Plan #1. It yields: (2) 2" x 22" strips, (3) pairs of 3.5" squares and (4) 6.5" squares.
All color A and color B fabrics can be cut in this way. However, you will NOT need all of the 2" strips and 3.5" squares generated by this cutting plan, especially in color A fabrics. To verify what you need, see the cutting summary at the end of this post. If you want to avoid cutting extra fabrics, you can start by cutting your favorite fabrics first, keep a tally, and stop cutting certain parts of this cutting plan when you reach your quota.
Step 4: Cut Color C
Those making the baby-sized Penny Patch quilt should cut Color C with Cutting Plan#1, demonstrated in Step 3. However, stop cutting after making the 3.5" squares. You do not need any 6.5" squares in color C for the baby-sized Penny Patch quilt.
Those making throw or twin-sized Penny Patch quilts, should cut Color C with the following Cutting Plan #2:
Start, as usual, with trimming for a vertical and horizontal straight edge (see Step 2).
Then place your ruler at 3.5", measuring from the bottom horizontal straight edge.
Move around the corner of your table to cut this 3.5" strip.
Cut a second 3.5" strip in the same way.
Return to the normal side of the table. Remove the excess fabric from above the 3.5" strips.
Now place your ruler at 3.5", measuring from the vertical straight edge.
Cut, creating a pair of 3.5" squares.
Move the ruler to the left 3.5" and cut again. Repeat, creating a series of 3.5" square pairs.
By the last cut, you'll have created (6) pairs of 3.5" squares. Set aside.
Return the excess fabric to the cutting mat. It measures about 11" x 22". Match it's vertical and horizontal straight cuts to lines on your cutting mat. Measure a 2" strip from the bottom horizontal straight edge.
Again, I walked around the corner of my mat to approach the work from the side. Cut the 2" strip.
Continue cutting 2" strips.
Each fat quarter should yield (5) 2" x 22" strips.
This series of cuts is Cutting Plan #2. It yields: (6) pairs of 3.5" squares and (5) 2" strips.
All color C fabrics can be cut in this way. However, you will NOT need all of the cuts generated by this cutting plan. To verify what you need, see the cutting summary at the end of this post. If you want to avoid cutting extra fabrics, keep a tally and stop when you reach your quota.
Step 5: Cut Low Volumes
When cutting your low volume fat quarters, you will cut some via Cutting Plan #1 and some via Cutting Plan #2. This combination yields many more 3.5" squares and 2" strips than 6.5" squares, which is exactly what you'll need!
for a Baby Penny Patch quilt
- Cutting Plan #1 - 4 fat quarters
- Cutting Plan #2 - 3 fat quarters
- Cutting Plan #1 - 6 fat quarters
- Cutting Plan #2 - 4 fat quarters
- Cutting Plan #1 - 9 fat quarters
- Cutting Plan #2 - 5 fat quarters
Step 6: Cut Fabric N
Note: This step applies to throw and twin-sized Penny Patch quilts only.
Prepare your fabric by trimming a vertical and horizontal straight edge.
Then place your ruler at 6.5", measuring from the bottom horizontal straight edge.
Move around the corner of your table to cut this 6.5" strip. Cut a second 6.5" strip in the same way.
Remove the excess fabric from above the 6.5" strips. Now place your ruler at 6.5", measuring from the vertical straight edge.
Cut, creating a pair of 6.5" squares. Move the ruler to the left 6.5" and cut again.
Repeat one more time, creating a total of (6) of 6.5" square pairs. This Cutting Plan #3 yields (6) 6.5" squares. The throw quilt requires 6 fabric N squares, while the twin requires 8.
::Cutting Summary::
In this cutting list, 2" strips are expected to be about 22" long (cut from a fat quarter). If you are not cutting fat quarters, they need to be at least 16" long for our purposes.
for a Baby Penny Patch quilt
- Color A - (8) 6.5" squares, (3) pairs of 3.5" squares and (1) 2" strip
- Color B - (8) 6.5" squares, (6) pairs of 3.5" squares and (4) 2" strips
- Color C - (3) pairs of 3.5" squares and (2) 2" strips
- Low Volume - (15) 6.5" squares, (20) pairs of 3.5" squares and assorted 2" strips
for a Throw Penny Patch quilt
- Color A - (15) 6.5" squares, (5) pairs of 3.5" squares and (3-4) 2" strip
- Color B - (15) 6.5" squares, (11) pairs of 3.5" squares and (6-8) 2" strips
- Color C - (6) pairs of 3.5" squares and (3) 2" strips
- Low Volume - (24) 6.5" squares, (38) pairs of 3.5" squares and assorted 2" strips
- Neutral N - (6) 6.5" squares
for a Twin Penny Patch quilt
- Color A - (21) 6.5" squares, (7) pairs of 3.5" squares and (4-5) 2" strip
- Color B - (21) 6.5" squares, (16) pairs of 3.5" squares and (8-10) 2" strips
- Color C - (8) pairs of 3.5" squares and (5) 2" strips
- Low Volume - (33) 6.5" squares, (53) pairs of 3.5" squares and assorted 2" strips
- Neutral N - (8) 6.5" squares
Have fun cutting piles of all your pretty fabrics!
If you have the space, it's really fun to tack your batting for this quilt onto a wall and arrange fabrics in your quilt layout as you cut. (Sorry for the awful pictures. My design wall area almost always has terribly light!) If you are making a baby quilt, remember to start the first row with a 4-penny patch block. Put up all 6.5"squares, spreading fabrics out colors in a pleasing manner. You'll probably have to overlap the edges of your pieces slightly so that they'll fit!
Then add the 3.5" square pairs as shown. Keep your 2" strips near your sewing station for now. We'll start working with those next week!