the yarn Pompom Garland tutorial
Do you know it's been over a month since I got it BAD? Yep, it has. I just pulled up that original list of home redecorating plans and turns out I've made more progress than I thought. One of my favorite new looks is the Pompom Garland of Fabulousness.
Are you ready?

Ta da!
Yes, the strings are meant to hang down like that. I was inspired by this one, strings and all.
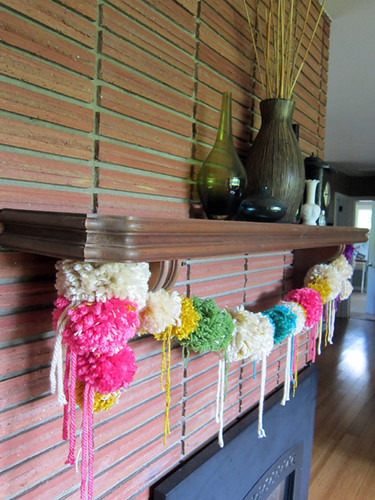
Our mantle is a much more interesting and colorful place, I do declare! And, amazingly, my cats have not bothered this one bit? I know. So lucky.
But I have to tell you, making this garland was not as cheap and easy as I expected. I soon discovered that pompoms are hungry little buggers. They eat lots and lots and uber lots of yarn, so best not to use the good stuff. I used some random thrifted yarn in turquoise and yellow that was too nubby to do much with, but shiny-good.

And, I also bought some yarn from....GASP..... Walmart (hangs head), because their cheap Lion Brand Hometown yarn has this chunky personality that makes big pompoms without lots of yarn. It's a lightweight, acrylic yarn, which helps the pompoms come out fluffy. (Cotton yarn is a poor choice, in my experience, since it's too heavy to puff much.) Still, I probably made only 4-5 from each skein of Hometown yarn! The cream, pink and purple pompoms are made with Hometown.
So, want to make yours? Here's my favorite method for making pompoms...
Supplies
Chunky yarn or at least worsted weight yarn, in a lightweight fiber like acrylic or wool
Cardboard circles, cut out from cereal boxes or whatnot. You need two equally sized circles to make one size pompom. I made 2 different sizes. You'll need to experiment to see what size circles makes the pompoms you like with your yarn.
Sharp scissors. Seriously, you want your good ones for this.
How To
#1 Place your equally sized circles together. Cut a notch in the circles that allows you to slide yarn into the center of the circle easily. This notch might be about a 1/4" wide for easy maneuvering.

#2 Grab your yarn and start wrapping it around and around the circles. The loose yarn end will get caught under the wraps. Nothing fancy here - just wrap the yarn smoothly trying to spread it out relatively evenly around the circle. This is a good kid-job too.
Keep wrapping until your circles can't hold any more yarn if you want a fluffy pompom. Remember, they're hungry! Fluff happens when you feed them extravagantly.
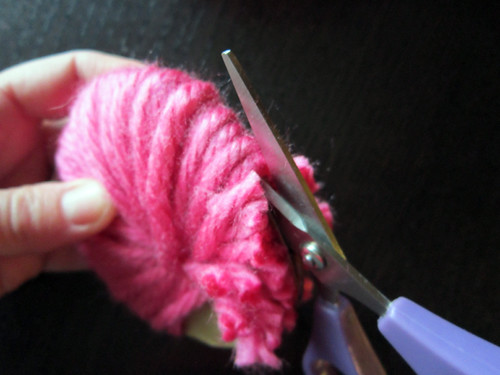
#3 Starting at the notch, slide your scissors between the two cardboard circles and cut all the way around the circle back to the notch. You're cutting through the yarn, creating a bunch of evenly short yarn pieces. Yes, you'll worry that the yarn will fall right off. Treat it with some care and it won't. Really, the yarn clings more than you'd expect, especially if you loaded the circle with plenty of yarn.

#4 See look, you can even set it down and it's ok! Cut a piece of yarn from the skein about 12" long.
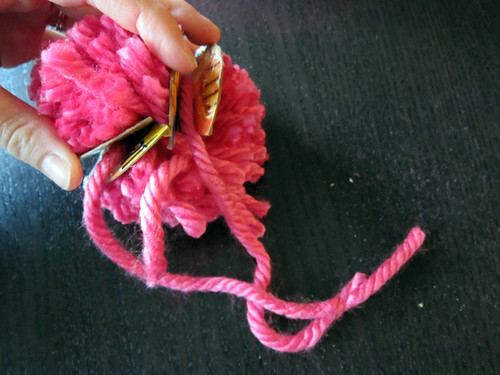
#5 Guide that 12" piece between the cardboard circles so that it wraps all the way around the yarn pieces. It should slide in easily. See, aren't those cardboard circles handy!

#6Tie the yarn really, really, really tight. Even tighter! Doubtle knot it to secure. Then, voila... a pompom! Yes, there will be some uneven bits, so trim those to make a nice round, fluffy friend. You can use the long tying tales to tie the pompom to a gift package or tie it up wherever. Or, you can let them hang down from your garland for character.

Hey, did you notice that some of mine have two colors? See the white bits of yarn in the green one? To mix in one or more extra color, just interrupt your wrapping (step #2) with a new bit of yarn. You can stop wrapping any time, cut the yarn, start with a new yarn, cut it, and proceed with a third yarn, etc. The yarn ends keep getting buried as you wrap, so it's quite secure!
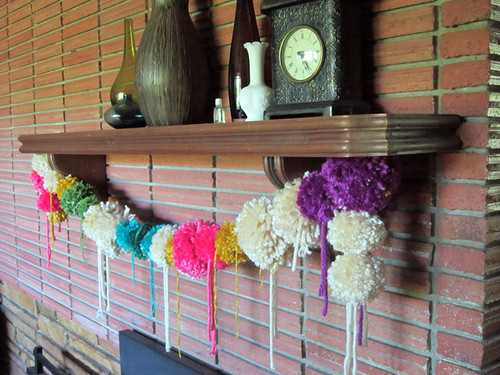
To create a garland, I used a long needle to run strong button thread through the center of each pompom. I found I needed to nest them pretty close together so that they look full and fluffy all in a row. Then I installed some screw hooks into the underside of my mantle to hang her up.
That's it! Happy pompom making!
Next up for me... new sofa pillows, those dining room curtains and someday, someday fresh kitchen rugs.