the Downside of QAYG
I've had some real good times with quilt-as-you-go (QAYG). There's Bottled Rainbows (still on my bed!) and my more recent mama's bag. So, when I was dreaming up a quilt design for grandpa's Green quilt, QAYG came to mind. I thought Grandpa, being all manly and such, would like the classic log cabin block. And who hasn't dreamed of making a QAYG log cabin quilt? Ok, perhaps there's just the few of us...
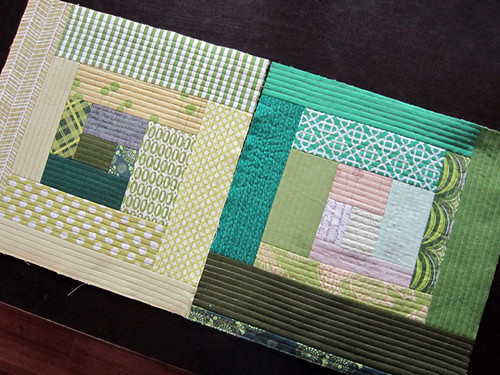
Well, I made it this far. Yesiree, after all of two blocks I abandoned this course in favor of the elongated courthouse steps design that came to be Emerald City. I think those were good instincts!
While I was piecing up Emerald City, I solidified in my mind a few downsides of QAYG. Since we tend to only share the positives in blogland, its easy to be surprised to discover that something which seemed so bright in shiny has it's downsides. I hope you can benefit from my experience or perhaps give me some tips that would make my life easier next time!
It's worth noting that both of the QAYG projects I've completed and enjoyed were improv-style QAYG. In contrast, the log cabin block was to have nice straight logs and right angle corners. With a regular log cabin block, you'll often trim newly added logs square and tidy as you sew, to keep things sewing along the right track. In fact, I'm the type that doesn't measure logs. Instead, I sew them on willy-nilly and them trim them to the proper length, using the work-in-progress as reference.
With QAYG you can't do that. You can't trim already-sewn logs with a rotary cutter/ruler because you'd cut off the batting in the process. This means I had to measure the proper required length for each log, cut scraps to length and sew carefully. When I erred, I tried to trim the log with small scissors as straight as possible. Erk.
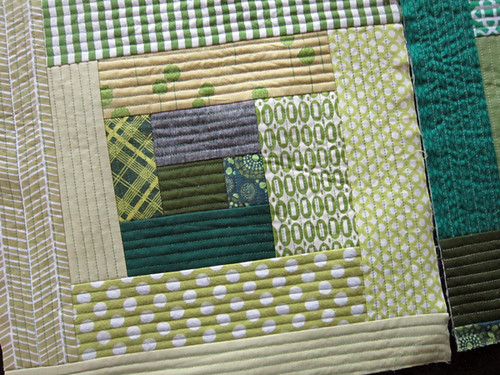
But what of squaring up? Since trimming's not possible, I tried to substitute by drawing in right angle guidelines with my ruler. Before adding a new log, I'd use my ruler and a pen to draw a nice straight line, which I'd use as reference for neatly sewing in the next log. This seemed to work on my first block (with the light outer), but my second block ended up wonky despite my efforts.
And, can we say time-consuming? More measuring than usual, all the pressing required of log cabins, plus the seeming need to draw guidelines. The blocks fairly crawled along. Lack of momentum was way discouraging. When I switched to the elongated courthouse steps blocks, they worked up 5 times faster!
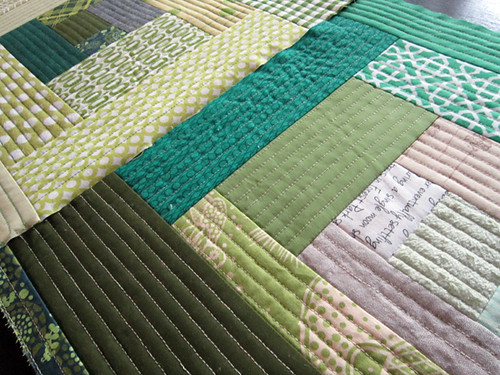
What everyone loves best about QAYG is the delicious texture it creates. Amen to that! I love it too. Ok, but... even that has a downside. With my 3/8" quilting these blocks were turning out stiff. Plus, all those straight lines really highlighted any not-so-straight logs. Sigh.
Well, obviously not a match made in heaven this time. That's not to say I won't QAYG again, but I think I'll favor improv style projects that at least cut out the measuring/squaring conundrum. If you valiantly set out to QAYG log cabin style, I recommend working with standard width logs (say 3.5" thick, for example) rather than the irregular widths I used. Doing so, you can cut lots of logs in advance and your blocks can build out faster. Also, setup your iron to be within arms reach of your sewing machine. Otherwise you'll be bobbing up and down like a jack-in-the-box.
I hope this was a teeny bit helpful, friends. Thanks for listening!
Hey, anyone want my green orphan blocks? They're 15" trimmed and free to a good home. I'll mail them off post-haste. And, feel free to cut/use as desired!
***Update*** Blocks are claimed. Thanks for helping me out!
Well, I made it this far. Yesiree, after all of two blocks I abandoned this course in favor of the elongated courthouse steps design that came to be Emerald City. I think those were good instincts!
While I was piecing up Emerald City, I solidified in my mind a few downsides of QAYG. Since we tend to only share the positives in blogland, its easy to be surprised to discover that something which seemed so bright in shiny has it's downsides. I hope you can benefit from my experience or perhaps give me some tips that would make my life easier next time!
It's worth noting that both of the QAYG projects I've completed and enjoyed were improv-style QAYG. In contrast, the log cabin block was to have nice straight logs and right angle corners. With a regular log cabin block, you'll often trim newly added logs square and tidy as you sew, to keep things sewing along the right track. In fact, I'm the type that doesn't measure logs. Instead, I sew them on willy-nilly and them trim them to the proper length, using the work-in-progress as reference.
With QAYG you can't do that. You can't trim already-sewn logs with a rotary cutter/ruler because you'd cut off the batting in the process. This means I had to measure the proper required length for each log, cut scraps to length and sew carefully. When I erred, I tried to trim the log with small scissors as straight as possible. Erk.
But what of squaring up? Since trimming's not possible, I tried to substitute by drawing in right angle guidelines with my ruler. Before adding a new log, I'd use my ruler and a pen to draw a nice straight line, which I'd use as reference for neatly sewing in the next log. This seemed to work on my first block (with the light outer), but my second block ended up wonky despite my efforts.
And, can we say time-consuming? More measuring than usual, all the pressing required of log cabins, plus the seeming need to draw guidelines. The blocks fairly crawled along. Lack of momentum was way discouraging. When I switched to the elongated courthouse steps blocks, they worked up 5 times faster!
What everyone loves best about QAYG is the delicious texture it creates. Amen to that! I love it too. Ok, but... even that has a downside. With my 3/8" quilting these blocks were turning out stiff. Plus, all those straight lines really highlighted any not-so-straight logs. Sigh.
Well, obviously not a match made in heaven this time. That's not to say I won't QAYG again, but I think I'll favor improv style projects that at least cut out the measuring/squaring conundrum. If you valiantly set out to QAYG log cabin style, I recommend working with standard width logs (say 3.5" thick, for example) rather than the irregular widths I used. Doing so, you can cut lots of logs in advance and your blocks can build out faster. Also, setup your iron to be within arms reach of your sewing machine. Otherwise you'll be bobbing up and down like a jack-in-the-box.
I hope this was a teeny bit helpful, friends. Thanks for listening!
***Update*** Blocks are claimed. Thanks for helping me out!