Value Dance Quilt Tutorial
This tutorial series is part of the Value Added Quilt Along. Visit my intro post for links to all the lessons on using value in quilt design. Stop by the flickr group to share your photos and keep up with other quilt-along happenings.
Want to make this quilt...

Okay then, let's get started! Today we'll talk fabric requirements, and I'll show you how to make the hourglass blocks for the patchwork portion of the quilt. That's "Part A" of my Value Dance tutorial. In "Part B" I'll teach the on point square blocks and in "Part C" the assembly and borders to finish your quilt!
As shown, quilt finishes 53" x 62", which is a small-ish throw. I'd recommend more patchwork blocks to enlarge the quilt, if desired. For more info see my post on the design of Value Dance.
Value Dance Fabric Requirements
for Patchwork Blocks
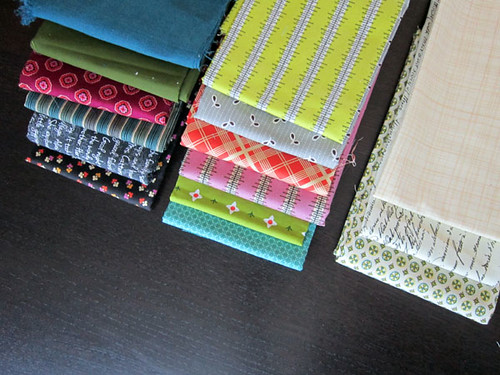
Light Values - You'll use light fabrics in all 40 hourglass blocks and for 20 on point square centers. I worked with 4 different light values (three prints shown above, plus Kona bone). If you'll be using 4 fabrics, you'd need a fat quarter of each. If using just 1 light value fabric, a yard will do.
Medium Values - You'll use medium fabrics in all 40 hourglass blocks and for 20 on point square backgrounds. I worked with 6 different medium values. If you'll be using 6 fabrics, you'd need less than a fat quarter of each.
Dark Values - You'll use dark fabrics for 20 on point square centers and 20 on point square backgrounds (there are a total of 40 on point square blocks). I worked with 6 different dark values. If you'll be using 6 fabrics, you'd need less than a fat quarter of each. You could work with as few as 3 dark value fat quarters to complete this quilt.
for Borders
The patchwork center is surrounded by 3 borders. Border 1 is a dark value border (I used solid teal) and requires a 1/2 yard. Border 2 is a light value border (I used a white text print) and requires a 1/3 yard. Border 3 can be a medium value or multi-colored print to tie your quilt together and requires 1 yard.
for Finishing
For a whole cloth backing, you'll need 3.5 yards. Batting required at 55" x 64". For binding, you'll need a 1/2 yard.

{Hourglass Blocks Tutorial}
Note: I learned this method of making hourglass blocks at Red Pepper Quilts. It creates pairs of identical hourglass blocks quite quickly!
Step 1: Cutting
From your light value fabrics, cut 6" strips. Divide strips into 6" square to create (20) light value 6" squares total. If cutting your light values from 4 fat quarters, begin by cutting (2) 6" x 22" strips from each fat quarter. Set aside remaining light value fabric for on point squares.
From your medium value fabrics, cut 6" strips. Divide strips into 6" square to create (20) medium value 6" squares total. If cutting your light values from 6 fat quarters, begin by cutting (1) 6" x 22" strips from each fat quarter. From these (6) strips, you'll be able to make (18) 6" squares. Choose a favorite medium value fabric and cut (2) more 6" squares. Set aside remaining medium value fabric for on point squares.
Step 2: Mark & Sew
(This step sews like a half square triangle block.) Locate a medium and a light value 6" square.

Match them up with right sides together. Mark a diagonal line using anything - even a regular old pencil - as this line will not show.

Sew a 1/4" seam using the line as a guideline. Do not sew on the line! Sew at 1/4" on one side of the marked line. Then, turn the block around and sew at 1/4" from the other side of the line. When you're done sewing your block will have 2 stitch lines on either side of the marked line (see image in next step).
Step 3: Slice & Sew
At your cutting mat, cut along the marked line. Without moving your pieces, also cut along the opposite diagonal line. After both cuts, you've quartered your square into triangles.

Press all triangle sets. I always press seams open. I like the look, and it's less thinking for me.
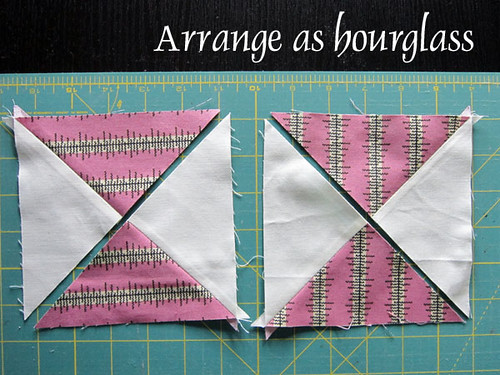
Match up your triangle sets to create 2 hourglass blocks. Place right sides together, carefully matching the center seam of each hourglass. I keep the center seam matched with my hands while feeding the pieces into my sewing machine. If you find that difficult, use two pins (placed closely on each side of the matched center seam) to anchor the pieces while sewing.

Press seams again!
Step 4: Trim
I'm using a 6.5" square ruler to trim my hourglass blocks. Another kind of ruler will do, but you want one with a diagonal line that matches the hourglass seam. We'll trim the block to 5" square.
Place the ruler so that the yellow diagonal line is running over the diagonal seamline of the hourglass. Then, slide the ruler so that you can trim two sides of the square at once, using the 5" measurement lines as a guide. At this point, you want the block to remain slightly larger than 5".
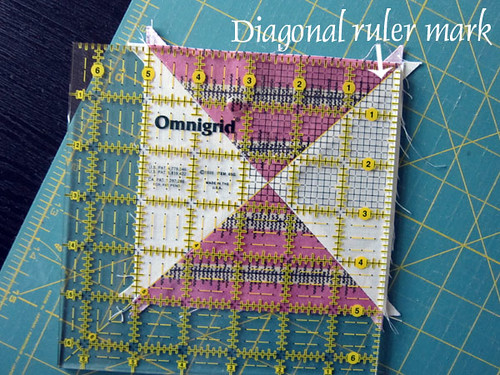
Here I've sliced off a bit along the right side. I'll also trim at the top before repositioning the ruler and block.

Rotate the block to trim the remaining 2 sides of the square. First, orient the block using the diagonal ruler line and the 5" measurement lines. Trim remaining sides for a perfect 5" hourglass block.

Tips
Each set of 6" squares yields 2 hourglass blocks. You'll need 40 hourglass blocks total for the Value Dance quilt.

If you're using some printed fabrics for light values, make sure every pair of light value and medium value 6'' squares has strong contrast.
To save time while sewing, mark all your 6" sets. Then, chain piece all the 1/4" lines. Press at once, and continue in batches. Chain piecing is a powerful way to save time!

Trimming is time consuming, but totally necessary here! The finished quilt relies on accurate piecing so that the larger square-in-square blocks can emerge from the combination of hourglass and on point square blocks. I listen to audio books while I do this kind of sewing!
Questions? Comments? I'm listening! These hourglass blocks are pretty fun to churn out. I'll be back on Monday with the next step of our quilt tutorial!
Want to make this quilt...
Okay then, let's get started! Today we'll talk fabric requirements, and I'll show you how to make the hourglass blocks for the patchwork portion of the quilt. That's "Part A" of my Value Dance tutorial. In "Part B" I'll teach the on point square blocks and in "Part C" the assembly and borders to finish your quilt!
As shown, quilt finishes 53" x 62", which is a small-ish throw. I'd recommend more patchwork blocks to enlarge the quilt, if desired. For more info see my post on the design of Value Dance.
Value Dance Fabric Requirements
for Patchwork Blocks
Light Values - You'll use light fabrics in all 40 hourglass blocks and for 20 on point square centers. I worked with 4 different light values (three prints shown above, plus Kona bone). If you'll be using 4 fabrics, you'd need a fat quarter of each. If using just 1 light value fabric, a yard will do.
Medium Values - You'll use medium fabrics in all 40 hourglass blocks and for 20 on point square backgrounds. I worked with 6 different medium values. If you'll be using 6 fabrics, you'd need less than a fat quarter of each.
Dark Values - You'll use dark fabrics for 20 on point square centers and 20 on point square backgrounds (there are a total of 40 on point square blocks). I worked with 6 different dark values. If you'll be using 6 fabrics, you'd need less than a fat quarter of each. You could work with as few as 3 dark value fat quarters to complete this quilt.
for Borders
The patchwork center is surrounded by 3 borders. Border 1 is a dark value border (I used solid teal) and requires a 1/2 yard. Border 2 is a light value border (I used a white text print) and requires a 1/3 yard. Border 3 can be a medium value or multi-colored print to tie your quilt together and requires 1 yard.
for Finishing
For a whole cloth backing, you'll need 3.5 yards. Batting required at 55" x 64". For binding, you'll need a 1/2 yard.
{Hourglass Blocks Tutorial}
Note: I learned this method of making hourglass blocks at Red Pepper Quilts. It creates pairs of identical hourglass blocks quite quickly!
Step 1: Cutting
From your light value fabrics, cut 6" strips. Divide strips into 6" square to create (20) light value 6" squares total. If cutting your light values from 4 fat quarters, begin by cutting (2) 6" x 22" strips from each fat quarter. Set aside remaining light value fabric for on point squares.
From your medium value fabrics, cut 6" strips. Divide strips into 6" square to create (20) medium value 6" squares total. If cutting your light values from 6 fat quarters, begin by cutting (1) 6" x 22" strips from each fat quarter. From these (6) strips, you'll be able to make (18) 6" squares. Choose a favorite medium value fabric and cut (2) more 6" squares. Set aside remaining medium value fabric for on point squares.
Step 2: Mark & Sew
(This step sews like a half square triangle block.) Locate a medium and a light value 6" square.
Match them up with right sides together. Mark a diagonal line using anything - even a regular old pencil - as this line will not show.
Sew a 1/4" seam using the line as a guideline. Do not sew on the line! Sew at 1/4" on one side of the marked line. Then, turn the block around and sew at 1/4" from the other side of the line. When you're done sewing your block will have 2 stitch lines on either side of the marked line (see image in next step).
Step 3: Slice & Sew
At your cutting mat, cut along the marked line. Without moving your pieces, also cut along the opposite diagonal line. After both cuts, you've quartered your square into triangles.
Press all triangle sets. I always press seams open. I like the look, and it's less thinking for me.
Match up your triangle sets to create 2 hourglass blocks. Place right sides together, carefully matching the center seam of each hourglass. I keep the center seam matched with my hands while feeding the pieces into my sewing machine. If you find that difficult, use two pins (placed closely on each side of the matched center seam) to anchor the pieces while sewing.
Press seams again!
Step 4: Trim
I'm using a 6.5" square ruler to trim my hourglass blocks. Another kind of ruler will do, but you want one with a diagonal line that matches the hourglass seam. We'll trim the block to 5" square.
Place the ruler so that the yellow diagonal line is running over the diagonal seamline of the hourglass. Then, slide the ruler so that you can trim two sides of the square at once, using the 5" measurement lines as a guide. At this point, you want the block to remain slightly larger than 5".
Here I've sliced off a bit along the right side. I'll also trim at the top before repositioning the ruler and block.
Rotate the block to trim the remaining 2 sides of the square. First, orient the block using the diagonal ruler line and the 5" measurement lines. Trim remaining sides for a perfect 5" hourglass block.
Tips
Each set of 6" squares yields 2 hourglass blocks. You'll need 40 hourglass blocks total for the Value Dance quilt.
If you're using some printed fabrics for light values, make sure every pair of light value and medium value 6'' squares has strong contrast.
To save time while sewing, mark all your 6" sets. Then, chain piece all the 1/4" lines. Press at once, and continue in batches. Chain piecing is a powerful way to save time!
Trimming is time consuming, but totally necessary here! The finished quilt relies on accurate piecing so that the larger square-in-square blocks can emerge from the combination of hourglass and on point square blocks. I listen to audio books while I do this kind of sewing!
Questions? Comments? I'm listening! These hourglass blocks are pretty fun to churn out. I'll be back on Monday with the next step of our quilt tutorial!