Bottled Rainbows:how to make
This post is part of a series Bottled Rainbows {ticker tape quilt along}. You can join in anytime. We're going at a leisurely pace and using up our scraps! Please see this page for links to all posts.
Here we are ready to make our first blocks for this quilt-along! Starting now until we finish all 16 blocks sometime in June, I'll be making 1 Bottled Rainbow block each week. It really doesn't matter in what order you make them - so just grab whichever scrap pile is biggest!
You'll need one Kona solid, a pile of matching scraps, neutral solid, matching neutral thread and batting, if you'll be doing quilt-as-you-go (QAYG). Pinking shears also optional for those of you preferring pinked edges (confused about edges? see this post).
What's this Quilt-As-You-Go?
Quilt-as-you-go (QAYG) is a style of block-making that combines piecing your block with quilting. Why? Because when making a large quilt, quilting can be quite a challenge for those of us sewing on normal, home machines. QAYG is a more enjoyable way to finish a quilt, particularly if your quilting pattern is complex. And quilting around lots of ticker tape scraps definitely qualifies as complex. If you're newer to quilting, I recommend QAYG!
To QAYG, prepare a piece of batting that's a bit larger than your intended finished block. We'll build the block onto this piece of batting, using it like a foundation. When you attach ticker tape scraps, you will simultaneously secure them to the block top and quilt through the batting layer, creating lovely puffy ticker tapes.
But what happens after we make all the blocks? With QAYG you piece together the blocks with right sides together and a 1/4" seam, just as usual. Then you press open seams - quilt top and batting at once. Lastly, you create a large quilt back, baste and do some quilting along the block seams to secure the quilt top/batting to the backing. You do not have to worry about batting shifting over time since it is well-secured to the quilt top. I plan to quilt along the block lines with neutral thread in a wide zigzag for a playful finishing effect. If you prefer, you could outline the blocks or stitch in the ditch!
Common question - won't that make for bulky seams? Well, people say "no". To put your mind at ease, see this post by Penny of Sew Take a Hike, who led a QAYG quilt-along awhile back. She recommends this style of QAYG that I'm teaching, which she originally learned from the book Patchwork Style by Suzuko Koseki.
Step 1: Prepare Batting
Piece or cut a batting to measure greater than 17" x 21". (The Bottled Rainbow unfinished blocks are 16.5" x 20.5").
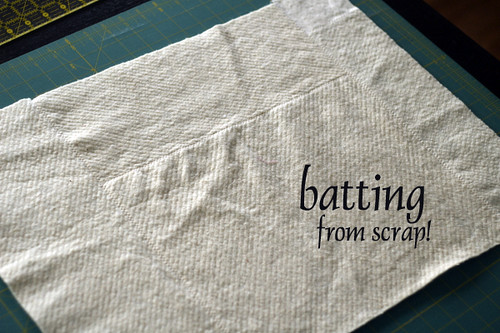
I didn't have a batting piece on hand large enough, so I pieced together batting scraps. I've done this on several occasions. Just butt up two pieces of batting and sew together with a wide zigzag stitch, keeping the batting flat. Remember that you'll be quilting the batting as well, so that will add plenty of stability to pieced battings.
If you're off to by batting now, the size you'll need depends on if you plan to add a border to the quilt or not. Finished quilt dimensions are 64" x 80" (twin sized batting) or 74" x 90" with a 5" border (full sized batting). If you want the quilt to fit a twin sized bed, definitely plan to add the border (I am!) and purchase the full sized batting. I recommend Warm & Natural batting by The Warm Company. It's affordable, readily available and I love that it allows for quilting up to 10" apart. Sometimes that comes in really handy!
Step 2: Cut Solids
For basic tips on how to use your rotary cutter, see Rotary Cutting 101.
Cut your neutral solid (Kona Bone shown) to 11.5" x 15.5". Cut the longest side of the rectangle on the crosswise grain. For example, cut a 11.5" strip from selvedge to selvedge. Trim strip to create (2) 11.5" x 15.5" neutral rectangles. You will need to orient your blocks on the crosswise grain, as instructed, in order to cut 16 total neutral rectangles from the 2 2/3 yards recommended in the materials list.
If you're not sure how to manage a large 2 2/3 piece of fabric, see this post for how to fold your fabric for cutting on a small cutting mat. Follow steps 1-6 in that tutorial and then cut a 11.5" strip of fabric when you get to step 7. If you can, cutout all 16 of your neutral rectangles at once, to get that out of the way! To do so, you'd cut a total of (8) 11.5" strips (running selvedge to selvedge) and then trim them down to the correct 11.5" x 15.5" size.
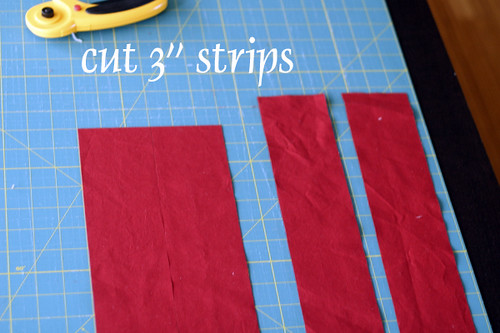
Cut your colored solid (Kona Ruby shown). Cut (2) 3" x 15.5" strips and (2) 3" x 16.5". You can cut crossgrain or on the lengthwise grain to accommodate these cuts. I suggest cutting (4) 3" strips on the lengthwise grain (along the 18" side of your fat quarter) and then trimming them down to the proper lengths.
Step 3: Prepare Block Base
Match the 15.5" colored strips to the 15.5" sides of your neutral rectangle. Pin with right sides together and stitch with a 1/4" seam. Press seams open. Match 16.5" strips with remaining sides. Sew right sides together and press seams as before. Block measures 16.5" x 20.5".
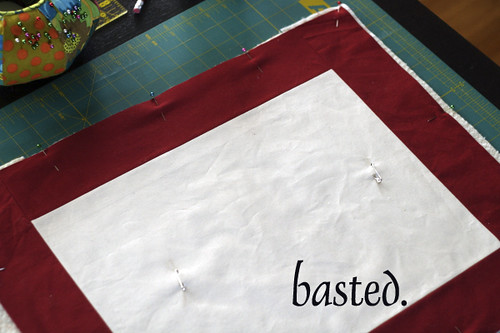
Center your block on the prepared batting. Use curved basting pins (or regular pins if that's all you have) to secure the center of the block to the batting. Smoothing from the center out, pin the edges with straight pins, inserting pins perpendicular to the edges.
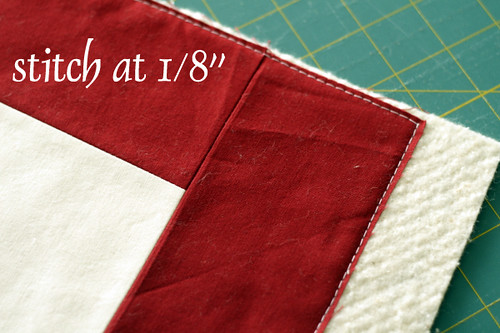
Using your walking foot attachment, stitch around the edge of the block at 1/8" from the edge of the colored sashing strips.
Step 4: Prepare Ticker Tape Scraps!
Now for some fun! Press your scraps and begin to arrange them on the neutral rectangle. Start by identifying your favorite, biggish scraps. If they have funky, uneven edges, go ahead and trim them so that the edges are straight-cut. Of course, if you're choosing pinked edges, you'll have to cut every side with pinking shears or a pinking blade in your rotary cutter. No need to square scraps (unless desired). Simply place them on the base.
Next, start filling in the spaces around your favorites with more scraps. To some extent, you have to take risks and trim as you go, to really start to see how the scraps are fitting. But, you can also fold scraps to approximately the right shape and place them in your mosaic to see if you like the look before cutting them down. Since you can never make a scrap bigger, I tend to avoid cutting until I'm pretty sure.
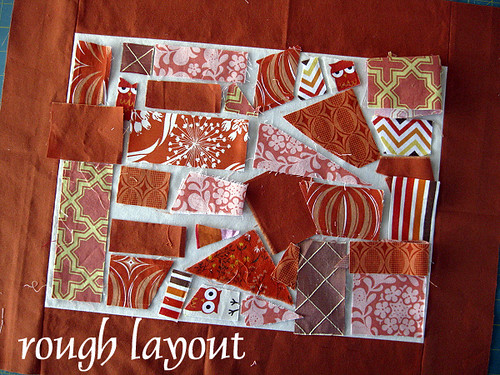
I aimed to distribute same-print scraps throughout the block, rather than allowing them to cluster. I allowed for squares, rectangles, triangles, and odd-shapes too. Some are also making blocks with circles, diamond patterns and curved sides.
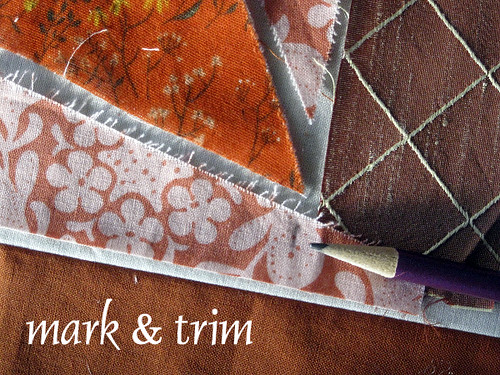
So how do you get the scraps to fit together just so? I use a very high-tech approach... I place the scrap in the mosaic, "eyeball" it and make a pencil mark where I'd like to cut. Then, I remove the scrap from the mosaic and cut it with my rotary cutter and quilting ruler. I suggest that you approach this trim-to-fit action with a relaxed, improv attitude. The spaces between your scraps do not have to be even. In fact, a few odd spots adds to the scrappy charm. And, honestly, trimming the scraps to fit does take a good bit of time, so why make things more difficult by aiming for "perfect"?
That said, if perfectly even spacing between scraps really is a must for you, I suggest using bigger scraps and only rectangles/squares, so that you can actually square up each scrap and not find yourself weighed down by cutting so many, many scraps so precisely.
Before you commit to a final layout, make sure you love it. It'd be worth cutting into some yardage for a few pieces that might really enhance your block. For example, with my pumpkin block below, I added another cut of Bridle Path/Central Park to the lower right corner and the Unicorn from Far Far Away to the upper right corner.

I made these additions because I decided my rough layout had too many small pieces. The fussy cut additions really enhance the block!
And now, you glue. Use an acid-free glue stick to temporarily secure the scraps. It doesn't take a lot - just a couple dabs on the back of each. The glue is not permanent, so if you change your mind, you can move it (you'll have to add more glue). As crazy as it sounds, lots of people use plain, old glue sticks for applique. It's designed to wash out of clothes and it's cheap!
Step 5: Stitch!
Treat your block carefully at this point so that you don't loose any scraps. Fold or roll the sides of the block as you sew to avoid scrunching up the scraps and potentially loosening the glue.
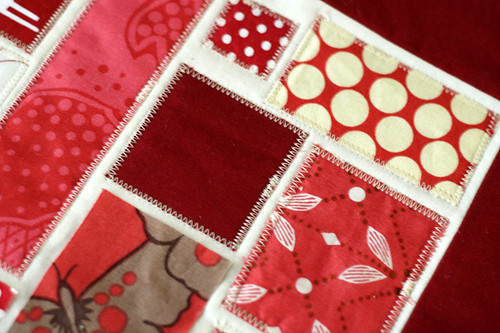
Starting wherever you like, secure each scrap one at a time with neutral thread. If your scrap has a light portion, start and end stitching there to hide the extra thread involved. For those of you doing a zigzag stitch, like mine, I set my machine at a "3" value for stitch width and a "1" value for stitch length. Stitch so that the right side of your zigzag falls just to the outside of your scrap. You want the zigzag to reach into the scrap for strength. When you come to the corner, stop with your needle down on the right side of your zigzag stitch, just past the end of the scrap corner. Lift the presser foot, reposition block and continue stitching. I backtacked after I went all the way around a scrap to lock my stitches.
If you're using the zigzag stitch, trim any unraveling threads before you start stitching each scrap. It's easier to remove them before they get tangled in the zigzag stitch.
If you're using a straight stitch, sew a full 1/4" in from the edge of the block. Turn corners with your needle in the down position.
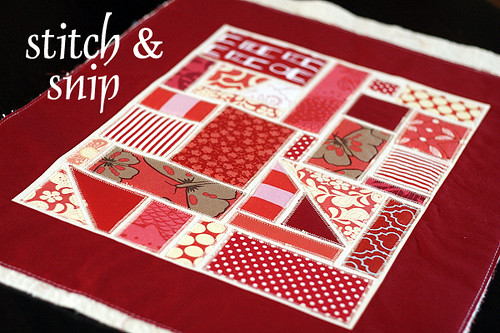
Step 6: Square Up Block
Now that all of your ticker tape scraps are secured, all that's left is to square your block to 16.5" x 20.5". During the sewing process, some things may have shifted slightly.
Start by choosing one side to trim into a straight edge, being careful to align the marks on your quilting ruler with the straight edge of the sashing. See:
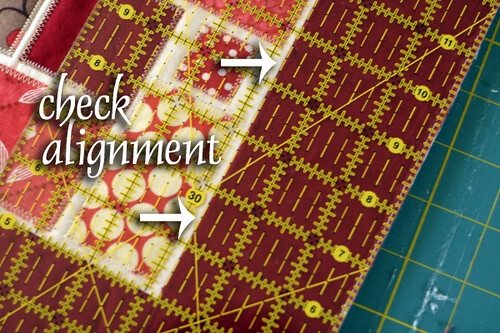
The edge of the block should be 2.75" from the inner edge of the sashing. Watch this line when you're making that first straight edge cut.
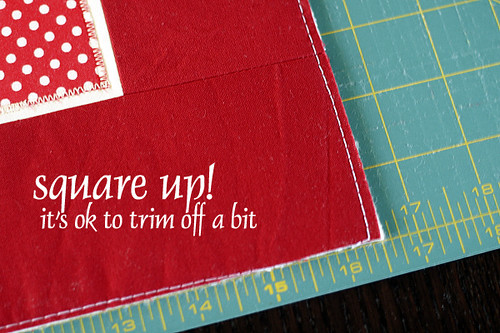
Next, you'll align that straight cut with the lines on your cutting mat and square the block to 16.5" x 20.5". It's ok if you have to trim off a little of the sashing during this process. A square block is definitely the priority!
Phew! You did it (or at least now you know how)!
But, I'm thinking you may have a few lingering questions. I'm ready! If you don't receive an answer by email, I probably can't reach you. Please check back at this post, as I'll be answering questions in the comments here as well.
Thanks for joining in with Bottled Rainbows! I am having so much fun!