Taking Pictures - Post Production
I always try my best to take a beautiful picture from the get go. But, the fact is that most all of my pictures benefit from a little boost after the fact. My husband says that pictures taken with a point and shoot digital camera generally need added contrast and saturation. If that means nothing to you, have no fear, just read on.
{more} Tips for Photographing Your Fabulous Craftiness
~Flickr!
If you are taking pictures of your work to share on a blog, by all means use Flickr! Flickr is way fun. It's a social community based on pictures. It's free. And, you're sure to be inspired by all the beauty there!
I start "processing" my pictures by choosing my favorites and deleting the rest. Then I shrink them down to a very manageable size so that they upload into Flickr quite quickly. I use Canon's "Digital Photo Professional" to resize my pictures to about 600 x 450 pixels all in one batch, saving the large originals in case I need them later. You don't have to do this though - Flickr will accept very large images. But, sharing large images, rather than smaller ones, on your blog may cause your pages to load slowly
~Picnic
Now that your pictures are in Flickr, you can use Picnic, a free tool that allows you to easy improve, correct and add text to your pictures! To find Picnic, click on one of your pictures to make it big. Locate the "actions" tab above your picture and select "edit photo in Picnic". It's near the bottom of a long list of options. Picnic takes a bit of time to load....
Autofix - find this button at the far left. Usually, it does great stuff. But don't feel like "autofix" is always right. If you don't like what it did, use the "Undo" button at the far right and try fiddling with other buttons to achieve the right effect.
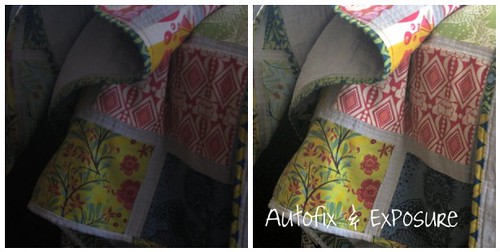
Exposure - use this setting to lighten or darken your pictures. Contrast is located with exposure because you generally need to increase contrast when you increase exposure. Contrast makes the dark parts of your picture darker and the light parts lighter.
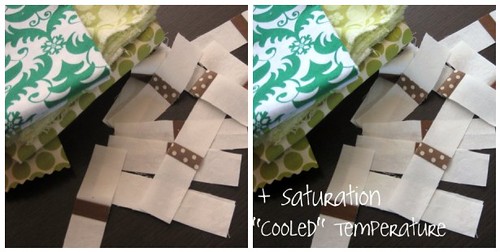
Colors - I like this button! Here you can adjust saturation (which is hard to explain - it's almost how much color is in the colors? - I like lots of saturation!) and temperature. If your image has an orange/pink cast, you can correct that with the temperature slider. Same with a blue cast. Colors get thrown off easily when you shoot by artificial light, causing these funny color casts. You'll totally like the picture better when you fix that! If the colors in your photo look wrong, and "autofix" didn't do the job, undo autofix and then go into "colors". Try using the "auto colors" button there at the left. That usually corrects problems quite nicely!
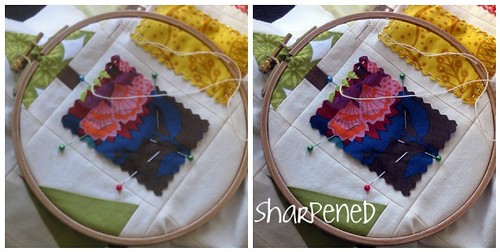
Sharpen - Another favorite! According to my professional husband, I like "too much" sharpness in my images. Don't tell me if he's right, ok? To me, increasing the sharpness just makes my pictures look more "real". And, real is definitely what I'm going for. If you increase sharpness too much (or way to much, as it were) you'll start to see white lines between the details of your image. So, watch out for that.
All of the above options are under the main "Edit" tab, which is the default when you open Picnic. If you switch from "Edit" to "Create" you'll find options for adding frames, effect, text and "stickers". I haven't explored this too much, apart from adding text and adding arrows, which are found in stickers under "basic shapes."
And, by the way, in case you are wondering if Photoshop is "better" than the free version of Picnic - it is. Photoshop allows for more flexibility when working with your images. BUT, Picnic is definitely more user friendly. I tend to use them half and half, and that's only because we already own Photoshop for Brandon's work. I'd be happy as a clam with Picnic alone, if faced with the cost of buying Photoshop.
~Big Huge Labs/Mosaic Maker
One last tip, you can make mosaics with a few or LOTS of pictures quite easily by using Big Huge Labs. Link your Big Huge Labs account with your Flickr acount so that you can painlessly add pictures to the mosaic and publish the mosaic to Flickr, including text that links to each original flickr image. Go to the Mosaic Maker. Have fun!
When your pictures are ready in Flickr, use the "share this" tab above any picture to "Grab the HTML/BBCode". I copy that code into the HTML version of my post to drop in pictures that automatically link to my Flickr account.
So, how was that folks? You were all so excited to hear my post-production tips. I hope I didn't disappoint!
{more} Tips for Photographing Your Fabulous Craftiness
~Flickr!
If you are taking pictures of your work to share on a blog, by all means use Flickr! Flickr is way fun. It's a social community based on pictures. It's free. And, you're sure to be inspired by all the beauty there!
I start "processing" my pictures by choosing my favorites and deleting the rest. Then I shrink them down to a very manageable size so that they upload into Flickr quite quickly. I use Canon's "Digital Photo Professional" to resize my pictures to about 600 x 450 pixels all in one batch, saving the large originals in case I need them later. You don't have to do this though - Flickr will accept very large images. But, sharing large images, rather than smaller ones, on your blog may cause your pages to load slowly
~Picnic
Now that your pictures are in Flickr, you can use Picnic, a free tool that allows you to easy improve, correct and add text to your pictures! To find Picnic, click on one of your pictures to make it big. Locate the "actions" tab above your picture and select "edit photo in Picnic". It's near the bottom of a long list of options. Picnic takes a bit of time to load....
Autofix - find this button at the far left. Usually, it does great stuff. But don't feel like "autofix" is always right. If you don't like what it did, use the "Undo" button at the far right and try fiddling with other buttons to achieve the right effect.
Exposure - use this setting to lighten or darken your pictures. Contrast is located with exposure because you generally need to increase contrast when you increase exposure. Contrast makes the dark parts of your picture darker and the light parts lighter.
Colors - I like this button! Here you can adjust saturation (which is hard to explain - it's almost how much color is in the colors? - I like lots of saturation!) and temperature. If your image has an orange/pink cast, you can correct that with the temperature slider. Same with a blue cast. Colors get thrown off easily when you shoot by artificial light, causing these funny color casts. You'll totally like the picture better when you fix that! If the colors in your photo look wrong, and "autofix" didn't do the job, undo autofix and then go into "colors". Try using the "auto colors" button there at the left. That usually corrects problems quite nicely!
Sharpen - Another favorite! According to my professional husband, I like "too much" sharpness in my images. Don't tell me if he's right, ok? To me, increasing the sharpness just makes my pictures look more "real". And, real is definitely what I'm going for. If you increase sharpness too much (or way to much, as it were) you'll start to see white lines between the details of your image. So, watch out for that.
All of the above options are under the main "Edit" tab, which is the default when you open Picnic. If you switch from "Edit" to "Create" you'll find options for adding frames, effect, text and "stickers". I haven't explored this too much, apart from adding text and adding arrows, which are found in stickers under "basic shapes."
And, by the way, in case you are wondering if Photoshop is "better" than the free version of Picnic - it is. Photoshop allows for more flexibility when working with your images. BUT, Picnic is definitely more user friendly. I tend to use them half and half, and that's only because we already own Photoshop for Brandon's work. I'd be happy as a clam with Picnic alone, if faced with the cost of buying Photoshop.
~Big Huge Labs/Mosaic Maker
One last tip, you can make mosaics with a few or LOTS of pictures quite easily by using Big Huge Labs. Link your Big Huge Labs account with your Flickr acount so that you can painlessly add pictures to the mosaic and publish the mosaic to Flickr, including text that links to each original flickr image. Go to the Mosaic Maker. Have fun!
When your pictures are ready in Flickr, use the "share this" tab above any picture to "Grab the HTML/BBCode". I copy that code into the HTML version of my post to drop in pictures that automatically link to my Flickr account.
So, how was that folks? You were all so excited to hear my post-production tips. I hope I didn't disappoint!