Colorbrick: Making Quilt Binding
This post is part of a series {Colorbrick} a Beginner’s Quilt-Along. You can join in anytime, even if you’re not a beginner! Please see this page for links to all posts, and join us on Flickr to share your questions and work-in-progress!
Making binding really isn't hard, but I find it tedious. The first time around I tried to avoid the whole process by buying ready-made binding from Hancocks. The color selections are limited, and the results were hideous, hideous I tell you! Immediately after applying it, I decided to rip it out!
So, ahem, we'll be making binding now. My next and last Colorbrick Quilt-Along post will show you how to apply your binding, and then you'll. be. done!
Step 1: Choose Your Fabric(s)
The simplest choice would be to bind your Colorbrick quilt in the same fabric you used for sashing. In the materials list, I designated for you to purchase enough of the sashing solid that you should now have plenty left over for this step.

But, I didn't go for simple when I (re)bound the first Colorbrick quilt. As you can see, I used a combination of natural linen and scraps from the bricks themselves. When faced with the decision on binding my Modern Meadow Colorbrick, I chose to go for the same effect. I'll be using scraps of Modern Meadow for the binding at the top and bottom of the quilt and natural linen around the sides.
Step 2: Cut 2.25" Strips

When making and applying binding, I follow Rita of Red Pepper Quilt's directions here. So, I cut my binding strips at 2.25". She mentions cutting them 2.5" if you're doing this for the first time, but when I did that last time it was too wide. I suggest doing what she does - 2.25". I cut mine straight on the grain. Since the quilt edges are straight, not curvy, there is no reason to cut your binding strips on the bias. For a refresher on how to cut long strips of fabric, see this step in this Quilt-Along.

How much to cut? You need enough to go all the way around your quilt and then have about 10-15 inches extra. My Colorbrick quilt measures 69 x 53". But, rather than measuring my strips, I just lay them around the quilt as I go, keeping in mind that a fair bit will get eaten up in seam allowances when we piece the strips.
Step 3: Piece Strips
To join the binding strips, take two strips and lay them right sides together. To create a diagonal seam that is less bulky than a straight seam, you must lay them perpendicular to each other, like so.
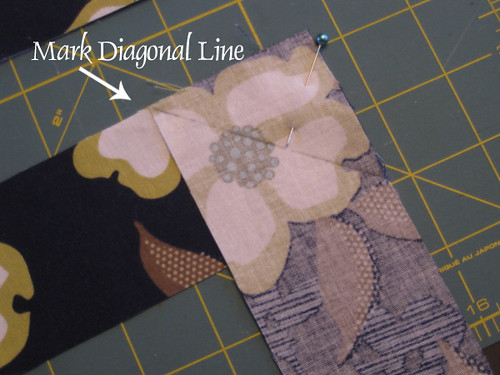
Make a pencil mark with a ruler from one edge to the other, as shown. Use a straight pin to stabilize things. Then, stitch along the line, back stitching at the beginning and end.

Now, trim off the excess, so that you have a 1/4" seam and press open. Voila!

Continue piecing all of your strips together until they will go all the way around your quilt with extra to spare. If you're going for a particular layout with a pieced binding, take care that none of your seams fall on the corners of the quilt.
Step 4: Press

Oh, this is easy! Now, press your entire strip of binding in half, longways. You're ready to apply it to your quilt! But, honestly, I never do the making and the applying in the same day. Binding bugs me =)

See you next time for our very last step!
Making binding really isn't hard, but I find it tedious. The first time around I tried to avoid the whole process by buying ready-made binding from Hancocks. The color selections are limited, and the results were hideous, hideous I tell you! Immediately after applying it, I decided to rip it out!
So, ahem, we'll be making binding now. My next and last Colorbrick Quilt-Along post will show you how to apply your binding, and then you'll. be. done!
Step 1: Choose Your Fabric(s)
The simplest choice would be to bind your Colorbrick quilt in the same fabric you used for sashing. In the materials list, I designated for you to purchase enough of the sashing solid that you should now have plenty left over for this step.
But, I didn't go for simple when I (re)bound the first Colorbrick quilt. As you can see, I used a combination of natural linen and scraps from the bricks themselves. When faced with the decision on binding my Modern Meadow Colorbrick, I chose to go for the same effect. I'll be using scraps of Modern Meadow for the binding at the top and bottom of the quilt and natural linen around the sides.
Step 2: Cut 2.25" Strips
When making and applying binding, I follow Rita of Red Pepper Quilt's directions here. So, I cut my binding strips at 2.25". She mentions cutting them 2.5" if you're doing this for the first time, but when I did that last time it was too wide. I suggest doing what she does - 2.25". I cut mine straight on the grain. Since the quilt edges are straight, not curvy, there is no reason to cut your binding strips on the bias. For a refresher on how to cut long strips of fabric, see this step in this Quilt-Along.
How much to cut? You need enough to go all the way around your quilt and then have about 10-15 inches extra. My Colorbrick quilt measures 69 x 53". But, rather than measuring my strips, I just lay them around the quilt as I go, keeping in mind that a fair bit will get eaten up in seam allowances when we piece the strips.
Step 3: Piece Strips
To join the binding strips, take two strips and lay them right sides together. To create a diagonal seam that is less bulky than a straight seam, you must lay them perpendicular to each other, like so.
Make a pencil mark with a ruler from one edge to the other, as shown. Use a straight pin to stabilize things. Then, stitch along the line, back stitching at the beginning and end.
Now, trim off the excess, so that you have a 1/4" seam and press open. Voila!
Continue piecing all of your strips together until they will go all the way around your quilt with extra to spare. If you're going for a particular layout with a pieced binding, take care that none of your seams fall on the corners of the quilt.
Step 4: Press
Oh, this is easy! Now, press your entire strip of binding in half, longways. You're ready to apply it to your quilt! But, honestly, I never do the making and the applying in the same day. Binding bugs me =)
See you next time for our very last step!