Colorbrick: Musical Bricks
This post is part of a series {Colorbrick} a Beginner’s Quilt-Along. You can join in anytime, even if you’re not a beginner! Please see this page for links to all posts, and join us on Flickr to share your questions and work-in-progress!
I think this is my favorite step - my very most favoritist step! We're going to take all those beautiful bricks and lay them out to reveal your gorgeous quilt-to-be. Ya!
Step 1: Make Eleven Rows of Five
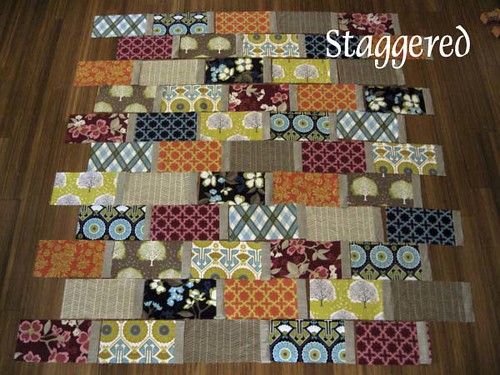
Set out your bricks in eleven rows with 5 bricks in each row. They should be staggered, like real brickwork. Of course, you'll want even - not staggered - sides on your quilt. To that end, we will cut 5 bricks in half, placing the half-bricks so as to fill in the holes. If you're wondering which bricks will be cut up, the 5 that are sticking out on the right are them. More on that later. At this step, your goal is to achieve a layout of color and print that makes you happy.
Step 2: Cut Bricks to Fill Holes
First we'll locate the 5 bricks that must be cut in half. Start at the top of your layout. In the first row NO bricks will be cut. Row 1 will remain as is with 5 whole bricks. In Row 2, the far right brick will be cut in half. Row 3 will remain whole. In Row 4, the far right brick will be cut in half - and so on alternating with one row remaining whole and the next containing a brick on the far right to be cut. After gathering all of your bricks, you should have 5 bricks total. The last row, Row 11, contains 5 bricks that will remain whole.
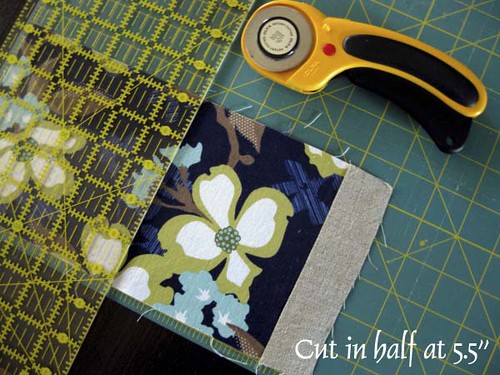
Take your 5 bricks to your cutting mat and place them as shown. Each brick measures 5.5 x 11 inches. Cut your bricks in half to create two squares, each 5.5 inches square.
Step 3: Place Half Bricks
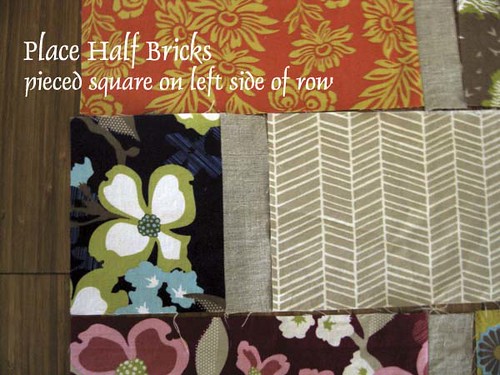
When you cut a brick in half, one side is a plain printed square and the other is a pieced square made of a print and a strip of sashing. All 5 pieced squares must go in the holes on the left side of your quilt. Put them wherever you like them best - they do not have to be opposite their other halves.

Place the simple printed squares in the holes on the right side of your quilt. By the way, because we have cut one brick in half, the rows with chopped bricks will measure 1/2 inch shorter than the rows with 5 whole bricks. That's ok - we'll just center the rows on each other when we go to piece the quilt and then trim the edges removing approximately 1/4 inch from each side. Don't worry!
Step 4: Finalize Layout

Now take the time to be sure that you love your layout. I tend to play musical bricks, swapping and shifting until things look just right. Try viewing your quilt from farther away or above to see if anything bothers you. Walk around the quilt to check it out from different perspectives. Sometimes taking a picture and looking at it on a computer screen can be helpful if you're having trouble.
If you are an experienced quilter, you can see how to continue from here. Feel free to piece it together right away, if you have the time. I'm going to continue now with directions for how to pick up and store your quilt layout for piecing later on. With two little kids in my home, I don't have the luxury of leaving my works in progress out!
Step 5: Mark Rows

I learned this technique for marking and storing quilts in progress from Oh, Fransson! She's a great teacher. Find some masking tape and place a piece on the far left brick of each row. Then, number your rows.
Step 6: Stack & Pin

Now stack up each row, keeping the bricks in order. So, first pick up the left brick and place it on top of the next brick. Continue all the way across until you've gathered the whole row. Finish by pinning your row together with one pin that points up towards the top of your quilt. In this way, you're preserving the order and orientation of each brick.
Don't they look nice all stacked up and fine? I'll be back later this week with the final step for completing your quilt top!
I think this is my favorite step - my very most favoritist step! We're going to take all those beautiful bricks and lay them out to reveal your gorgeous quilt-to-be. Ya!
Step 1: Make Eleven Rows of Five
Set out your bricks in eleven rows with 5 bricks in each row. They should be staggered, like real brickwork. Of course, you'll want even - not staggered - sides on your quilt. To that end, we will cut 5 bricks in half, placing the half-bricks so as to fill in the holes. If you're wondering which bricks will be cut up, the 5 that are sticking out on the right are them. More on that later. At this step, your goal is to achieve a layout of color and print that makes you happy.
Step 2: Cut Bricks to Fill Holes
First we'll locate the 5 bricks that must be cut in half. Start at the top of your layout. In the first row NO bricks will be cut. Row 1 will remain as is with 5 whole bricks. In Row 2, the far right brick will be cut in half. Row 3 will remain whole. In Row 4, the far right brick will be cut in half - and so on alternating with one row remaining whole and the next containing a brick on the far right to be cut. After gathering all of your bricks, you should have 5 bricks total. The last row, Row 11, contains 5 bricks that will remain whole.
Take your 5 bricks to your cutting mat and place them as shown. Each brick measures 5.5 x 11 inches. Cut your bricks in half to create two squares, each 5.5 inches square.
Step 3: Place Half Bricks
When you cut a brick in half, one side is a plain printed square and the other is a pieced square made of a print and a strip of sashing. All 5 pieced squares must go in the holes on the left side of your quilt. Put them wherever you like them best - they do not have to be opposite their other halves.
Place the simple printed squares in the holes on the right side of your quilt. By the way, because we have cut one brick in half, the rows with chopped bricks will measure 1/2 inch shorter than the rows with 5 whole bricks. That's ok - we'll just center the rows on each other when we go to piece the quilt and then trim the edges removing approximately 1/4 inch from each side. Don't worry!
Step 4: Finalize Layout
Now take the time to be sure that you love your layout. I tend to play musical bricks, swapping and shifting until things look just right. Try viewing your quilt from farther away or above to see if anything bothers you. Walk around the quilt to check it out from different perspectives. Sometimes taking a picture and looking at it on a computer screen can be helpful if you're having trouble.
If you are an experienced quilter, you can see how to continue from here. Feel free to piece it together right away, if you have the time. I'm going to continue now with directions for how to pick up and store your quilt layout for piecing later on. With two little kids in my home, I don't have the luxury of leaving my works in progress out!
Step 5: Mark Rows
I learned this technique for marking and storing quilts in progress from Oh, Fransson! She's a great teacher. Find some masking tape and place a piece on the far left brick of each row. Then, number your rows.
Step 6: Stack & Pin
Now stack up each row, keeping the bricks in order. So, first pick up the left brick and place it on top of the next brick. Continue all the way across until you've gathered the whole row. Finish by pinning your row together with one pin that points up towards the top of your quilt. In this way, you're preserving the order and orientation of each brick.
Don't they look nice all stacked up and fine? I'll be back later this week with the final step for completing your quilt top!