how to Sew a Sun {Tutorial}
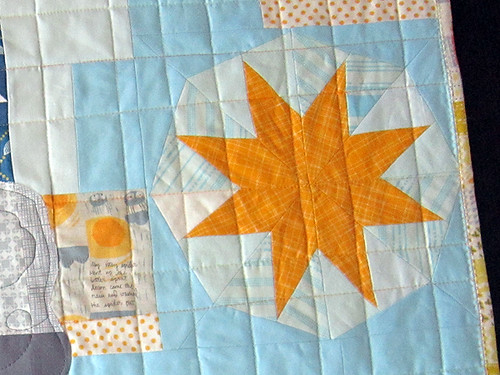
Look, it's Monday again! Here's that tutorial I offered on how to sew the sun that appears in my Nursery Versery picture quilt. Speaking of Nursery Versery, I hope you're plotting a project for our contest? Some entries have already popped up, actually! Check them out and the rules at the Nursery Versery Contest post.

I have two tutorials this week, so we'd better get right down to business. Today's "Sunglow Block" is essentially an 8-point star block that creates a secondary circle (the sunglow) all without using templates or y-seams. You can customize the size, but my directions will yield a 9" finished block.

Before we get started, I want to tell you where my head was at when designing this block. Basically, I didn't want to have to reference a computer screen. Often I prefer to "feel my way" as I sew, rather than take the time to scour the internet for a pattern that matches the picture in my head. I don't know that this is the "best" way to make this block, but I do know that it's low-stress and customizable. Aside from the tutorial aspect, I wanted to share these directions with you to plant some seeds, in hopes that they might help you "feel your way" someday as well! Here goes...
Fabrics
Step 1: Cut Triangles
The 8 star points of this sun begin as 8 triangles. Each triangle must have a 45 degree angle, so that 8 of them can be arranged together to make a full circle.
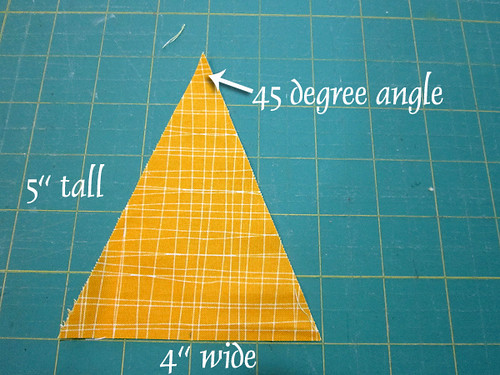
I don't have a 45 degree angle ruler, so I cut a strip of fabric at 5" tall. Then I cut triangles that are 4" wide at the straight edge base, with the triangle's peak centered. I don't believe that this is an exact 45 degree angle, but it works well enough and I like cutting in whole numbers.

If you cut one 5" wide strip and then start slashing diagonal lines to make triangles, you can make a batch of them without fabric waste. For the play-by-play on cutting triangles, see Step 1 of my Triangle Quilt tutorial. I'm using the same size triangle here!
To make a smaller star, you need to start out with smaller triangles. If you don't have a 45 degree ruler, cut your triangles as demonstrated (so you'll have the right angles) and then shorten them by trimming off some of the base. For example, you could take 1/2" off at the 4" wide base, making triangles that are just 4.5" tall. Whatever you do, your triangles must all be the same size and they should make a circle when all 8 are set out with the 45 degree angles touching.
Step 2: Add Sunglow
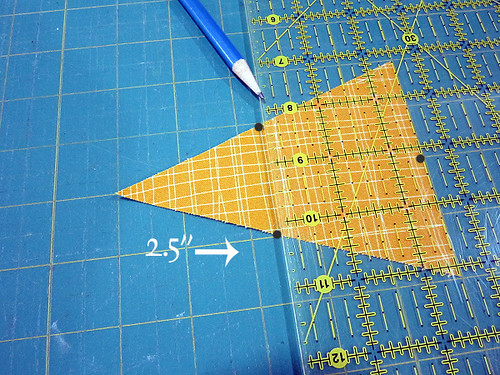
Use a marking tool to place 3 marks on each triangle. Place one at the center of the 4" base. Use a clear quilting ruler to measure 2.5" down from the apex of the triangle point. Place marks on the edge of the triangle where the ruler intersects. Repeat on all 8 triangles. These marks will allow your star points to match! I've represented my marks by charcoal dots throughout to make them super easy to see.
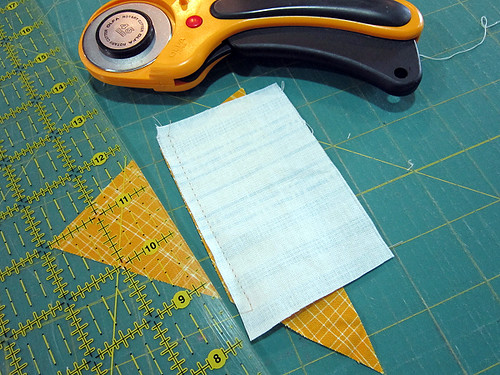
Lay a 2.5" x 3.5" sunglow rectangle on the triangle with right sides together. Match the raw edges of the rectangle to two of your marks. Center the sunglow rectangle so that some excess sunglow fabric sticks out on both sides of the triangle. Sew pieces together with a 1/4" seam.

Cut the excess triangle fabric to match the 1/4" seam allowance just sewn. Press seam open or to the side (I like to press open to keep things from getting bulky later on).
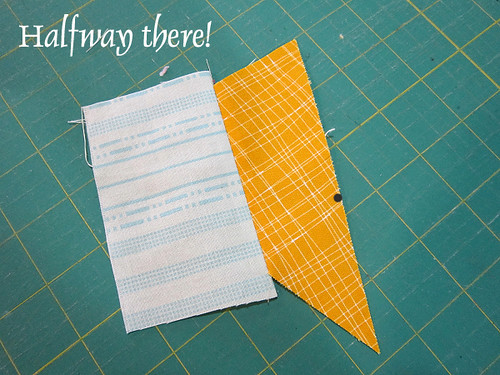
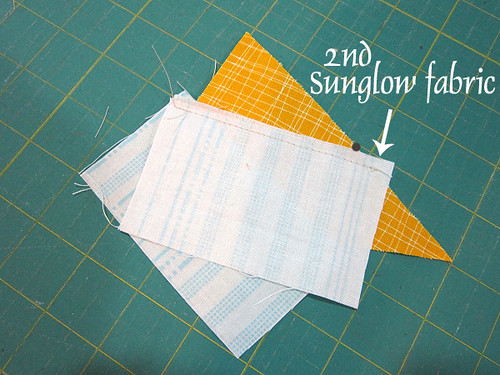
Lay a second 2.5" x 3.5" sunglow rectangle on the triangle with right sides together. Match the raw edge of the rectangle with the remaining visible mark and the seam of the first sunglow rectangle.
{Dear Miss Precise: The mark made at the center of the base is actually a scant 1/4" over from the pressed open seam. That mark is not visible. If you want to be more precise, align the fabric at the base a scant 1/4" over from the pressed seam, overlapping the first sunglow fabric even farther than shown here. For simplicity, I just aligned with the pressed open seam and I bet you weren't the wiser!}
Sew the second sunglow rectangle with a 1/4" seam. Then, trim the excess triangle fabric to match the 1/4" seam allowance and press open as before.

With both sunglow pieces in place, you can see the diamond-shaped star point emerge. But, maybe it looks a little funny? See, now this is how I like to sew. To figure all this out, I just experimented with large scraps for the sunglow shapes, knowing I would trim the sewn configuration to match the original 45 degree triangle. If we trim back to the original triangle shape then you know all 8 triangles can be sewn together to make a circle!
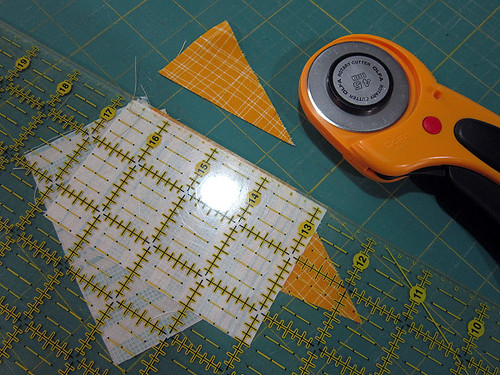
One at a time, place a triangle on your cutting mat aligning the point with a vertical and horizontal line - an intersection point. Cut at 5" below that intersection point to establish your triangle at 5" tall once again.
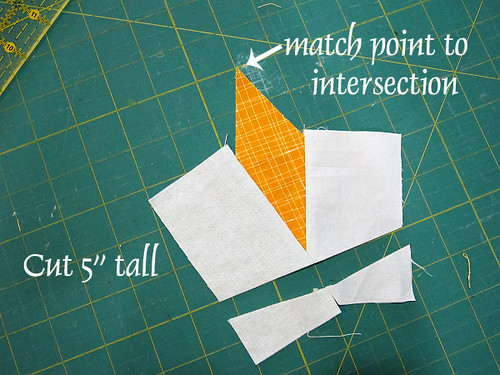
Now, using that intersection point/triangle tip as a guide, trim the triangle so that it is 4" wide at the base. You'll make a diagonal cut at each side of the triangle. (If you are making a smaller block and began with smaller triangles than mine, cut as if your triangle is 5" tall, aligning your ruler with a point 5" down from the triangle tip and 4" wide at that plane.)
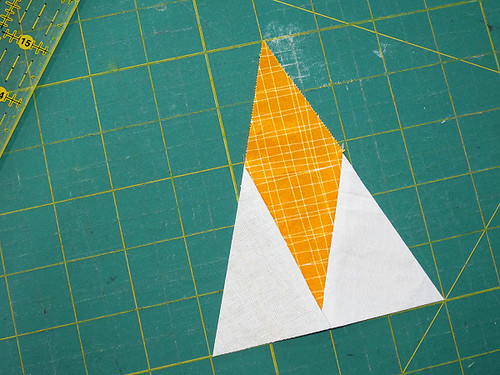
Trim each triangle so that they match their original dimensions before sunglow pieces were added. See how pretty these "sun diamonds" look! Notice how a directional print (especially a stripe) really accentuates the sunglow section to make these blocks glow.

Step 3: Complete Block
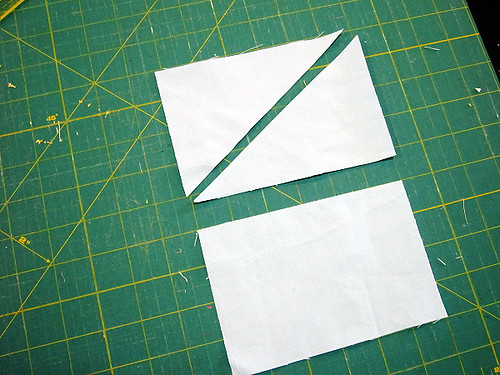
All that's missing is the background fabric to bring this block to a square shape. I recommend a solid or non-directional print for this part. The materials list calls for (4) 4" x 6" rectangles. Cut each one in half on diagonal from corner to corner creating (8) background triangles.
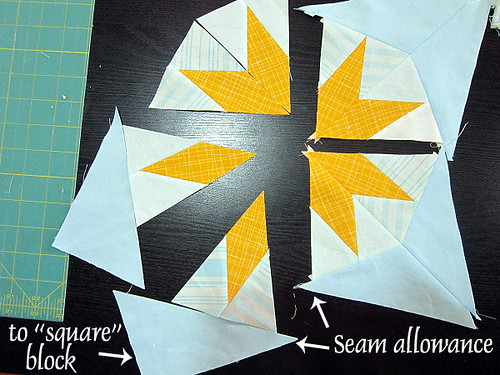
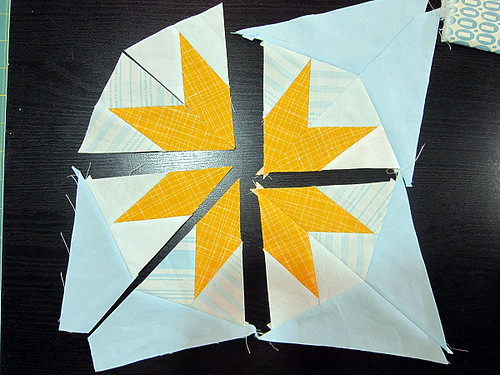
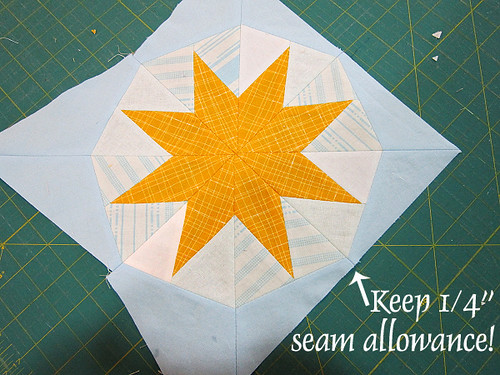
This part could be a brain-teaser, so take some time to study what's going on in the picture below. We're going to sew the block together by pairing up sun diamond/background segments to create a 4-quadrant block. First you need to add background to the sun diamonds in a way that accomplishes two goals. 1. Creates a seam allowance at the sun points nearest to the square edge of the completed block and 2. Puts plenty of "extra" background fabric at the corners to "square" out the block.
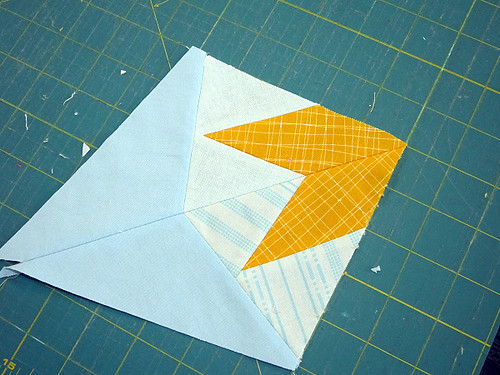
I've already given you the right dimensions in background fabric, but you need to place these triangles right to make a square block. The longest edge of your background triangle will be sewn to the base of each sun diamond. The thinnest point of the background triangle becomes the seam allowance on one side and the fattest corner of the background triangle becomes the excess background fabric that "squares" out the block.
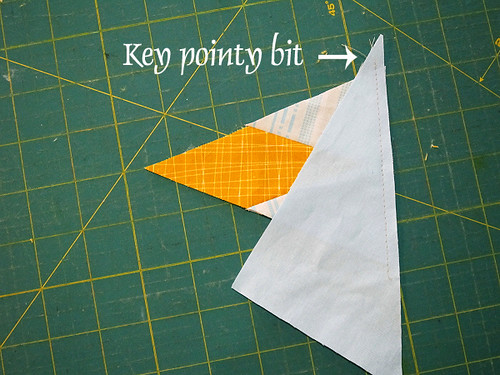
Lay out your background triangles the way that they should go to "square" out the block and then flip them over onto the base of your sun diamond with right sides together. Again, make sure that you have that pointy bit sticking out to create a seam allowance around your sun!
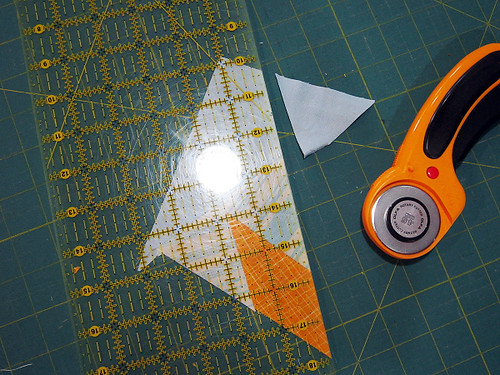
After adding the background triangle with a 1/4" seam, press seam open. Trim unnecessary background fabric off by extending the angle of the sun diamond. Just align your ruler with the edge of your sun diamond and trim to match.
Return your sun diamond/background segments to the block layout as you go to keep yourself from getting all mixed up. When two sun diamond/background segments are prepared, sew them together along the long diagonal seam taking care to match the points of the sun. Continue pairing them up until you've created 4 sun block quadrants.
Before assembling the quadrants, take a moment to trim them into a perfect 90 degree angle, using the grid of your cutting mat. This corrects any minor sewing or cutting mistakes! I took a smidge off of both sides of this segment to bring it flush with the lines of my cutting mat.
Sew pairs together, again matching up the sun points (the orange grid fabric in my block). This is an especially good time to press seams open, instead of to the side, to keep the sun's center from becoming too bulky.
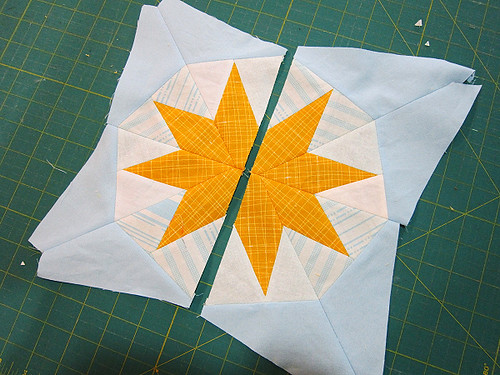
And sew the halves together to complete!
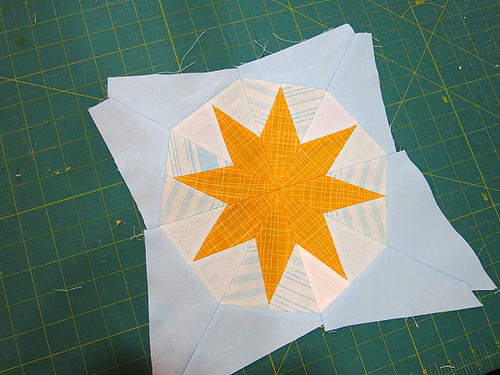
Now it's time to square up your block. As you do so, be sure to leave a 1/4" seam allowance of background fabric all the way around the block. To start squaring up such a funny-looking block, I trim the block at a generous 1/4" from the sun's points along two sides of my quilt. I use my clear quilting ruler to see that 1/4" measurement and reference the center seam line of the block to make sure the ruler is "straight" with the block itself.
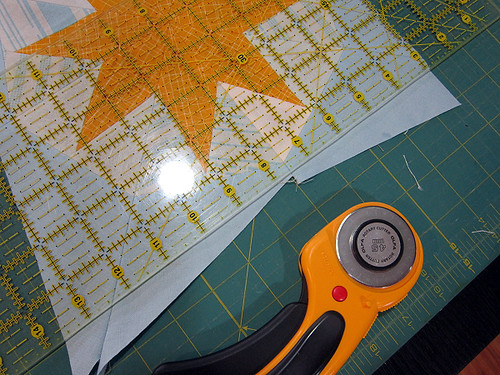
That creates a trimmed 90 degree angle that I can now match with lines on my cutting mat. When making my next two cuts, I'll be sure to bring the block square while preserving a 1/4" seam allowance. I trimmed my block to 9.5" square, unfinished.
Please let me know if you have any questions!
I have two tutorials this week, so we'd better get right down to business. Today's "Sunglow Block" is essentially an 8-point star block that creates a secondary circle (the sunglow) all without using templates or y-seams. You can customize the size, but my directions will yield a 9" finished block.
Before we get started, I want to tell you where my head was at when designing this block. Basically, I didn't want to have to reference a computer screen. Often I prefer to "feel my way" as I sew, rather than take the time to scour the internet for a pattern that matches the picture in my head. I don't know that this is the "best" way to make this block, but I do know that it's low-stress and customizable. Aside from the tutorial aspect, I wanted to share these directions with you to plant some seeds, in hopes that they might help you "feel your way" someday as well! Here goes...
Fabrics
- (8) Triangles for diamond Star Points (5" x 20" strip), shown in orange grid
- (16) 2.5" x 3.5" rectangles for Sunglow, shown in pale blue and pale blue stripe
- (4) 4" x 6" rectangles for background, shown in baby blue
- regular pencil or temporary marking tool
Step 1: Cut Triangles
The 8 star points of this sun begin as 8 triangles. Each triangle must have a 45 degree angle, so that 8 of them can be arranged together to make a full circle.
I don't have a 45 degree angle ruler, so I cut a strip of fabric at 5" tall. Then I cut triangles that are 4" wide at the straight edge base, with the triangle's peak centered. I don't believe that this is an exact 45 degree angle, but it works well enough and I like cutting in whole numbers.
If you cut one 5" wide strip and then start slashing diagonal lines to make triangles, you can make a batch of them without fabric waste. For the play-by-play on cutting triangles, see Step 1 of my Triangle Quilt tutorial. I'm using the same size triangle here!
To make a smaller star, you need to start out with smaller triangles. If you don't have a 45 degree ruler, cut your triangles as demonstrated (so you'll have the right angles) and then shorten them by trimming off some of the base. For example, you could take 1/2" off at the 4" wide base, making triangles that are just 4.5" tall. Whatever you do, your triangles must all be the same size and they should make a circle when all 8 are set out with the 45 degree angles touching.
Step 2: Add Sunglow
Use a marking tool to place 3 marks on each triangle. Place one at the center of the 4" base. Use a clear quilting ruler to measure 2.5" down from the apex of the triangle point. Place marks on the edge of the triangle where the ruler intersects. Repeat on all 8 triangles. These marks will allow your star points to match! I've represented my marks by charcoal dots throughout to make them super easy to see.
Lay a 2.5" x 3.5" sunglow rectangle on the triangle with right sides together. Match the raw edges of the rectangle to two of your marks. Center the sunglow rectangle so that some excess sunglow fabric sticks out on both sides of the triangle. Sew pieces together with a 1/4" seam.
Cut the excess triangle fabric to match the 1/4" seam allowance just sewn. Press seam open or to the side (I like to press open to keep things from getting bulky later on).
Lay a second 2.5" x 3.5" sunglow rectangle on the triangle with right sides together. Match the raw edge of the rectangle with the remaining visible mark and the seam of the first sunglow rectangle.
{Dear Miss Precise: The mark made at the center of the base is actually a scant 1/4" over from the pressed open seam. That mark is not visible. If you want to be more precise, align the fabric at the base a scant 1/4" over from the pressed seam, overlapping the first sunglow fabric even farther than shown here. For simplicity, I just aligned with the pressed open seam and I bet you weren't the wiser!}
Sew the second sunglow rectangle with a 1/4" seam. Then, trim the excess triangle fabric to match the 1/4" seam allowance and press open as before.
With both sunglow pieces in place, you can see the diamond-shaped star point emerge. But, maybe it looks a little funny? See, now this is how I like to sew. To figure all this out, I just experimented with large scraps for the sunglow shapes, knowing I would trim the sewn configuration to match the original 45 degree triangle. If we trim back to the original triangle shape then you know all 8 triangles can be sewn together to make a circle!
One at a time, place a triangle on your cutting mat aligning the point with a vertical and horizontal line - an intersection point. Cut at 5" below that intersection point to establish your triangle at 5" tall once again.
Now, using that intersection point/triangle tip as a guide, trim the triangle so that it is 4" wide at the base. You'll make a diagonal cut at each side of the triangle. (If you are making a smaller block and began with smaller triangles than mine, cut as if your triangle is 5" tall, aligning your ruler with a point 5" down from the triangle tip and 4" wide at that plane.)
Trim each triangle so that they match their original dimensions before sunglow pieces were added. See how pretty these "sun diamonds" look! Notice how a directional print (especially a stripe) really accentuates the sunglow section to make these blocks glow.
Step 3: Complete Block
All that's missing is the background fabric to bring this block to a square shape. I recommend a solid or non-directional print for this part. The materials list calls for (4) 4" x 6" rectangles. Cut each one in half on diagonal from corner to corner creating (8) background triangles.
This part could be a brain-teaser, so take some time to study what's going on in the picture below. We're going to sew the block together by pairing up sun diamond/background segments to create a 4-quadrant block. First you need to add background to the sun diamonds in a way that accomplishes two goals. 1. Creates a seam allowance at the sun points nearest to the square edge of the completed block and 2. Puts plenty of "extra" background fabric at the corners to "square" out the block.
I've already given you the right dimensions in background fabric, but you need to place these triangles right to make a square block. The longest edge of your background triangle will be sewn to the base of each sun diamond. The thinnest point of the background triangle becomes the seam allowance on one side and the fattest corner of the background triangle becomes the excess background fabric that "squares" out the block.
Lay out your background triangles the way that they should go to "square" out the block and then flip them over onto the base of your sun diamond with right sides together. Again, make sure that you have that pointy bit sticking out to create a seam allowance around your sun!
After adding the background triangle with a 1/4" seam, press seam open. Trim unnecessary background fabric off by extending the angle of the sun diamond. Just align your ruler with the edge of your sun diamond and trim to match.
Return your sun diamond/background segments to the block layout as you go to keep yourself from getting all mixed up. When two sun diamond/background segments are prepared, sew them together along the long diagonal seam taking care to match the points of the sun. Continue pairing them up until you've created 4 sun block quadrants.
Before assembling the quadrants, take a moment to trim them into a perfect 90 degree angle, using the grid of your cutting mat. This corrects any minor sewing or cutting mistakes! I took a smidge off of both sides of this segment to bring it flush with the lines of my cutting mat.
Sew pairs together, again matching up the sun points (the orange grid fabric in my block). This is an especially good time to press seams open, instead of to the side, to keep the sun's center from becoming too bulky.
And sew the halves together to complete!
Now it's time to square up your block. As you do so, be sure to leave a 1/4" seam allowance of background fabric all the way around the block. To start squaring up such a funny-looking block, I trim the block at a generous 1/4" from the sun's points along two sides of my quilt. I use my clear quilting ruler to see that 1/4" measurement and reference the center seam line of the block to make sure the ruler is "straight" with the block itself.
That creates a trimmed 90 degree angle that I can now match with lines on my cutting mat. When making my next two cuts, I'll be sure to bring the block square while preserving a 1/4" seam allowance. I trimmed my block to 9.5" square, unfinished.
Please let me know if you have any questions!