Easter Dress!
Hurray, it FITS! Yes, it's official, I zipped Aria up in the finished dress and found that she does have room to breathe! So it might not fit her by the end of summer and it certainly won't fit next year, but it totally fits now. First dress + fits = success. I'm so very happy!
Oh, and she is too! Which is undoubtedly very, very important. Of course.
Backing up, this is the Sis Boom Marissa dress - my first experience with a full-fledged clothing pattern and my first dress. Without a doubt, it was a pleasant experience. Such clear, detailed instructions felt like someone holding my hand all the way through. I'm a clothing-making convert, yes-sirree.
Now, if you're looking for pictures of said daughter actually wearing the dress, you're out of luck. Or perhaps we're out of luck, cause I would like those pictures too. But worry not! I will be sure to snap some shots on Easter Sunday.
So why post now? Well, because I wanted to share my experience with putting in that tulle skirt lingin. My request for advice was met with some great tips (thanks again!), and I also heard that some of you are working on the same skirt-fluffifying project. So, here's a quick, not-tutorial on what worked for me!

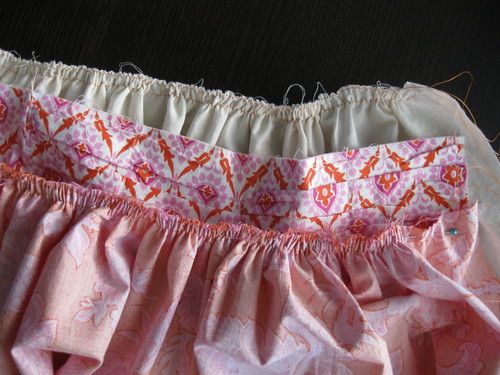
From bottom to top, here's a snapshot of the skirt layers. At bottom is the very wide Honey Child skirt outer. Next is my muslin lining, which I cut 6" narrower than the skirt outer. Up top is the tulle netting I bought for all of 50 cents at Hancocks. I cut it slightly shorter than the muslin so Aria wouldn't feel the tulle and approximately as wide as the muslin.
Next, I stitched 2 rows of gathering stitches at the top of each skirt layer. Then, I pulled the bobbin threads to gather the skirt layers until each was the same size as the waist of the bodice. At this point, I had 3 separate skirt layers - all gathered to the same width.
Now the Marissa pattern doesn't include a lining in the skirt at all. But, I figured out (by studying another part of the pattern) that I could make the inner bodice/skirt seam smooth and scratch-free by sewing the skirt layers and the bodice in this order.
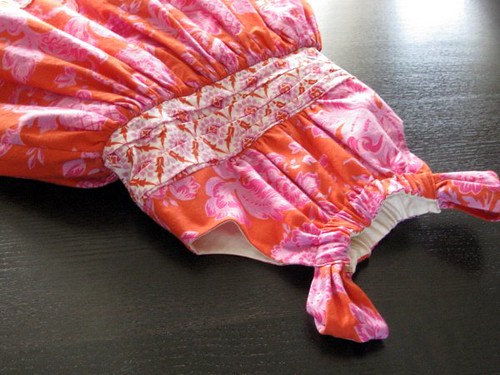
So, that's muslin skirt lining (right side up), bodice (right side up) and skirt outer (right side down). I made a fabric sandwich of these three pieces, aligned the raw edges and stitched my seam. I did not attach the tulle at this stage, because I wanted to minimize bulk at this seam. Here's the inside of the dress when I was finished:

See, no raw edges! They're stuck inside the layers of the skirt. Is it just me, or sometimes doesn't sewing feels like magic?
To attach the tulle, I pinned and stitched it directly to the muslin lining only, near the bodice/skirt seam where no one will see it. Yeah. Skirt is pleasantly puffy. Joyfully twirly. And, no scratchy tulle or saggy separate petticoat. Victory!
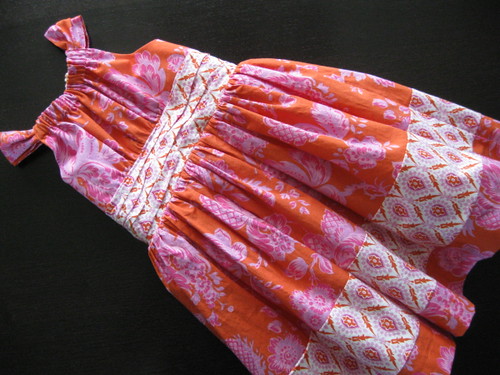
And now this pretty little thing is hanging in my bedroom awaiting the big day. Not sure why it's in my bedroom... But I do know that I have absolutely nothing to wear.
Oh, and she is too! Which is undoubtedly very, very important. Of course.
Backing up, this is the Sis Boom Marissa dress - my first experience with a full-fledged clothing pattern and my first dress. Without a doubt, it was a pleasant experience. Such clear, detailed instructions felt like someone holding my hand all the way through. I'm a clothing-making convert, yes-sirree.
Now, if you're looking for pictures of said daughter actually wearing the dress, you're out of luck. Or perhaps we're out of luck, cause I would like those pictures too. But worry not! I will be sure to snap some shots on Easter Sunday.
So why post now? Well, because I wanted to share my experience with putting in that tulle skirt lingin. My request for advice was met with some great tips (thanks again!), and I also heard that some of you are working on the same skirt-fluffifying project. So, here's a quick, not-tutorial on what worked for me!
From bottom to top, here's a snapshot of the skirt layers. At bottom is the very wide Honey Child skirt outer. Next is my muslin lining, which I cut 6" narrower than the skirt outer. Up top is the tulle netting I bought for all of 50 cents at Hancocks. I cut it slightly shorter than the muslin so Aria wouldn't feel the tulle and approximately as wide as the muslin.
Next, I stitched 2 rows of gathering stitches at the top of each skirt layer. Then, I pulled the bobbin threads to gather the skirt layers until each was the same size as the waist of the bodice. At this point, I had 3 separate skirt layers - all gathered to the same width.
Now the Marissa pattern doesn't include a lining in the skirt at all. But, I figured out (by studying another part of the pattern) that I could make the inner bodice/skirt seam smooth and scratch-free by sewing the skirt layers and the bodice in this order.
So, that's muslin skirt lining (right side up), bodice (right side up) and skirt outer (right side down). I made a fabric sandwich of these three pieces, aligned the raw edges and stitched my seam. I did not attach the tulle at this stage, because I wanted to minimize bulk at this seam. Here's the inside of the dress when I was finished:
See, no raw edges! They're stuck inside the layers of the skirt. Is it just me, or sometimes doesn't sewing feels like magic?
To attach the tulle, I pinned and stitched it directly to the muslin lining only, near the bodice/skirt seam where no one will see it. Yeah. Skirt is pleasantly puffy. Joyfully twirly. And, no scratchy tulle or saggy separate petticoat. Victory!
And now this pretty little thing is hanging in my bedroom awaiting the big day. Not sure why it's in my bedroom... But I do know that I have absolutely nothing to wear.