how to Organize your Quilt Project (without a Design Wall)
If your quilt-in-progress has blocks that interact with each other, you need some way to stay organized so that everything will match up at the end. Don’t have a design wall? No worries. Here’s how to easily organize your quilt project so it can be packed away and sewn in stops and starts, while keeping everything where it should be.
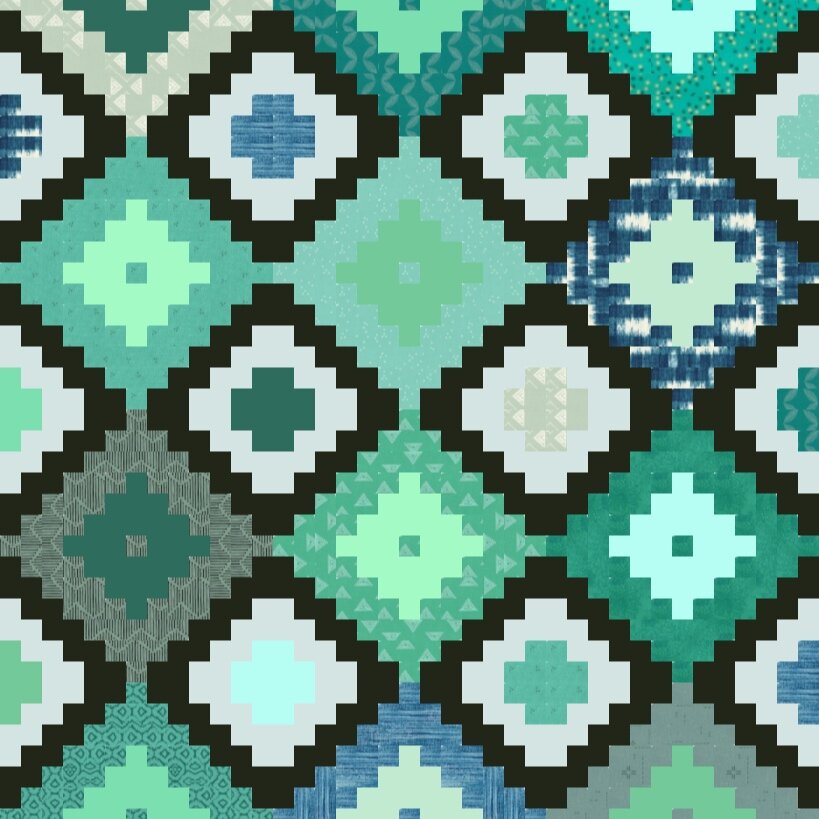
the Ikat quilt
Supplies
Paper (any kind) + a writing tool
Sewing pins
Glue stick
Your fabrics + cutting tools
Quilt pattern (here’s the Ikat quilt pattern)
Note: I have photographed this tutorial on my design wall for clear photos. The design wall is completely unnecessary. You can do this work on a table or floor, since the pieces are moveable once organized.
Step 1: Prepare Paper
We’re going to create an organization map for your quilt. Each block will be represented by a piece of paper.
To get started, how many quilt blocks will you have? I am organizing an Ikat quilt today, in throw size. It has 20 blocks total, though some are partial blocks. Prepare the same number of papers as quilts blocks and number them accordingly.
For visual reference, I cut some of my papers into squares, to represent my square, full-size quilt blocks. Other papers are rectangles to represent the partial blocks necessary at the edges of my quilt project. You might like to cut your papers into a representative shape too, but it’s not necessary.

Step 2: Prepare Fabric Swatches
What elements of your quilt should be planned in advance and/or interact with each other in some way? In this step you’ll create fabric swatches to represent those key elements.
For example, with the Ikat quilt, I’d like to plan the fabrics for the Ikat diamonds at the center of each block. This element is composed of two fabrics. I want to make sure my color choices for the Ikat diamonds are well-balanced and spread out throughout the quilt.

I start by pairing Ikat diamond fabrics in pleasing color combos. As per the pattern, I will need larger squares in the print fabric and smaller squares in the solids. Cut a few fabric pieces in the measurements required by your pattern to serve as fabric swatches in your project map. In this way, you’re also starting the cutting for your project!

The Ikat quilt also has plus shapes that are formed at the corners where blocks meet. I want these plus fabrics to match. That’s where my quilt map will come in super handy! While I cut swatches for the Ikat diamonds, I also cut little swatches for the plus shapes. Again, I’m cutting dimensions required by the pattern, so I’m essentially starting my project.

Are you mapping out interactive block elements like the Ikat plus shape? Cut multiple fabric pieces in the same fabric so that you can label papers with matching fabrics. For the Ikat quilt, I’m cutting stacks of 4 little squares, so I’ll be able to place a swatch at all 4 matching corners of my paper block map.
Sponsor of the Week
Fenceline Fabrics
Shop a gorgeous selection of Rifle Paper Fabrics in yardage and jelly rolls at Fenceline Fabrics.
quilting cottons + canvas + lawn


Step 3: Affix Fabrics
Now it’s time to map out your project. Use glue or sewing pins to affix fabric swatches to your block papers, in oder to map out your fabric placement plans.

When stacking fabrics, as with my Ikat diamond fabric choices, use a sewing pin to affix fabrics to the appropriate block paper. You’ll pin through the fabric stack and through the paper.

If you only need to affix one layer of fabric, as with my Ikat plus shapes, simply glue the fabric to the paper with regular stick glue. It will be easy to remove later on, I promise!
As you can see, I’ve placed matching Ikat plus fabrics at the corners of my blocks. When the paper quilt map is arranged in order like this, as a grid, it’s easy to see how the blocks connect. Later, when I’ve put everything away, this map will be essential!


If you are also organizing an Ikat quilt, I recommend that you place all of the Ikat diamond fabrics first, then place the plus shape fabrics. This way you can place the plus shape fabrics so that they are not nearby the matching diamond print fabric. Note that the Ikat partial blocks only need plus fabrics where they touch full-size Ikat blocks.
Step 4: Sew Blocks
Your map is now complete! You can stack the papers however you like, no need to keep them in order. Sew one block at a time, referencing each block paper for correct fabric placement. When each block is complete, pin the empty block paper to the finished block, to record the block’s number.

When all blocks are complete, arrange them in order according to paper numbers. Pretty snazzy - your fabrics are going to be exactly where you intended with no stress and no design wall needed!
This post is part of a blog series for the Ikat quilt sew-along. I hope it’s helpful for those of you sewing an Ikat quilt and also for anyone sewing a more complex quilt that benefits from a bit of advance planning!


