Sewing Room Strategies - Dedicated Room or Shared Space
Surprise! Today I’m sharing a sample from QuilterSpace, my online course for giving your sewing space a total makeover. In five modules, I guide you step-by-step through the process of decluttering, creating a vision, establishing work stations, using your space efficiently and implementing storage ideas for fabric, scraps, notions, patterns, unfinished projects, upcoming projects and much, much more.
Sign up today and you can start your personal QuilterSpace journey anytime this April. Want more details? Find out more right here.
Enjoy this excerpt!

Furnish: Strategize
In this module of QuilterSpace, we will take a close look at the furnishings in your sewing space. We’ll discuss work spaces, storage stations, design walls and more. Before we do, let’s step back and think big picture about how you are using your space.
a Dedicated Room
Lucky you! In your dedicated room, you have great flexibility. How you arrange your furnishings can make such a big impact. Here are some basic ideas that might improve your space. Try to have an open mind about where you might want to make changes.
First Sight: When you stand at the door to your room, what do you see first? Place something inviting and inspiring such as a design wall or fabric storage shelf in your initial line of sight. This gives you a positive feeling right from the get go.
Flow: As you step into the room, does your path feel blocked? Can you freely walk around the space without getting stuck? Think of creating an open path for your energy to flow around the room. Road blocks may seem logically insignificant, but they tend to create a subtle trapped feeling.
View: When sewing or cutting, can you see the door? It’s not considered good feng shui to work with your back to the door. You want to be able to see someone entering the space in order to feel most at ease. This also allows you to welcome visitors.
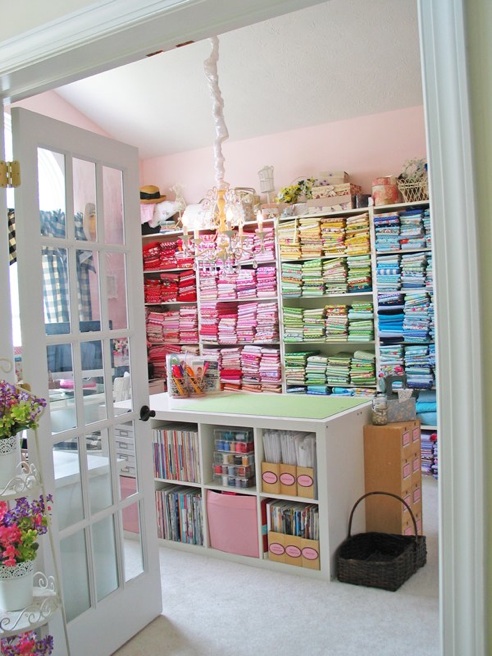
sewing studio by Olabelhe
Example: A colorful fabric display makes an inviting entry to this sewing studio by Olabelhe. Energy flows freely around the cutting table, which is oriented with a clear view of the door.
Design Wall: I’m going to insist that you need a design wall, especially if you have a dedicated room! We’ll talk about options later in this module. For now, be thinking about its location. Your design wall should be viewable when seated at your sewing table. Ideally, it is also in a location with good light.
Storage: Where in the room should storage be located? Avoid areas with direct light, which can fade fabric or books. Cabinets, shelves, drawers and floating shelves are all useful options. We’ll talk more about this soon!
Display: Besides practical storage, designate a spot for placing an upcoming project or two, perhaps a new fabric stack or a ruler that you’d like to try next. Displaying something coming soon can be a great motivator. It sets a positive tone and keeps the idea in mind. An attractive basket or single dedicated shelf might be a simple solution.
a Shared Space
Does your creative space cohabitate with your dining room, living room, guest room or other common area? Here are some strategies for managing this balancing act.
Keep Out: I urge you to decide on a few basics that you keep out at all times. Doing so creates the opportunity for short, spur-of-the-moment sewing sessions because it’s not so daunting to get started. It also establishes that sewing is a priority in your life. There’s no need to hide it! Integrate your hobby by establishing a permanent home for your sewing machine, pressing station and essential tool caddy. For example, your sewing machine could live on one end of the dining table alongside a handsome hinged box for your essential tools, and your pressing station might land on a buffet behind you. A table top ironing board or flat pressing mat are all you need to flourish! No need for a bulky, full-sized ironing board.
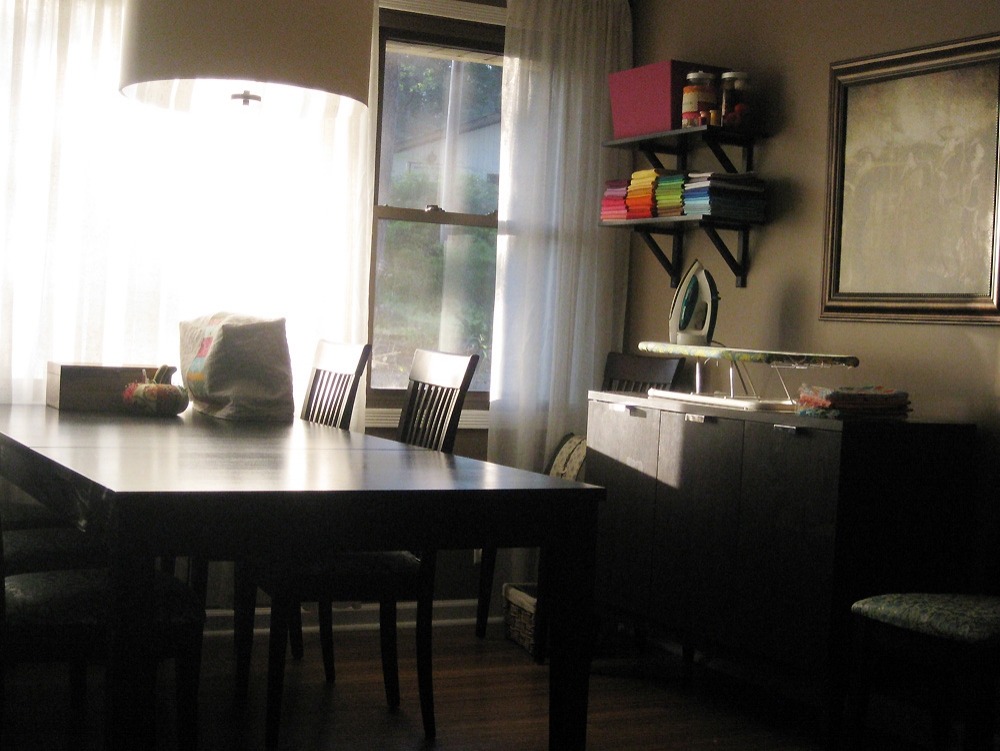
my sewing/dining room, 2011
Store Away: Given space constraints, you likely need to store away your cutting mat, works in progress, fabric thread and misc. supplies. Consider stashing large, flat cutting mats behind a piece of furniture (sandwiched against the wall) or under a bed or sofa. If practical, find containers for utilizing all the space under beds or sofas for storage. Is your dining hutch full of rarely-used items? Maybe you can convert it into sewing storage? With a mix of display shelves and closed storage, dining hutches actually make great sewing cabinets! If anything must be stored out of the room, keep it as close as possible.
Use a Wall: Ask yourself, can just one wall in your shared space be dedicated to sewing? Since your sewing machine is going to stay out, no one is going to be confused to see more evidence of your hobby. Think attractive elements like a design wall (it’s rotating art!) or tidy fabric storage on shelves. We’ll talk more about how to use walls soon.
Consider Room Division: Sometimes you can create more space by dividing a room. For example, you might create a sewing “nook” on one side of your living room or guest room. Try a cubby shelf as a room divider, adding storage at the same time. To further visually separate the spaces, use a large rug to anchor the non-sewing living area.

image by Patrick Johansson
In a Guest Room: If your room has a built-in closet, you can makeover the closet as a work space. The “nook” nature of a closet naturally sets it apart from the rest of the room. Consider removing closet doors entirely if they waste space.
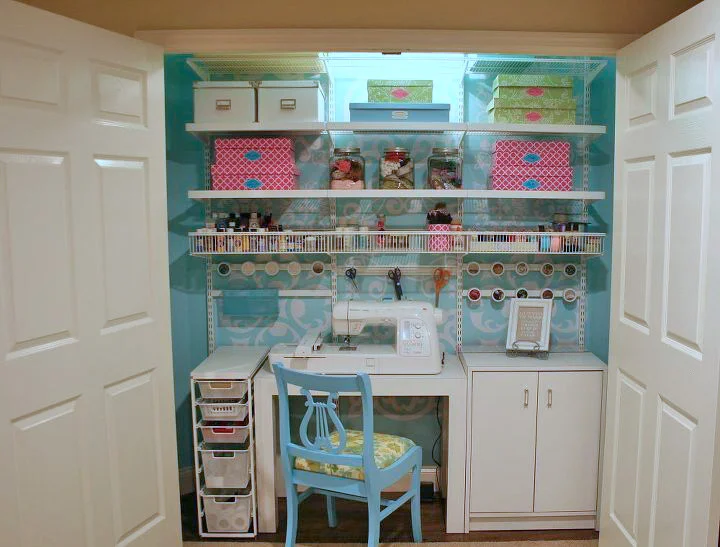
closet makeover by DIY Design by Judy
If, instead you will be using the closet as storage space, you have the advantage of ample hidden storage. For your work space, use an attractive desk and chair. Then, when you actually have guests, it will look the part of a spare room when you clear the desk for their visit. Don't forget to use under-bed storage!
Try Satellite Sewing: If no one space will suit you, consider using two spaces: one for storage and one for sewing. A storage space might be a spare room closet or basement. Here you keep your notions, fabric stash and works-in-progress. The sewing space is in a well-lit location, perhaps in the midst of a lively home, where you enjoy working. Here you’d keep your sewing machine, pressing station and essential tool caddy out and ready to use. Add a basket for your current WIP - a great way to transport your project between spaces.
I hope this has sparked some actionable ideas for rethinking your space. I have found that little changes to what you keep out, what you put away and where you work can actually make all the difference. If your basic set up is not flowing for you, please try something new!
Create your QuilterSpace this Spring!
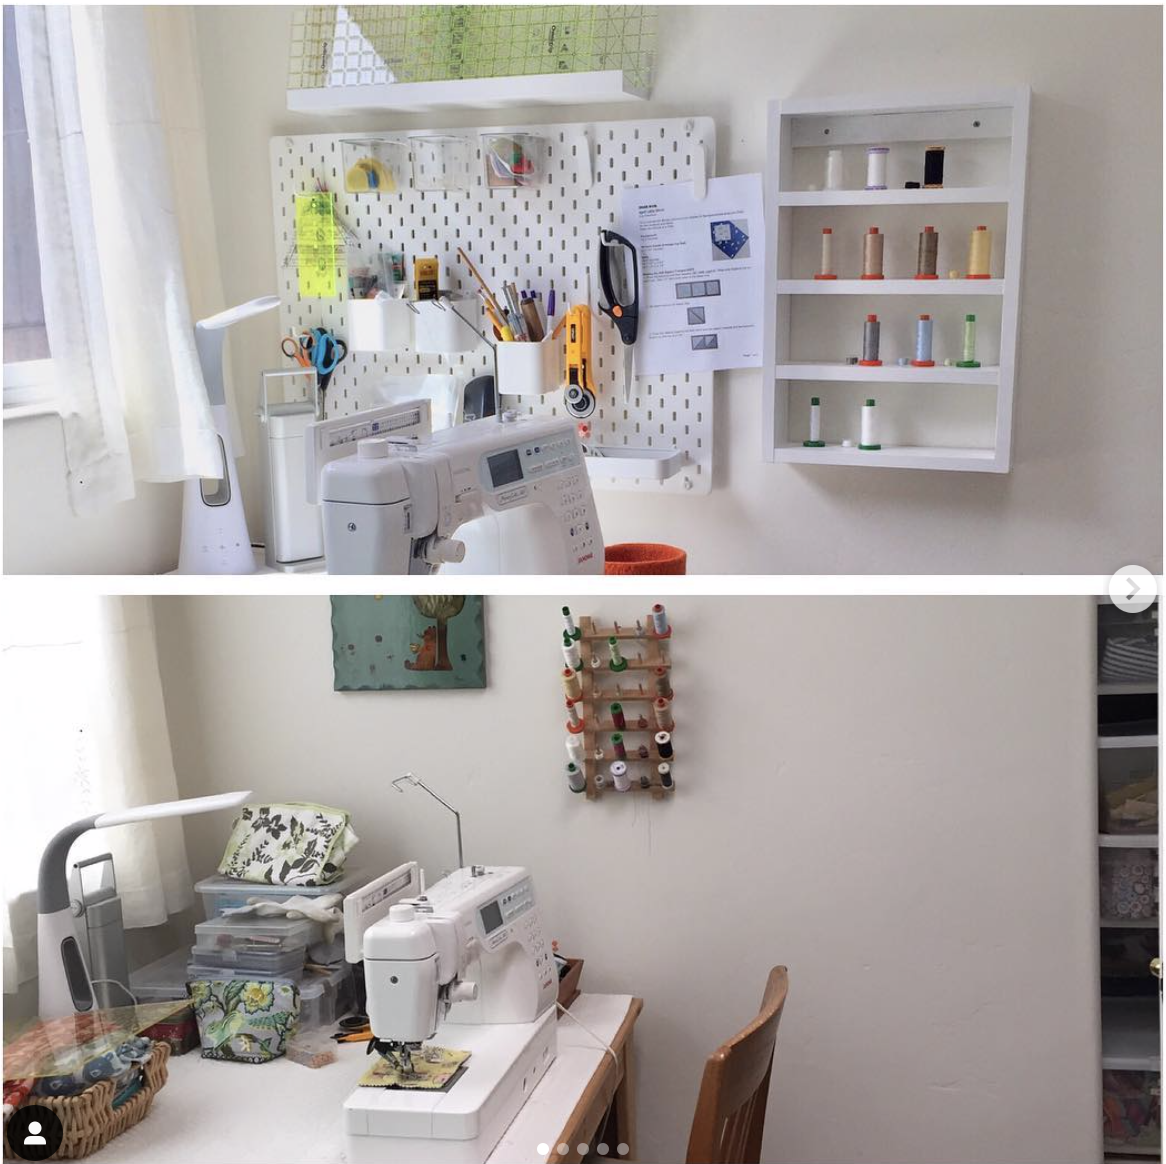
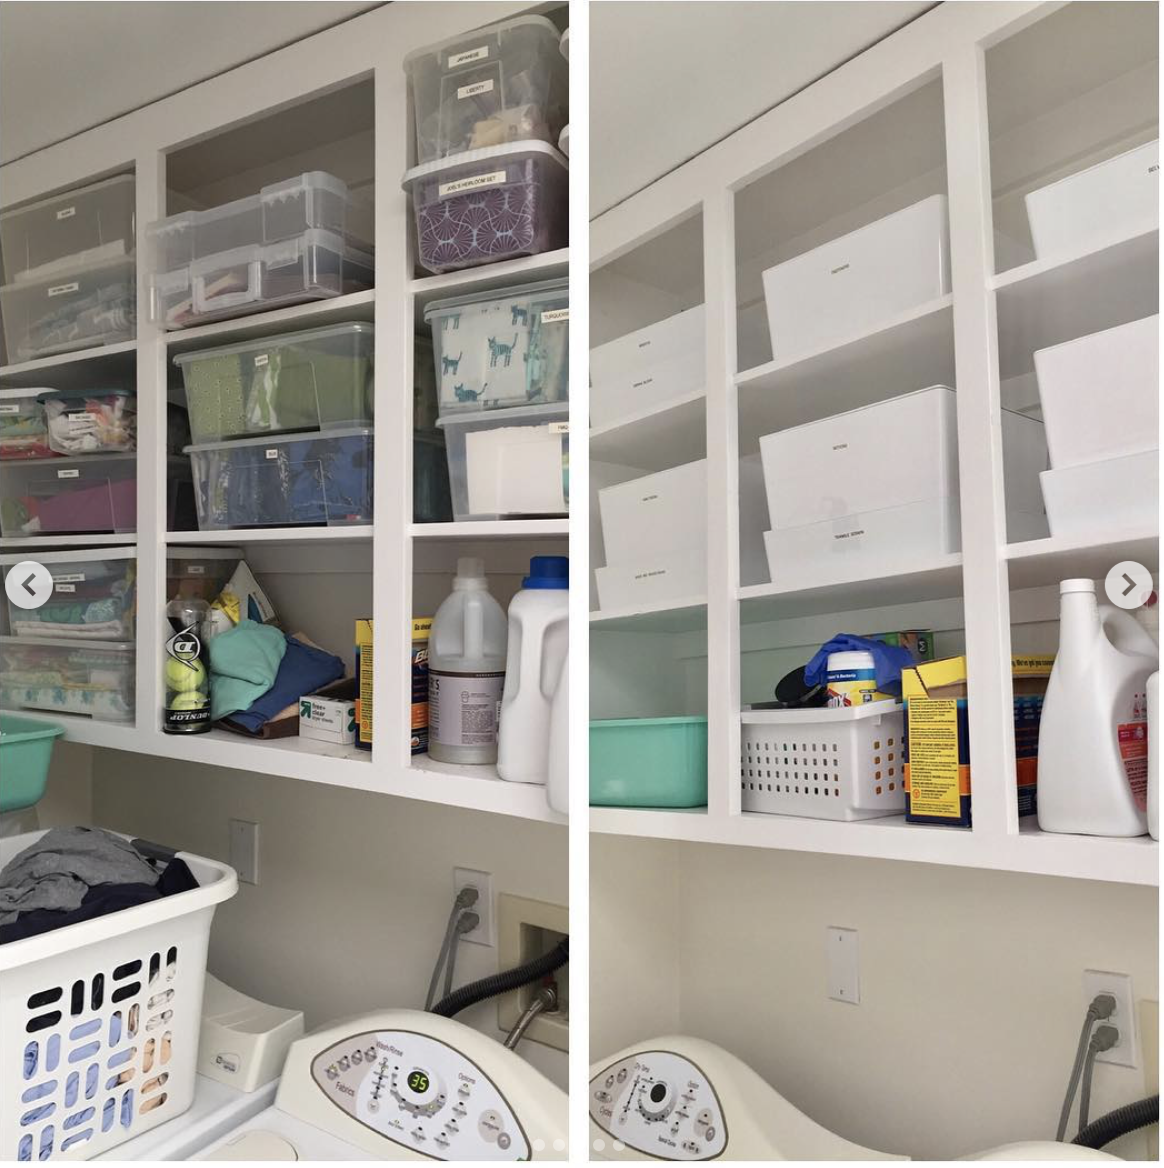
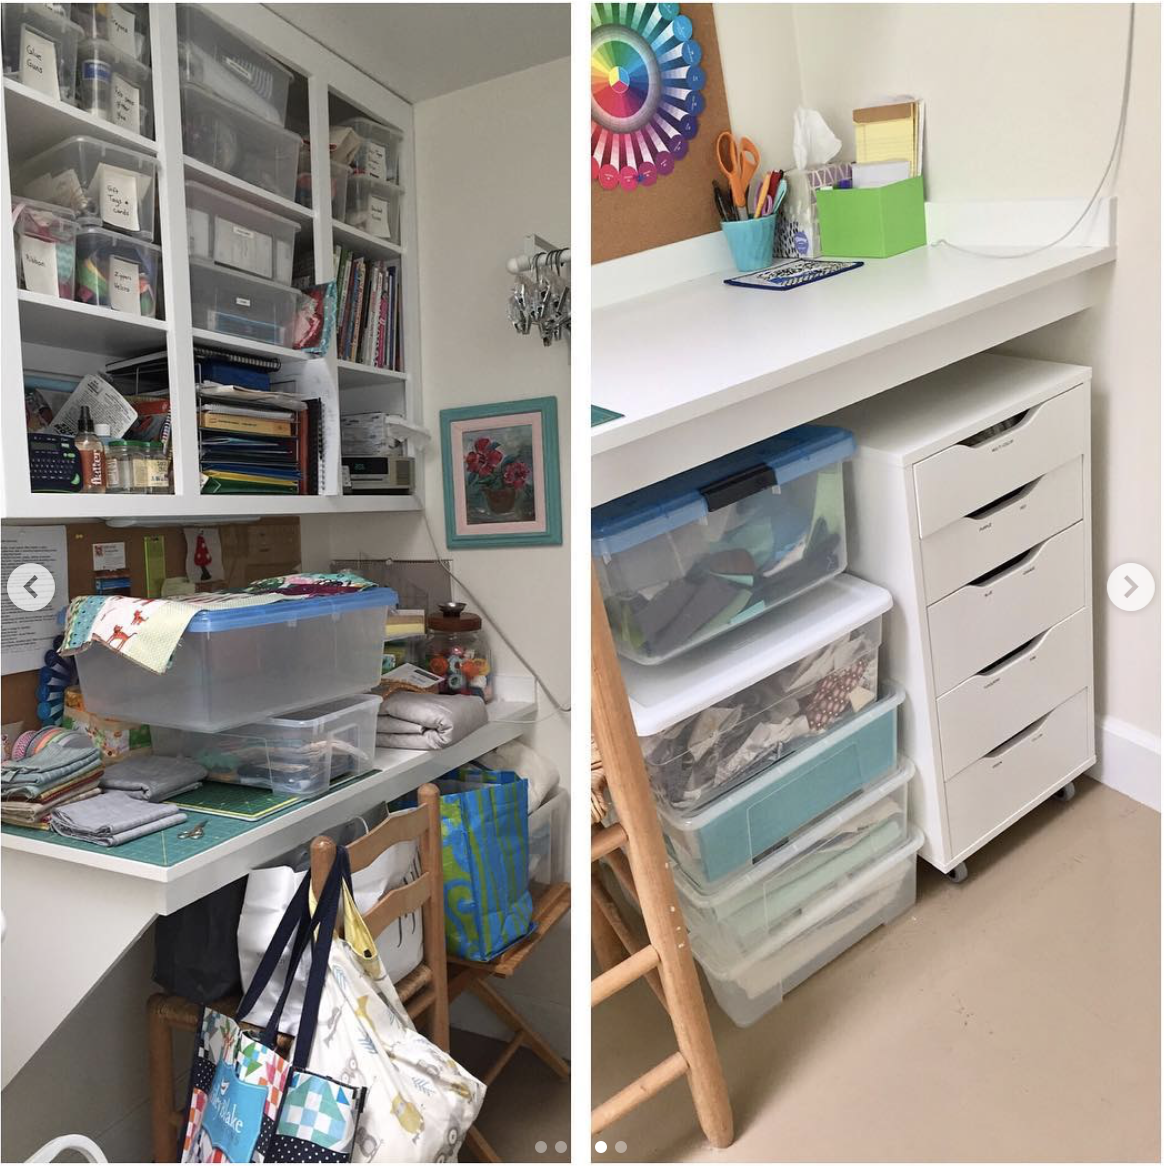
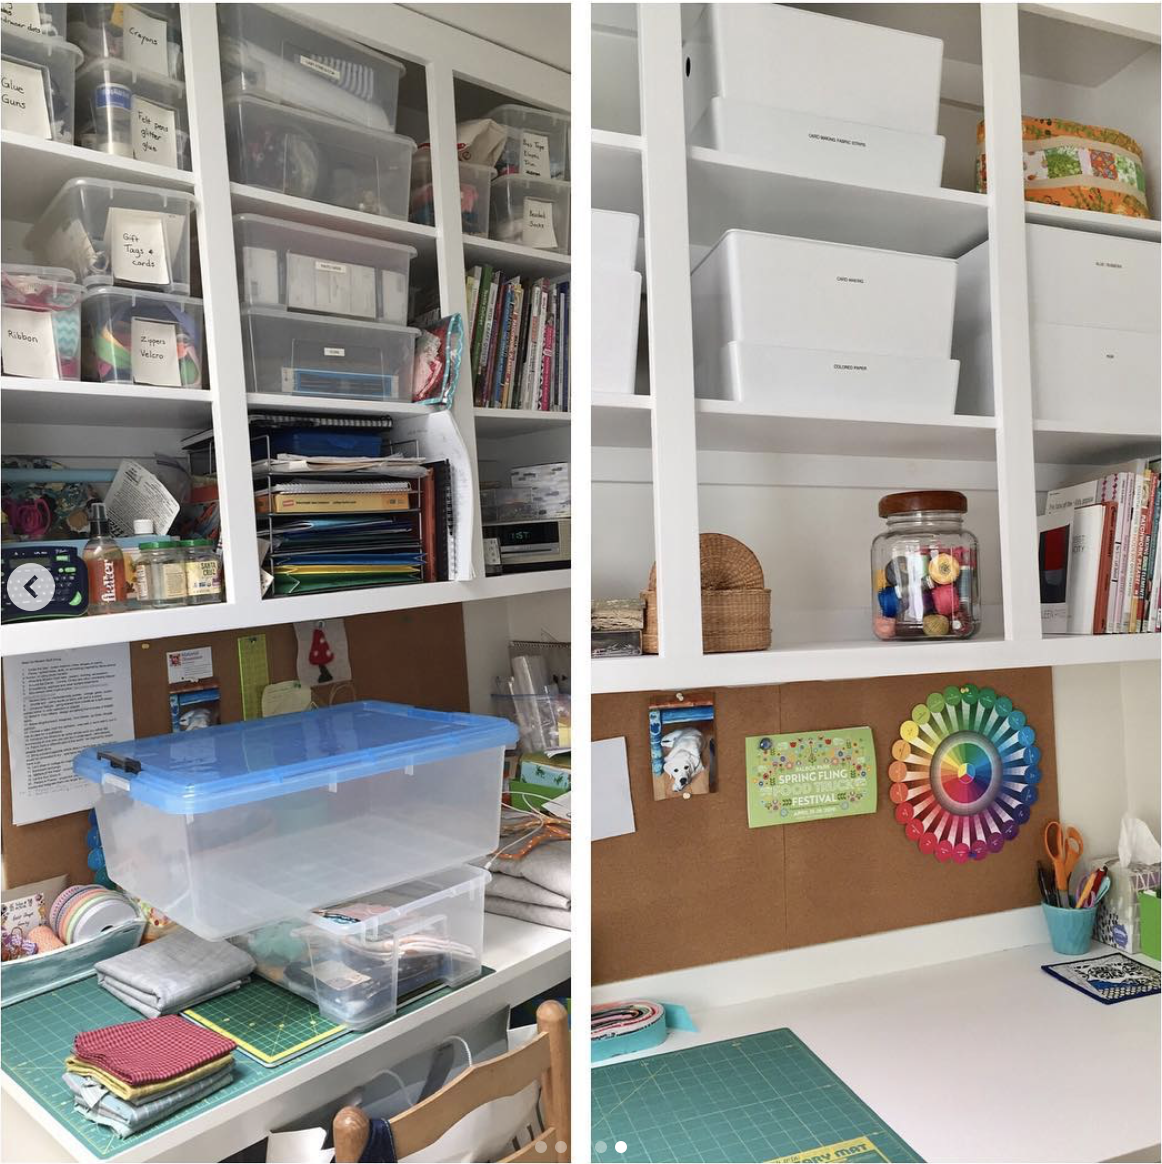
Pam Sadler just finished her QuilterSpace transformation. Fortunately, she took before and after photos, which are such fun to see!
“The class was great! I consider myself fairly organized, but the class filled in all the blanks for me, from start to finish. I also used IKEA products, happy there. My only continued challenge, is having a bit more WIP than I want, and feel like I need time to see which ones to keep and which ones not. Thanks so much for the class, totally worth every cent!”
Wow, your space is so much more functional and zen. Thanks for sharing, Pam! I wish you such peace and joy as you stitch in your lovely new room!!!