the Half Rectangle Triangle
Have you sewn a half rectangle triangle block? It's the stretched out cousin to the half square triangle. I don't know if I've sewn one before, but if I did it was definitely not an independent design. I love the shape and am looking forward to getting cozy with its construction.
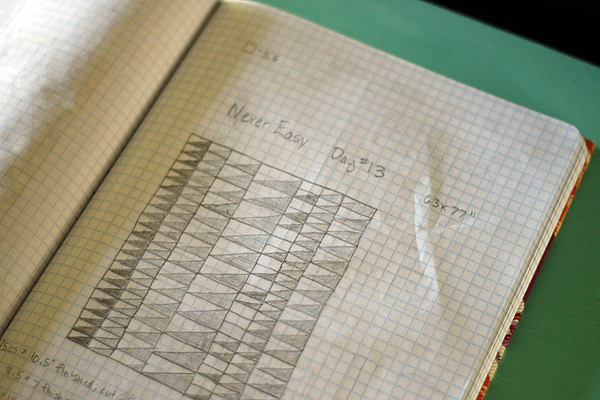
Today I sat down with this sketch to begin work on my new quilt, the one I mentioned on Friday was all "angles and drama." I'll be using those Loominous II fabrics! Before I could start cutting I needed to get a general idea of my construction approach. Luckily, my first internet search led to Heidi's post at Buttons & Butterflies which summarizes different construction approaches to the half rectangle triangle block.

Generally, I agreed with Heidi on construction approach. You can find another tutorial of the approach she and I are using right here. Unfortunately this approach calls for marking 4 points and drawing 2 lines per rectangle set. That's too much prep for my taste. On my first test rectangle set, I only marked 2 points and drew 1 line, all on the top fabric (the gray plaid above), leaving the bottom fabric (mint green) alone. For orienting the blocks I aimed to set things up so that I would be able to start and end my stitch lines where the raw edges of the fabrics meet, which is a concept that will be quite familiar to my Angled students. It always helps with sewing points!

Before sewing, I fitted my machine with a brand new size 10 needle. Some of these wovens are fine (like shot cottons), so a smallish needle seems wise. I also set my stitch length to 1.5; whereas, I normally sew at 2.

Here's my first pair of half rectangle triangle blocks. The construction method worked, but they ended up quite a bit smaller than I expected based on the tutorial's guidelines. Also, I decided I need to slant all my angles for this quilt in the opposite direction so that I can create the same effect as my sketch. You'll see, if you compare these blocks and my sketch, that these are reversed in the orientation of the slant. I feel the opposite slant has more of a sharp, contrary feel, almost a backward-pointing feel, which is what I'm going for in a quilt meant to capture the fact that some things are "Never Easy."
Now I'm going to be fiddling with cut sizes until I land on the right size rectangles to yield the desired finished block sizes. Wonder how I even start with that? After I've sketched a quilt on graph paper, I begin to bring it to life by deciding on the scale for the drawing. In this case, in order to yield a throw quilt from this sketch, I've decided that each graph square is equal to 3.5". Based on that scale, my quilt will finish 63" x 77". Next I look at each block to see what size it was drawn. Today I'm working on row 3, which has blocks that should finish 5.25" x 10.5". (I've purposely drawn a 1:2 ratio in height vs. width for the dimensions of my half rectangle triangle blocks.) My second batch of test blocks demonstrated that cutting rectangles 6.5" x 11.5" will yield blocks that trim nicely to 5.75" x 11", which of course will finish at 5.25" x 10.5", as desired.
Yes, that's quilt math! I don't mind it at all, if I know where to start. And, if I don't know where to start, the internet is always there to help. I'll keep you posted on how things progress!
Today I sat down with this sketch to begin work on my new quilt, the one I mentioned on Friday was all "angles and drama." I'll be using those Loominous II fabrics! Before I could start cutting I needed to get a general idea of my construction approach. Luckily, my first internet search led to Heidi's post at Buttons & Butterflies which summarizes different construction approaches to the half rectangle triangle block.
Generally, I agreed with Heidi on construction approach. You can find another tutorial of the approach she and I are using right here. Unfortunately this approach calls for marking 4 points and drawing 2 lines per rectangle set. That's too much prep for my taste. On my first test rectangle set, I only marked 2 points and drew 1 line, all on the top fabric (the gray plaid above), leaving the bottom fabric (mint green) alone. For orienting the blocks I aimed to set things up so that I would be able to start and end my stitch lines where the raw edges of the fabrics meet, which is a concept that will be quite familiar to my Angled students. It always helps with sewing points!
Before sewing, I fitted my machine with a brand new size 10 needle. Some of these wovens are fine (like shot cottons), so a smallish needle seems wise. I also set my stitch length to 1.5; whereas, I normally sew at 2.
Here's my first pair of half rectangle triangle blocks. The construction method worked, but they ended up quite a bit smaller than I expected based on the tutorial's guidelines. Also, I decided I need to slant all my angles for this quilt in the opposite direction so that I can create the same effect as my sketch. You'll see, if you compare these blocks and my sketch, that these are reversed in the orientation of the slant. I feel the opposite slant has more of a sharp, contrary feel, almost a backward-pointing feel, which is what I'm going for in a quilt meant to capture the fact that some things are "Never Easy."
Now I'm going to be fiddling with cut sizes until I land on the right size rectangles to yield the desired finished block sizes. Wonder how I even start with that? After I've sketched a quilt on graph paper, I begin to bring it to life by deciding on the scale for the drawing. In this case, in order to yield a throw quilt from this sketch, I've decided that each graph square is equal to 3.5". Based on that scale, my quilt will finish 63" x 77". Next I look at each block to see what size it was drawn. Today I'm working on row 3, which has blocks that should finish 5.25" x 10.5". (I've purposely drawn a 1:2 ratio in height vs. width for the dimensions of my half rectangle triangle blocks.) My second batch of test blocks demonstrated that cutting rectangles 6.5" x 11.5" will yield blocks that trim nicely to 5.75" x 11", which of course will finish at 5.25" x 10.5", as desired.
Yes, that's quilt math! I don't mind it at all, if I know where to start. And, if I don't know where to start, the internet is always there to help. I'll keep you posted on how things progress!