Penny Patch: Straight Line Quilting
This post is part of a series {Penny Patch} a Beginner’s Quilt-Along. You can join in anytime, even if you’re not a beginner! Please see this page for links to all posts, and join us on Flickr to share your questions and work-in-progress!
 So we've finished that top, prepared a backing and basted.... Now it's time to quilt all three layers together. Quilting stabilizes the batting so it won't shift and bunch over the years. More quilting = a more durable quilt. I know it's time-consuming, but try not to scrimp at this stage.
For beginners I recommend straight-line quilting. This is just sewing as usual, though you really need a walking foot to do it successfully. Without a walking foot, your sewing machine pulls fabric from the bottom only. When you're quilting a thick quilt, this uneven feeding will easily cause puckers and bunching. A walking foot pulls the fabric from the top as well. I promise it will come in handy on countless projects!
Quilting Tips
**For truly straight lines, you must mark your quilting path in some way. You could mark with a hera marker crease (must have good lighting to use this product), a water soluble pencil or a strip of masking tape. I find the hera marker quick and accurate.
**Use a long stitch length such as 3 or 4. This saves thread and tends to reduce puckers.
**Use a walking foot if at all possible!
**Start with a fresh needle if you can't remember when you changed it last.
**Go slow. With some machines, a slower pace produced better stitch quality.
**To prevent quilting drag, alternate the traveling direction of quilting lines and quilt in a loose grid, which you'll later fill in. The loose grid stabilizes the entire quilt to prepare for denser quilting. The denser your quilting, the easier it is to gradually pull the fabrics one way. See here for more details.
**Start/stop quilting just off the edge of the quilt on the batting whenever possible.
**If you need to start quilting from the center for some reason (bobbin runs out, undoing a short mistake), resume quilting about an inch back on the "good quilting" line so that you double-quilt a short bit. You can choose to make a little backstitch (easy to do, but possibly slightly messy from the back) or pull up the bobbin-thread and resume quilting with a very short stitch that gradually returns to your regular length.
Your Quilting Pattern
Not sure how you want to quilt your Penny Patch? It just so happens that my friend Jolene of Blue Elephant Stitches quilted her Penny Patch in just the way I was going to suggest - an all-over diamond grid:
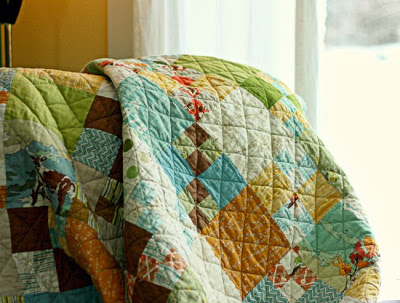
Notice how this quilting pattern creates an "X" over each of the 3" square quadrants in the 4-Penny Patch block. To do this pattern, first mark and quilt your straight lines so as to make a giant X in each 6" finished block. By quilting the entire quilt in this way, you will stabilize the fabrics and minimize quilt drag or puckers. Then, go back and quilt more densely filling in the small diamond grid.
Another good option is shared by Svetlana of s.o.t.a.k. handmade. She quilted at 1/4" on each side of the seam lines of the blocks like so:
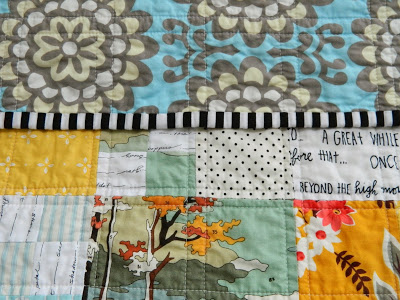
This quilting pattern makes a cross in the center of the 6" blocks. Visit her post to see more!
Hope this gets you off and running! Don't forget to take breaks when you need, and when you make mistakes, remember that quilting is just fun and games! Mistakes can be so frustrating at the time, but when it's all done and washed you'll have a whole new perspective. Mistakes will mean so little. Your penny patch quilt will keep you warm and cozy!
I'll be back tomorrow to share some tips for free motion quilting!
So we've finished that top, prepared a backing and basted.... Now it's time to quilt all three layers together. Quilting stabilizes the batting so it won't shift and bunch over the years. More quilting = a more durable quilt. I know it's time-consuming, but try not to scrimp at this stage.For beginners I recommend straight-line quilting. This is just sewing as usual, though you really need a walking foot to do it successfully. Without a walking foot, your sewing machine pulls fabric from the bottom only. When you're quilting a thick quilt, this uneven feeding will easily cause puckers and bunching. A walking foot pulls the fabric from the top as well. I promise it will come in handy on countless projects!
Quilting Tips
**For truly straight lines, you must mark your quilting path in some way. You could mark with a hera marker crease (must have good lighting to use this product), a water soluble pencil or a strip of masking tape. I find the hera marker quick and accurate.
**Use a long stitch length such as 3 or 4. This saves thread and tends to reduce puckers.
**Use a walking foot if at all possible!
**Start with a fresh needle if you can't remember when you changed it last.
**Go slow. With some machines, a slower pace produced better stitch quality.
**To prevent quilting drag, alternate the traveling direction of quilting lines and quilt in a loose grid, which you'll later fill in. The loose grid stabilizes the entire quilt to prepare for denser quilting. The denser your quilting, the easier it is to gradually pull the fabrics one way. See here for more details.
**Start/stop quilting just off the edge of the quilt on the batting whenever possible.
**If you need to start quilting from the center for some reason (bobbin runs out, undoing a short mistake), resume quilting about an inch back on the "good quilting" line so that you double-quilt a short bit. You can choose to make a little backstitch (easy to do, but possibly slightly messy from the back) or pull up the bobbin-thread and resume quilting with a very short stitch that gradually returns to your regular length.
Your Quilting Pattern
Not sure how you want to quilt your Penny Patch? It just so happens that my friend Jolene of Blue Elephant Stitches quilted her Penny Patch in just the way I was going to suggest - an all-over diamond grid:
Notice how this quilting pattern creates an "X" over each of the 3" square quadrants in the 4-Penny Patch block. To do this pattern, first mark and quilt your straight lines so as to make a giant X in each 6" finished block. By quilting the entire quilt in this way, you will stabilize the fabrics and minimize quilt drag or puckers. Then, go back and quilt more densely filling in the small diamond grid.
Another good option is shared by Svetlana of s.o.t.a.k. handmade. She quilted at 1/4" on each side of the seam lines of the blocks like so:
This quilting pattern makes a cross in the center of the 6" blocks. Visit her post to see more!
Hope this gets you off and running! Don't forget to take breaks when you need, and when you make mistakes, remember that quilting is just fun and games! Mistakes can be so frustrating at the time, but when it's all done and washed you'll have a whole new perspective. Mistakes will mean so little. Your penny patch quilt will keep you warm and cozy!
I'll be back tomorrow to share some tips for free motion quilting!