Penny Patch: Link Party & Tutorial
This post is part of a series {Penny Patch} a Beginner’s Quilt-Along. You can join in anytime, even if you’re not a beginner!
Please see this page for links to all posts, and join us on Flickr to share your questions and work-in-progress!
 Morning, friends! Today is our first link party. What's that you ask? It's a way to share our works-in-progress right in this blog post. Anyone anywhere can upload a photo from their computer or share a photo already living somewhere online. We want to see where you're at with your Penny Patch quilt, whether you've just chosen fabrics, finished cutting, are sewing up blocks or zipping ahead to the finishing stages. Show us yours!
Now, a little birdy told me that these link party's aren't always so user-friendly for first timers. Need help? Scroll down past the links to find a Link Party Tutorial!
After you add yours, I hope you'll have some time to visit some other quilt-alongers!
::Add an Image from your Computer::
First size your image so it's not humungous. All images must be 1 MB or less. Scroll down to the bottom of the images in the link party. Find and click the blue "Add your link" button.

When you click that button, these other fields appear. Leave the first field (URL) blank. Fill in your name and email address. This name will appear under your image, so use your preferred online identity. Then click "Next step!"

A new page appears with this blue background and white box. Select "Browse" and navigate to your image on your computer.
 >
>
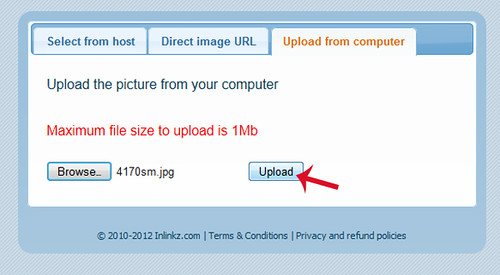
When you select your image, you'll find yourself here again. Notice that your image name is shown to the right of the Browse button (mine is called 4170sm.jpg). Now click "Upload".
Now you'll be back here at the Stitched in Color website. Your image is "processing", so be patient. Try refreshing this page in about a minute and you should see it at the bottom of the link party! All done.

::Add an Image that Lives Online::
If your image is already loaded to a blog post, Flickr, Facebook, Instagram or anywhere online, you should be able to add it to the link party by copy and pasting the URL of the page where it lives. I tested this with Blogger (copy the blog post that the image is displayed in) and with Flickr (copy the image URL via Flickr's "grab the link").
Scroll down to the bottom of the images in the link party. Find and click the blue "Add your link" button. When you click that button, these other fields appear. Paste your URL in the first field. In the link party, people will be able to go to this URL when they click on your image. It's a fun way to direct people to your blog! Also fill in your name and email address. This name will appear under your image, so use your preferred online identity. Then click "Next step!"

Now you'll be brought to a new page with a blue background. The software will detect all the images it can find at the URL you provided. Since I used a blog post URL from Stitched in Color, this is what shows up. Click "select" under the image that you want to use.

This page comes next. Just click "skip this step" to skip these options and move on.

Now you'll be back here at the Stitched in Color website. Your image is "processing", so be patient if it doesn't show up right away. Try refreshing this page in about a minute and you should see it at the bottom of the link party! By the way, see that red "x" under your image? You can use that to delete your image if you'd like to start over.

Hope that helps!
Morning, friends! Today is our first link party. What's that you ask? It's a way to share our works-in-progress right in this blog post. Anyone anywhere can upload a photo from their computer or share a photo already living somewhere online. We want to see where you're at with your Penny Patch quilt, whether you've just chosen fabrics, finished cutting, are sewing up blocks or zipping ahead to the finishing stages. Show us yours!Now, a little birdy told me that these link party's aren't always so user-friendly for first timers. Need help? Scroll down past the links to find a Link Party Tutorial!
After you add yours, I hope you'll have some time to visit some other quilt-alongers!
::Add an Image from your Computer::
First size your image so it's not humungous. All images must be 1 MB or less. Scroll down to the bottom of the images in the link party. Find and click the blue "Add your link" button.
When you click that button, these other fields appear. Leave the first field (URL) blank. Fill in your name and email address. This name will appear under your image, so use your preferred online identity. Then click "Next step!"
A new page appears with this blue background and white box. Select "Browse" and navigate to your image on your computer.
>When you select your image, you'll find yourself here again. Notice that your image name is shown to the right of the Browse button (mine is called 4170sm.jpg). Now click "Upload".
Now you'll be back here at the Stitched in Color website. Your image is "processing", so be patient. Try refreshing this page in about a minute and you should see it at the bottom of the link party! All done.
::Add an Image that Lives Online::
If your image is already loaded to a blog post, Flickr, Facebook, Instagram or anywhere online, you should be able to add it to the link party by copy and pasting the URL of the page where it lives. I tested this with Blogger (copy the blog post that the image is displayed in) and with Flickr (copy the image URL via Flickr's "grab the link").
Scroll down to the bottom of the images in the link party. Find and click the blue "Add your link" button. When you click that button, these other fields appear. Paste your URL in the first field. In the link party, people will be able to go to this URL when they click on your image. It's a fun way to direct people to your blog! Also fill in your name and email address. This name will appear under your image, so use your preferred online identity. Then click "Next step!"
Now you'll be brought to a new page with a blue background. The software will detect all the images it can find at the URL you provided. Since I used a blog post URL from Stitched in Color, this is what shows up. Click "select" under the image that you want to use.
This page comes next. Just click "skip this step" to skip these options and move on.
Now you'll be back here at the Stitched in Color website. Your image is "processing", so be patient if it doesn't show up right away. Try refreshing this page in about a minute and you should see it at the bottom of the link party! By the way, see that red "x" under your image? You can use that to delete your image if you'd like to start over.
Hope that helps!