Quilt Backings
So, here's the thing - I rarely give the quilt back any thought until my quilt top is completely finished. Nope, I don't plan ahead. I'll actually say to myself "tomorrow I'll baste this top" and not even consider if I have fabrics on hand for backing. When I go to baste, sometimes I realize I need to order yardage and have a bit of a "duh" moment. But, most times I will make do with fabric in my stash.
As I mentioned earlier this week, I buy most prints in 1/2 yard cuts, which won't go far for backings. I have a few larger cuts stashed away, including a few 3 yard cuts of Kona since solids are the one thing I know will never sit idle for long. Most of my backings are improvisationally pieced based on fabrics on hand.
Today I thought I'd walk you through how my backing for the Modern Medallion quilt came to be. It's nothing fancy, but sometimes it's helpful to hear someone's process, right?

To start on a backing, I usually lay the quilt top on the floor as a reference point. In this picture, it's off to one side to show me how tall my backing needs to be. This quilt is a square, so I can visually estimate from there.

After fishing through my stash, I pulled this Flea Market Fancy Seedpod Stripe, a fabric I had used a tiny bit on the quilt top. This red/orange/blue/brown color scheme is not something I figured would be very versatile for my stash and I had almost a yard cut left. Perfect!

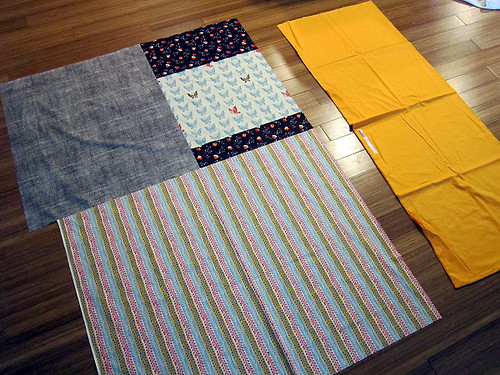
Turns out, one of my 3-yard Kona cuts was Kona Papaya, which coordinates nicely with Flea Market Fancy. I laid the orange fabric out beside my 1 yard cut of Seedpod Stripe, and found that what remained to be filled was a modestly-sized section at the upper left.
If you take a look at this picture again, you'll see that I added the Momo butterfly fat quarter next (which just happens to exactly match Seedpod Stripe), then the chocolate Heath and lastly Flea Market Fancy Posie Brown, since the butterfly print was not large enough vertically to fill the space.
I'll admit that I hesitated at this point, since the back had turned out to carry such a different color scheme than the front of my quilt. I decided that since the Flea Market Fancy collection unites the front and back, it was good enough for me. And that's the thing about color - each of us gets to decide what we like. And we're the expert on that!

Now that my backing fabrics were laid out, the next step was to trim up the fabrics that I planned to use in their entirety. So, the Seedpod Stripe and the Momo butterfly fabrics - each of those I planned to have take up as much space as possible on the quilt back. Here I am squaring up the butterfly fat quarter so it's ready to be worked with.

Next, I added Posie Brown fabric to the butterfly print. How much Posie Brown? I measured Seedpod Stripe + Momo Butterfly to see how long they were combined and subtracted that number from the total length of the quilt top. The difference is how much Posie Brown I should add. And... I made a mistake here, so I ended up adding Posie Brown on both sides of the butterfly to fix my mistake. Which turned out to be an improvement!
The Chocolate Heath went in next, sewn to the Posie Brown/Butterfly block. I added enough Heath to make this segment as wide as my Seedpod Stripe, and then pieced the upper segment to the Seedpod Stripe.

Now in the homestretch - just need to add that Kona Papaya! With my large cut of Papaya, cutting would be easiest on the floor. I slid my mat under the fabric and cut it just long enough to equal my work in progress. No math!

Before piecing, I wanted to trim off some Papaya so that the long strip was only as wide as required for the finished quilt back. Here I've folded my length of Papaya on my cutting mat to rotary cut it to width. For tips on how to fold, square up and cut yardage with your rotary mat, see steps 1-6 on this Colorbrick tutorial.
And that's a wrap! Hope this was helpful. Now I'm hand quilting...
As I mentioned earlier this week, I buy most prints in 1/2 yard cuts, which won't go far for backings. I have a few larger cuts stashed away, including a few 3 yard cuts of Kona since solids are the one thing I know will never sit idle for long. Most of my backings are improvisationally pieced based on fabrics on hand.
Today I thought I'd walk you through how my backing for the Modern Medallion quilt came to be. It's nothing fancy, but sometimes it's helpful to hear someone's process, right?
To start on a backing, I usually lay the quilt top on the floor as a reference point. In this picture, it's off to one side to show me how tall my backing needs to be. This quilt is a square, so I can visually estimate from there.
After fishing through my stash, I pulled this Flea Market Fancy Seedpod Stripe, a fabric I had used a tiny bit on the quilt top. This red/orange/blue/brown color scheme is not something I figured would be very versatile for my stash and I had almost a yard cut left. Perfect!
Turns out, one of my 3-yard Kona cuts was Kona Papaya, which coordinates nicely with Flea Market Fancy. I laid the orange fabric out beside my 1 yard cut of Seedpod Stripe, and found that what remained to be filled was a modestly-sized section at the upper left.
If you take a look at this picture again, you'll see that I added the Momo butterfly fat quarter next (which just happens to exactly match Seedpod Stripe), then the chocolate Heath and lastly Flea Market Fancy Posie Brown, since the butterfly print was not large enough vertically to fill the space.
I'll admit that I hesitated at this point, since the back had turned out to carry such a different color scheme than the front of my quilt. I decided that since the Flea Market Fancy collection unites the front and back, it was good enough for me. And that's the thing about color - each of us gets to decide what we like. And we're the expert on that!
Now that my backing fabrics were laid out, the next step was to trim up the fabrics that I planned to use in their entirety. So, the Seedpod Stripe and the Momo butterfly fabrics - each of those I planned to have take up as much space as possible on the quilt back. Here I am squaring up the butterfly fat quarter so it's ready to be worked with.
Next, I added Posie Brown fabric to the butterfly print. How much Posie Brown? I measured Seedpod Stripe + Momo Butterfly to see how long they were combined and subtracted that number from the total length of the quilt top. The difference is how much Posie Brown I should add. And... I made a mistake here, so I ended up adding Posie Brown on both sides of the butterfly to fix my mistake. Which turned out to be an improvement!
The Chocolate Heath went in next, sewn to the Posie Brown/Butterfly block. I added enough Heath to make this segment as wide as my Seedpod Stripe, and then pieced the upper segment to the Seedpod Stripe.
Now in the homestretch - just need to add that Kona Papaya! With my large cut of Papaya, cutting would be easiest on the floor. I slid my mat under the fabric and cut it just long enough to equal my work in progress. No math!
Before piecing, I wanted to trim off some Papaya so that the long strip was only as wide as required for the finished quilt back. Here I've folded my length of Papaya on my cutting mat to rotary cut it to width. For tips on how to fold, square up and cut yardage with your rotary mat, see steps 1-6 on this Colorbrick tutorial.
And that's a wrap! Hope this was helpful. Now I'm hand quilting...