on Binding
Binding. It's the way most quilts are finished. It's a little edging detail that can make a big impact. Honestly, it's something I need to work on.
Often, my choice of binding is uninspired. It may be that I put all of my thought and focus into the quilt top patchwork and just feel like finishing by the time binding comes around. But, whatever the reason, I always seem to play it safe.
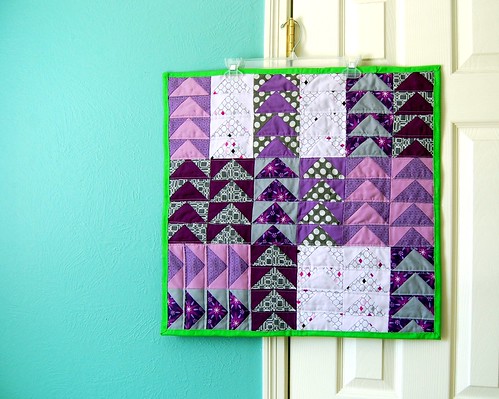
But "safe" has it's drawbacks. I mean, what if Jacey had played it safe here? That vibrant lime binding adds so much, don't you think? It's actually that little something extra that makes it "look" like Jaceycraft. I love it!
I'm not saying that binding has to JUMP out at you to be a great choice. Sometimes you do really want a subtle frame. I guess my point is that I want to start taking risks, start feeling my way into the possibilities.
What about you, how do you feel about binding? Is it an afterthought? Do you love to hand sew it? Or, do you rush through it (like me)?
One traditional way of binding a quilt is to sew down the back to the underside of the quilt. Done well, this will leave a flawless, virtually invisible finish front and back. But it's s.l.o.w. As much as I love handwork, I've only hand stitched one binding. Unfortunately, I didn't much enjoy it.
And so my friends, I machine apply binding. Because it's FAST! For starters, I learned this way, as taught by Rita of Red Pepper Quilts. About this time last year, I made my own step-by-step tutorial on how to make and machine stitch binding as part of the Colorbrick Quilt Along. But over time I realized that I like a wider binding than Rita, so I now cut my binding strips 2.5" wide and apply them to the quilt top at 3/8" from the edge. Like Rita, I've typically secured the back of the binding by stitching in the ditch from the quilt top and hoping to catch the binding (which is folded over to the back) as I go.
"Hoping" being the key word.


These are a two examples of recent quilts finished with binding secured in the ditch of the quilt top/binding seam through to the back. I've really had a lot of practice with this method, and I try to be super-careful about pinning the back of the binding evenly. But it seems that no matter what, I have plenty of binding sections that get missed entirely, so that I have to go back and fix things after I'm "done" stitching in the ditch. Plus, the parts that are secured don't look so hot from the back if you take a close look.
Mostly, I've not let this get to me. My quilts won't be perfect, and I'm ok with that. On the other hand, I do want to work towards improving my skills. And, I also wonder if I "figured out" my binding technique a bit more if I'd enjoy the process and put more thought into my binding choices.
To that end, I tried a different way of machine finishing when I bound Bottled Rainbows. I was inspired by Jeni's binding tutorial to stitch from the folded-over side so that my finishing seam would be tidy.

I did not actually follow Jeni's method, since I began my sewing my binding to the front and then folding it over to the back; whereas, Jeni sews her binding to the back and folds over to the front. But, other than that, it's the same basic concept. If you look at the back (green stripe fabric), you can see that I followed the binding neatly about 1/8" from the gray binding edge.
Due to user error (or human-ness?) my stitch lines on the quilt front fell on the binding itself sometimes and on the quilt top (the Heath grey grid). Fortunately, with the Heath fabric, they don't show. With other quilt tops or backings, I think this would bug me.
So, here's what I really want to show you!

I tried zigzags! To bind the Summer Sampler quilt, I stitched along the quilt top/binding ditch with a zigzag stitch using multi-tone thread. I know you can only see a small stretch of the underside of the quilt in this picture, but it all looks that good! The zigzag is so forgiving because it makes your stitch wider. This hides discrepancies between the quilt front and back that result in a wavy finishing stitch line in other methods. It also means that there are fewer binding gaps in the back that don't get stitched at all. When I finished this decent-sized quilt, I think there was just one gap I had to close! Also, since I'm not stitching IN the ditch, I can go a lot faster and not feel so paranoid about making mistakes.
Suffice it to say, I'm excited! I also finished last week's baby quilt this way with speed and happy results. I know that zigzags aren't for everyone. They're far from subtle. But, I think it adds a good kind of character for many of the types of quilts I make.
Hello, zigzag bindings!
Often, my choice of binding is uninspired. It may be that I put all of my thought and focus into the quilt top patchwork and just feel like finishing by the time binding comes around. But, whatever the reason, I always seem to play it safe.
But "safe" has it's drawbacks. I mean, what if Jacey had played it safe here? That vibrant lime binding adds so much, don't you think? It's actually that little something extra that makes it "look" like Jaceycraft. I love it!
I'm not saying that binding has to JUMP out at you to be a great choice. Sometimes you do really want a subtle frame. I guess my point is that I want to start taking risks, start feeling my way into the possibilities.
What about you, how do you feel about binding? Is it an afterthought? Do you love to hand sew it? Or, do you rush through it (like me)?
One traditional way of binding a quilt is to sew down the back to the underside of the quilt. Done well, this will leave a flawless, virtually invisible finish front and back. But it's s.l.o.w. As much as I love handwork, I've only hand stitched one binding. Unfortunately, I didn't much enjoy it.
And so my friends, I machine apply binding. Because it's FAST! For starters, I learned this way, as taught by Rita of Red Pepper Quilts. About this time last year, I made my own step-by-step tutorial on how to make and machine stitch binding as part of the Colorbrick Quilt Along. But over time I realized that I like a wider binding than Rita, so I now cut my binding strips 2.5" wide and apply them to the quilt top at 3/8" from the edge. Like Rita, I've typically secured the back of the binding by stitching in the ditch from the quilt top and hoping to catch the binding (which is folded over to the back) as I go.
"Hoping" being the key word.
These are a two examples of recent quilts finished with binding secured in the ditch of the quilt top/binding seam through to the back. I've really had a lot of practice with this method, and I try to be super-careful about pinning the back of the binding evenly. But it seems that no matter what, I have plenty of binding sections that get missed entirely, so that I have to go back and fix things after I'm "done" stitching in the ditch. Plus, the parts that are secured don't look so hot from the back if you take a close look.
Mostly, I've not let this get to me. My quilts won't be perfect, and I'm ok with that. On the other hand, I do want to work towards improving my skills. And, I also wonder if I "figured out" my binding technique a bit more if I'd enjoy the process and put more thought into my binding choices.
To that end, I tried a different way of machine finishing when I bound Bottled Rainbows. I was inspired by Jeni's binding tutorial to stitch from the folded-over side so that my finishing seam would be tidy.
I did not actually follow Jeni's method, since I began my sewing my binding to the front and then folding it over to the back; whereas, Jeni sews her binding to the back and folds over to the front. But, other than that, it's the same basic concept. If you look at the back (green stripe fabric), you can see that I followed the binding neatly about 1/8" from the gray binding edge.
Due to user error (or human-ness?) my stitch lines on the quilt front fell on the binding itself sometimes and on the quilt top (the Heath grey grid). Fortunately, with the Heath fabric, they don't show. With other quilt tops or backings, I think this would bug me.
So, here's what I really want to show you!
I tried zigzags! To bind the Summer Sampler quilt, I stitched along the quilt top/binding ditch with a zigzag stitch using multi-tone thread. I know you can only see a small stretch of the underside of the quilt in this picture, but it all looks that good! The zigzag is so forgiving because it makes your stitch wider. This hides discrepancies between the quilt front and back that result in a wavy finishing stitch line in other methods. It also means that there are fewer binding gaps in the back that don't get stitched at all. When I finished this decent-sized quilt, I think there was just one gap I had to close! Also, since I'm not stitching IN the ditch, I can go a lot faster and not feel so paranoid about making mistakes.
Suffice it to say, I'm excited! I also finished last week's baby quilt this way with speed and happy results. I know that zigzags aren't for everyone. They're far from subtle. But, I think it adds a good kind of character for many of the types of quilts I make.
Hello, zigzag bindings!