Colorbrick: Easiest Machine Binding
This post is part of a series {Colorbrick} a Beginner’s Quilt-Along. You can join in anytime, even if you’re not a beginner! Please see this page for links to all posts, and join us on Flickr to share your questions and work-in-progress!
Notice I'm claiming "easiest" not "easy". This was my 3rd time machine-applying binding. The finished product looks great - on the front. Apparently, I need to work a bit more on overall precision to get the back looking ship-shape too. The good news is that it stitches up pretty fast. Let's finish that quilt!
Step 1: Zigzag the Edges
Following along with Rita of Red Pepper Quilt's quilt binding instructions, the next step is to zigzag stitch the raw edges of your folded, pressed binding. This step helps prevent shifting and puckering in the next step.

Try to zigzag as close to the edges as possible, so that these stitches won't show when you attach the binding to the quilt. A long, narrow zigzag is preferable. Mine was a little too far from the edge and showed a tiny bit when I applied the binding. Definitely use a thread color that matches your binding!
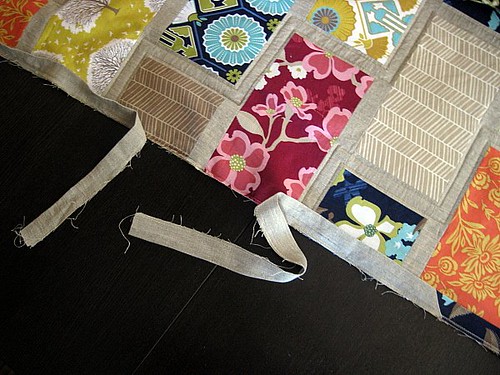
Step 2: Begin Pinning Binding
On the right side of your quilt, align the raw edges of your binding with the raw edges of the quilt. When you begin pinning, leave a 5-7" tail of unpinned binding. Don't start pinning right at a corner - start on an edge. Carefully align the edges of the binding and quilt, pinning every 4-5 inches.

I started in the center of this side and ended at this corner.
Step 3: Miter the Corners
When you finish one edge and get to the corner, you need to fold the binding a special way to create a mitered corner.

First fold the binding away from the quilt, until it looks like an extension of the next edge going out towards the table. You'll have made a little 45 degree fold in the binding.

Holding the 45 degree fold in place with one hand, fold the binding over to rest on the next edge of the quilt. Place pins to hold that fold in place.
Continue pinning the binding all the way around the quilt. When you get back to the edge you started on, leave a 12" gap of the quilt unpinned.
Step 4: Stitch
Make sure you're using a walking foot on your sewing machine! Now, starting where you began pinning, attach the binding to your quilt with a 1/4" seam. Go slowly and make it really straight! Take a backstitch to secure your stitching every time you start and stop.

When you get to the corner, stop stitching 1/4" from the very tip of the corner. Take a backstitch and remove your quilt from the machine. Trim thread tails. Now start stitching on the next side at the corner, just 1/4" away from the very tip of the corner.
Continue stitching all the way around the quilt until you get to the end of your pins. Leave that unpinned gap unsewn.
Step 5: Join Ends

To join the two ends of your binding, you'll make a diagonal seam like those you made when piecing the binding strips. First, trim your binding so that you have just 2.5" of overlap. Make sure that this overlapped part is in the center of your unpinned gap. That will make things easier to maneuver.
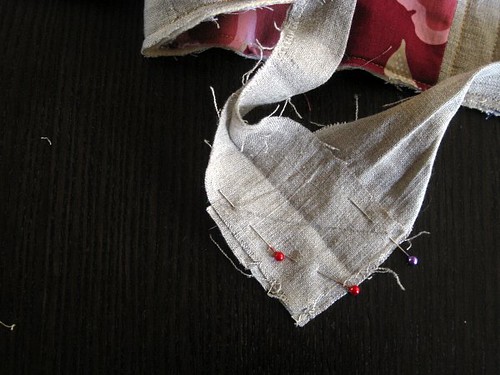
Rip out the zigzag stitches so that you can press the binding open. Lay the binding with right sides together and perpendicular to each other, allowing a generous 1/8" of overlap, as shown. Pin. Draw your diagonal line and stitch along the line. Now test to make sure that the joined binding fits along the quilt edge. When it does, trim the excess binding off (the part past the diagonal stitch line) to leave a 1/4" seam allowance and press seam open.
Pin and finish attaching binding to your quilt with a 1/4" seam.
Step 6: Fold & Pin

Fold the binding around the edge of the quilt, pinning as you go. Usually, you'd pin with your pins sticking out, as I started to do. But, it really does avoid gaps if you pin longways through the binding. That's what Rita does, and I switched over to her method as I went.

Take care to fold neatly, with even tension so that the binding is straight, not wavy on the back. Your binding should fall about an 1/8" past the stitch line you made with you attached the binding to the front of the quilt in Step 4. At the corners, you'll overlap the folds to make a mitered edge.
Step 7: Stitch in the Ditch
I have to go pretty slow for this part. To "stitch in the ditch" is to stitch in the little gap between pieced fabrics. Successfully done, your stitches will disappear on the front of the quilt and show only on the back.

The goal is to stitch in the seam between your quilt and the wrapped around binding, while catching the folded over binding on the back. Again, be sure to use a walking foot and a thread that matches your binding. Sometimes my stitches landed on my binding on the top of the quilt. Fortunately, they blend in!

Stitch all the way around your quilt in the ditch. At the corners, turn the quilt to change directions with the needle in the down position.
After you're done, you may find when you look at the back of your quilt that some of the binding did not get sewn down to the back during this process. That's ok - you're learning (and I had the same problem). Simply pull the binding taut, pin again and restitch that section from the front of the quilt in the ditch. Second time's a charm.
The stitching on the binding at the back of my quilt is not exactly straight. I think I need more practice at stitching in the ditch and it's possible that more pins would have helped. Rita says, "Your technique will improve over time as you become familiar with the width of your binding and the pinning of your binding." Let's hope so!
Congratulations!
I hope you are in love with your very own Colorbrick quilt! You're done, unless you want to add a label. I'll be making one for mine, as it is gift for my sister. Yep, still gotta do that...
Next week I'll be posting pictures of YOUR quilt, wherever you are in the process. Please share your pictures at our Flickr group so I can find them. Thanks for quilting along with me! We'll be sure to do this again sometime in the new year!
Notice I'm claiming "easiest" not "easy". This was my 3rd time machine-applying binding. The finished product looks great - on the front. Apparently, I need to work a bit more on overall precision to get the back looking ship-shape too. The good news is that it stitches up pretty fast. Let's finish that quilt!
Step 1: Zigzag the Edges
Following along with Rita of Red Pepper Quilt's quilt binding instructions, the next step is to zigzag stitch the raw edges of your folded, pressed binding. This step helps prevent shifting and puckering in the next step.
Try to zigzag as close to the edges as possible, so that these stitches won't show when you attach the binding to the quilt. A long, narrow zigzag is preferable. Mine was a little too far from the edge and showed a tiny bit when I applied the binding. Definitely use a thread color that matches your binding!
Step 2: Begin Pinning Binding
On the right side of your quilt, align the raw edges of your binding with the raw edges of the quilt. When you begin pinning, leave a 5-7" tail of unpinned binding. Don't start pinning right at a corner - start on an edge. Carefully align the edges of the binding and quilt, pinning every 4-5 inches.
I started in the center of this side and ended at this corner.
Step 3: Miter the Corners
When you finish one edge and get to the corner, you need to fold the binding a special way to create a mitered corner.
First fold the binding away from the quilt, until it looks like an extension of the next edge going out towards the table. You'll have made a little 45 degree fold in the binding.
Holding the 45 degree fold in place with one hand, fold the binding over to rest on the next edge of the quilt. Place pins to hold that fold in place.
Continue pinning the binding all the way around the quilt. When you get back to the edge you started on, leave a 12" gap of the quilt unpinned.
Step 4: Stitch
Make sure you're using a walking foot on your sewing machine! Now, starting where you began pinning, attach the binding to your quilt with a 1/4" seam. Go slowly and make it really straight! Take a backstitch to secure your stitching every time you start and stop.
When you get to the corner, stop stitching 1/4" from the very tip of the corner. Take a backstitch and remove your quilt from the machine. Trim thread tails. Now start stitching on the next side at the corner, just 1/4" away from the very tip of the corner.
Continue stitching all the way around the quilt until you get to the end of your pins. Leave that unpinned gap unsewn.
Step 5: Join Ends
To join the two ends of your binding, you'll make a diagonal seam like those you made when piecing the binding strips. First, trim your binding so that you have just 2.5" of overlap. Make sure that this overlapped part is in the center of your unpinned gap. That will make things easier to maneuver.
Rip out the zigzag stitches so that you can press the binding open. Lay the binding with right sides together and perpendicular to each other, allowing a generous 1/8" of overlap, as shown. Pin. Draw your diagonal line and stitch along the line. Now test to make sure that the joined binding fits along the quilt edge. When it does, trim the excess binding off (the part past the diagonal stitch line) to leave a 1/4" seam allowance and press seam open.
Pin and finish attaching binding to your quilt with a 1/4" seam.
Step 6: Fold & Pin
Fold the binding around the edge of the quilt, pinning as you go. Usually, you'd pin with your pins sticking out, as I started to do. But, it really does avoid gaps if you pin longways through the binding. That's what Rita does, and I switched over to her method as I went.
Take care to fold neatly, with even tension so that the binding is straight, not wavy on the back. Your binding should fall about an 1/8" past the stitch line you made with you attached the binding to the front of the quilt in Step 4. At the corners, you'll overlap the folds to make a mitered edge.
Step 7: Stitch in the Ditch
I have to go pretty slow for this part. To "stitch in the ditch" is to stitch in the little gap between pieced fabrics. Successfully done, your stitches will disappear on the front of the quilt and show only on the back.
The goal is to stitch in the seam between your quilt and the wrapped around binding, while catching the folded over binding on the back. Again, be sure to use a walking foot and a thread that matches your binding. Sometimes my stitches landed on my binding on the top of the quilt. Fortunately, they blend in!
Stitch all the way around your quilt in the ditch. At the corners, turn the quilt to change directions with the needle in the down position.
After you're done, you may find when you look at the back of your quilt that some of the binding did not get sewn down to the back during this process. That's ok - you're learning (and I had the same problem). Simply pull the binding taut, pin again and restitch that section from the front of the quilt in the ditch. Second time's a charm.
The stitching on the binding at the back of my quilt is not exactly straight. I think I need more practice at stitching in the ditch and it's possible that more pins would have helped. Rita says, "Your technique will improve over time as you become familiar with the width of your binding and the pinning of your binding." Let's hope so!
Congratulations!
I hope you are in love with your very own Colorbrick quilt! You're done, unless you want to add a label. I'll be making one for mine, as it is gift for my sister. Yep, still gotta do that...
Next week I'll be posting pictures of YOUR quilt, wherever you are in the process. Please share your pictures at our Flickr group so I can find them. Thanks for quilting along with me! We'll be sure to do this again sometime in the new year!