the Invisible Zipper tutorial

Step 1: Believe
You can do this. It is NOT too hard. This is my second time putting an invisible zipper in a pillow and I have decided that it is actually faster than any other closure method I've tried. I learned how from my friend Katie's tutorial, but I've added lots of extra pics here that may help you avoid the twisted zipper scenario I experienced that first time around.
Step 2: Prepare
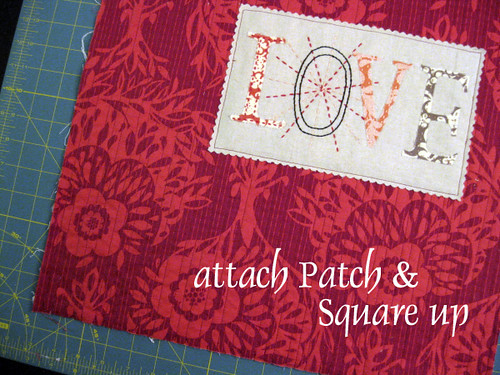
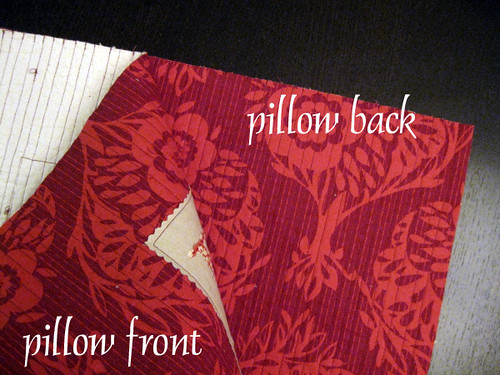
You'll need two equally sized pillow fronts and backs. If you're following the Love Pillow tutorial, attach your finished patch to your pillow front with a simple machine stitch at 1/4" from the edge. Check that your pillow front and back are square and equally sized before continuing.

Attach a zipper foot to your sewing machine. Mine is a regular zipper foot, not a foot specially designed for the invisible zipper. It works quite nicely, thank you.

Gather a ruler, your pins and bust out your invisible zipper. Prepare it for attachment by ironing the zipper coils flat. Invisible zippers are "invisible" because the coils are designed to curl in towards the wrong side of the zipper. The right side of the zipper is the one with the zipper pull showing. So, open your zipper and iron those coils flat. Use pressure! Be careful not to melt the polyester coils. Leave the zipper open.
Step 3: Attach Zipper to Front
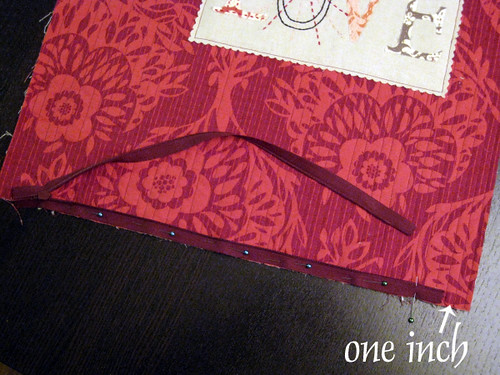
Lay your pillow front on your work surface with the right side up. Place the zipper on the bottom edge with the right side down and the coils pointed towards the center of the pillow. Space the bottom, open end of the zipper tape 1" from the side of your pillow. Use your ruler to be precise.

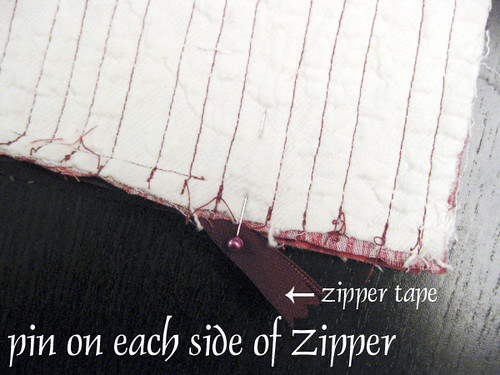
Place a pin in the zipper to mark the spot at which the coils end. The coils stop before the end of the zipper tape. Find that spot and anchor the zipper with a pin, being sure that the end of the zipper tape is still 1" from the side of your pillow. Now, pin along the entire length of the zipper, with pins going longways so that they won't be in the way. Don't be stingy with the pins!

At the sewing machine, you'll start sewing at that first perpendicular pin, the one that marks where the coils stopped. Your needle should be going along the left side of your zipper foot, with your pillow extending out to the left.
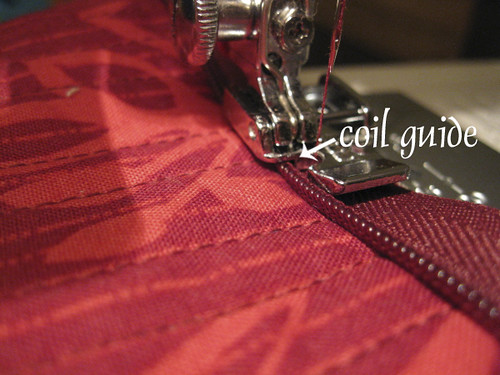
Your zipper foot might have a tiny little ledge built in to serve as a coil guide, like mine does. Make sure that the coil is snug against the guide. If not, just use the edge of your foot as a guide. Either way, before you sew check that the needle is positioned close to the coils, but not in them. You want to get as close to the coils as possible.
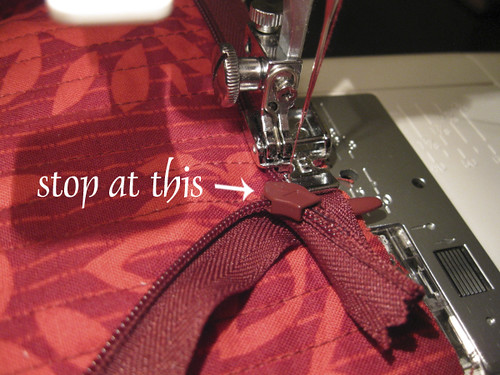
Sew, backstitch and keep sewing until you can't go any farther because the zipper pull is in the way. Backstitch.
Step 4: Attach Zipper to Back
Lay your pillow back on your work surface, right side up. Lay your pillow front on your pillow back with right sides together, aligning all edges and corners. If your fabrics are directional, check that "up" is the same for pillow back and front.

Now, grab the side of your zipper that is NOT attached yet and place the right side of that zipper onto the right side of your pillow back. I fold my pillow front out of the way a bit for easy access.
Measure in 1" from the side, as you did before, and pin the bottom of the zipper tape at that point. Once again, the zipper coils should be facing in towards the center of the pillow. As before, place a perpendicular pin at the point where the zipper coils end to mark where you should start sewing. Pin along the length of the zipper with plenty of pins.

OK, now check that your zipper is not twisted. Look at the part where the zipper pull is sitting. Does it looklike it could be closed? That's a good thing (wink).

At the machine, you need to switch the zipper foot over to allow you to stitch on the right side of the zipper foot. For my machine, I have to take it off and reattach it aligned to the new side. Your pillow back will extend to the right side of the needle. Get ready to start sewing at the perpendicular pin, there at the bottom of your zipper coils. Make sure that your needle stitches quite close to the coils.
Sew, backstitch and sew some more until you can't go any farther because the zipper pull is in the way. Backstitch.
Step 5: Sew that Pillow Closed
We're almost there!
First, close your zipper (yeah!!!). Now, lay out your pillow cover with right sides together. Place pins on both sides of your zipper to stabilize it nice and flat. When you place those pins, pull out the zipper tape ends and the zipper pull section - both parts of the zipper that did not get sewn down. Keep these parts sticking out while you continue to pin and sew the pillow.
Next try to align all four corners of your pillow. Hopefully, when you do so your zipper still looks nice and flat. However, it's more important that your zipper lays flat than that your corners are perfectly aligned. If necessary, leave your corners a bit "off". The difference will be hidden in the inseam. Pin the corners

Reach in and open the zipper about most of the way open. Then, and only then, finish pinning all the way around the pillow.

At the machine, switch your zipper foot for a regular foot, or even better - a walking foot! Stitch the rest of the pillow together with a 1/2" seam, being sure to backstitch at the beginning and end. Where to start stitching? Get pretty close to the stitching line for the zipper, but don't try to get right, right above it. Remember, you're stitching at 1/2" from the edge, while the zipper was attached closer. Don't sweat it.
After stitching, clip the corners with pinking shears (or regular shears). Turn the pillow cover right side out, by pulling it through the open zipper. Poke the corners out. Press and stuff it.
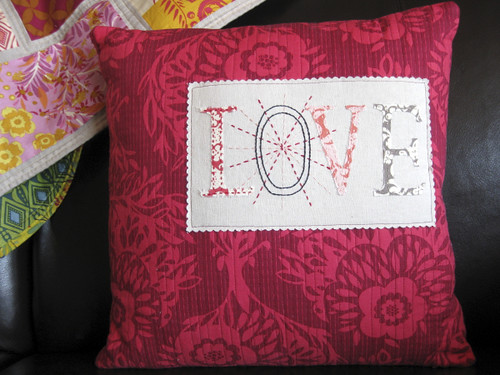
Congratulations, you made a very lovely pillow cover with a sassy hidden zipper! It may have felt cumbersome the first time around, but give this skill another go and you'll find it goes much easier. It's definitely a skill worth learning!

This time around, I think I didn't sew quite close enough to the coils on one side. So, my zipper may not be truly invisible, but I'm still smiling.