The key detail for me was... Solids. I started by cutting my most colorful scraps, thinking that this would be a quilt where "anything goes". But anything most certainly did not. She was kind of a handful and cast unflattering shadows on favorite fabrics until I almost decided not to play at all. Then I took a second look at Ungt Blod's quilt...
![]() |
| by Ungt blod |
So here we are today with a Triangle Tutorial! My quilt is still in process, but there's enough here to get you started...
Step 1: Cut Triangles
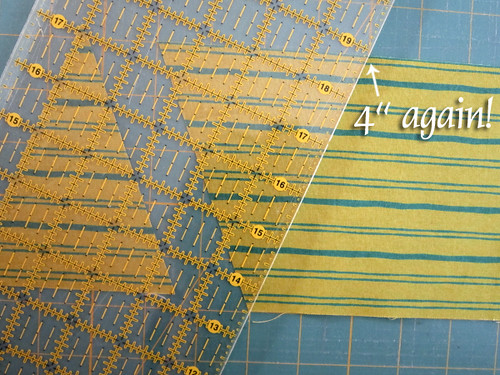
My triangles are 4" across at the base and 5" high, unfinished. You can cut bunches of them from 5" wide strips of scraps or cut them one at a time from oddly shaped scraps. Let's start with a 5" strip of fabric. After trimming it to 5" wide on your cutting mat, leave it in place for cutting the triangles. Start by cutting from the bottom left corner to the peak of the first triangle at 2" over from the side.

Ok, now cut from that triangle peak to 4" over at bottom of the strip. So, that's 4" over from the bottom left corner of the fabric strip. Yeah for photos, right? This is easier done than described!
Cool, so that's one triangle cut. Now shift your ruler to cut from that bottom point to 4" over at the top. Make that slice to cut another triangle.

Keep on shifting your ruler to cut in a zigzag pattern across the 5" wide strip of fabric. When you run out of room, you're done! To save time layer several 5" fabric strips and cut through all at once.

Yep, that part is really painless. But, because you love your scraps, you might even want to cut triangles one at a time from unusual shaped scraps by using an already-cut triangle as a template like so:

Step 2: Piece
Soon you'll have a flock of triangles.
Yeah! This quilt goes together in rows, not blocks. Decide how many triangles you'd like to have in each row and start laying things out, or simply sew them together without any planning. I started with rows 15 triangles wide, which are shown in these pictures. When I had determined that I had plenty of triangles for a larger quilt, I enlarged my rows to 23 triangles wide, which is about as wide as my kitchen table (or approximately 34"). You don't have to settle on final width now, because it's easy to add on to your rows.
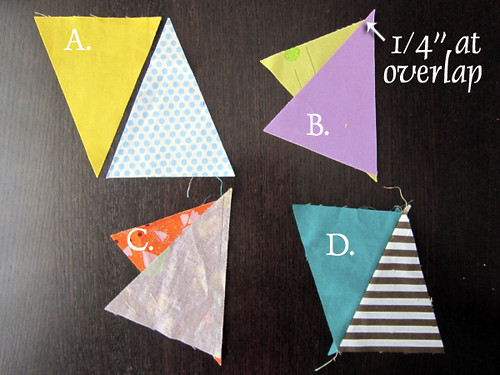
Ok, triangle piecing takes some finesse. Unlike squares, you don't sew them together with all points matching. Let's go step by step. First, I have two triangles laying side by side (A). Then, I flip one triangle over the other along the future seam line (B). Notice those points!!! You have to slide the triangles until you have those poky bits sticking out. How much poky, you ask? Just enough so that the fabrics overlap by 1/4" (your seam allowance) where you will start and end sewing. Take a look at example C, where the pair of triangles is sewn. See how the stitch line reaches to the edge of the fabrics right at that 1/4" overlap. This is important! When you press your seam open (D) the triangles are making a straight row because of those vital poky bits. If you match the points instead of making poky bits, your triangles will loose their nice sharp points when the rows are pieced together. It's also a trial and error thing. If you get it wrong, your trusty seam ripper will come to the rescue. Mine was a hero a few times ;)
I suggest you sew all of your triangles into pairs, whipping through a bunch by chain piecing. Press all seams open. Then, return your triangles to a row layout and join to create a long triangle chain. When you join triangle pairs, you still have to make poky bits so that your stitch line extends exactly to that 1/4" overlap, just as illustrated above. The end effect is a row of triangles with a 1/4" seam allowance at the top of each triangle point (see photo in next step).
Step 3: Finishing
This quilt is so easy! Really, I love the simplicity. Cut, sew rows, finish. After you have as many rows as desired (all made with an equal number of triangles), layout the rows alternating the orientation so that the shapes line up. So, points of triangles touch other triangle points and triangle bases touch other triangle bases.

Now, sew rows together with a 1/4" seam allowance (as always). Hopefully all of your triangles remain pointy thanks to your careful piecing. If a few don't I won't let it get to me. We're having fun, folks!
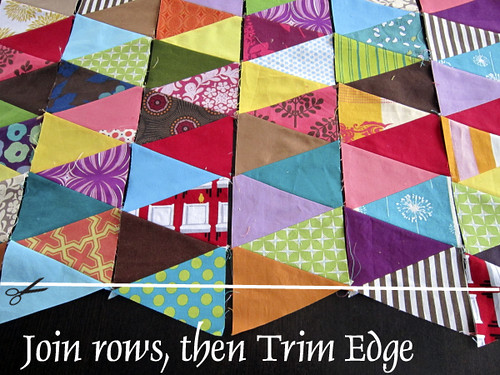
Last of all, you'll trim the zig-zaggy edges to make a straight edge. I haven't trimmed mine yet because I won't join my rows and finalize things until I'm ready to be finished!
If you make a triangles quilt, we'd love to see your work in progress at the Scrap Attack Flickr Group and also at the Stitched in Color group, where I go to find evidence that my tutorials are actually used (wink). Thanks for sewing along, my friends!


Thank you so much for the tutorial which is clear and concise- I have only worked with triangles once and was very disappointed in the result-now I know why!!
ReplyDeleteSeam ripper to the rescue......
Heather
OK! I'm going to DO IT! I'm going to risk triangles because of this tutorial. And I'm bookmarking it for future reference.
ReplyDeleteEEEeeeeeeeeeeeeeeeeeeeeek!
JennX
Great job and thank you for putting this together! I am planning on using this with some of my scraps, but just as a border.
ReplyDeleteThis is going to be SO fun!!
Great tutorial Rachel. That triangle quilt is beautiful and so colorful. I love the addition of solids.
ReplyDeleteThey look amazing, Rachel! Happy triangles, indeed. I'm definitely going to try it for myself!
ReplyDeleteYou make having a gorgeous, informative, inspiring blog look easy! I'm always excited to come see what you're up to :-)
ReplyDeleteyes, oh, yes. the solids are perfect. and this tutorial is lovely. congrats!
ReplyDeleteOoh, that's looking fab (have I mentioned before that I want your scraps ;o) ) Can't wait to see it done!
ReplyDeleteGreat quilt and great tutorial. You've inspired me to attack my stack of scraps and make something fun.
ReplyDeleteWhat a great tutorial...makes me wish that I could join you! Next time...
ReplyDeleteI made a quilt like this for my younger daughter when she was 9. It took a while to cut all the triangles since we went for a very scrappy look, but it was so worth it.
ReplyDeleteShe's 16 now - probably time for another quilt :) Time flies!
I chop my top tip off a quarter inch and then just line them up to sew, no measuring.
ReplyDeletep.s. i just finished a triangle quilt so I'll link to you when I post.
ReplyDeleteYou make this looking soo easy peasy ... I´ll definitly give the triangles a try!! Thanks a lot!!
ReplyDeleteYour colour choice is great - it looks wonderful now! Choosing the right fabrics to look it good for you is sometimems the hardest part :)
Oooh great tutorial and great looking quilt!
ReplyDeleteThis is lovely ... triangles are on my list for this year!!
ReplyDeleteSorry, I deleted my last comment because the link didn't work!!
Mary @ Molly Flanders has a really nifty cutting/piecing tutorial for her pyramid quilt here if you don't fancy all those pokey bits !!
I'm going to try both ways!
p.s. my word verification is MONSTR!! LOL!! That's going to be the name for this, my Monstr quilt!
What a great way to use up a lot of scraps! Thanks for giving me an idea of how to whittle down my scrap stash. Your photos and descriptions are so clear that you really do make working with triangles look easy. Thanks!
ReplyDeleteI have to admit, my scraps are becoming rugs instead of quilts (at least the strips). I wanted to make a scrappy quilt but then there was this pesky deadline for a complicated paper-pieced dealie for my guild, and then I needed a new bathmat and lo and behold my scrap quilt plan was gone baby gone.
ReplyDeleteOoh, a scrappy rug! Well, link us over girl =) Or share in the Flickr group. I want to se!
ReplyDeleteI need to make this. Right now! Great tutorial, thank you!!
ReplyDeleteA great tutorial! I may be just what I need to get going for some placemats I had in mind...
ReplyDeletethanks Rachel! This looks like fun! a triangles quilt has been on my mind for a while! And I'm joining the scrappy flickr group too. I'm currently taking a scraps class and am learning some cool stuff!
ReplyDeleteOhhhh....love this! thanks for showing it...just what I had been looking for!
ReplyDeleteAwesome! I actually tried to make this exact quilt that you have a picture of up top. But I failed miserably and it become a doll's quilt! It was soooooo wonky! Thanks! :)
ReplyDeleteYou are a great cheerleader. The tutorial makes me want to attempt it. Thanks for the inspiration and encouragement to tackle my scraps.
ReplyDeletegreat post thank you! I am so glad you did not use a fancy triangle ruler or anything. I am going to give this a go with a bunch of silk solids to make a cushion. Fingers crossed!
ReplyDeleteok, so i'm a little behind here, having browsed pinterest with finding a scrap quilt in mind and finding your wonderful tutorial! i've done these before...but not in many years, so it was great to read a refresher and take up a challenge! i have a stack (okay, six or seven stacks) of salvaged cloth (i.e., old clothes, etc.) that i've been dying to work up into something (or somesix) and this looks like the perfect start! thanks so much! i'll be sure to post progress pics on the flickr group!
ReplyDeleteJust the tutorial I was needing! I'm planning an argyle quilt and needed a quick guide on cutting the triangles the right way and lining them up, etc. You write an excellent tutorial for a beginner quilter (like me) to follow! Thank you!! Will link up when I ever get done.
ReplyDeleteoooohh..I can't wait to try this! Thank you
ReplyDeletecrap, i found this after i had sewn together oodles of my triangles point to point...but realized the error when i started putting my triangle pairs together with other triangle pairs. quick search for a tutorial and i found this. rats! lesson learned *sad face*, now i'm off to find my seam reaper.
ReplyDeleteJust pinned this...
ReplyDeleteFor our wedding in April I cut out hundreds of triangles from old bedding bought in charity shops, then made feet after feet of bunting, but I have LOADS of triangles left over. I'm going to try to use them to make a quilt like this one.
Wish me luck!!!
This is the first quilt I have ever tried! I made it for a friend who had a baby boy. I just picked up remnant fabric with bold colors and designs with contrast. I might have $15 in the fabric for the triangles. There are some points that didn't match dead on but I told myself when I started putting all the rows together that I wasn't going to drive myself crazy about it. I am very pleased with how it turned out. Thank you so much for the inspiration, and the tutorial!!
ReplyDeleteThank you - so good of you to put all this information out here so clearly explained and displayed. I just might be able to do this now
ReplyDeleteThis looks great! I think I might make this my next quilt project! Never tried triangles before, but nothing ventured, nothing gained. :)
ReplyDeleteWell, several months later, I finished it! I used your tutorial for the "how-to" of doing this, but did an all-over color with just 3 focal diamonds to simulate argyle. You can see my quilt (with link to your tutorial) on my blog, here:
ReplyDeletehttp://musings-onthemove.blogspot.com.br/2012/10/the-argyle-baby-quilt-finished.html
thanks again for great directions!
I am having trouble... Yours seem to have the points pointy right up to the edge of the triangle. Wouldn't a 1/4 seam allowance take away that point?
ReplyDeleteYes, it would. They actually do have 1/4" seam allowances past the triangle points. I guess it must be hard to see in the photos. Sorry for any confusion!
Delete