English Paper Piecing
Has it really been almost a month since my last star blossoms update? I've made a lot of progress and was hoping to have my table runner completely finished before posting this much-requested tutorial. But, well, there hasn't been as much TV watching lately, which translates to less hand-sewing than usual.

My "Star Blossoms" are made with three different shapes: hexagons (blossom centers), jewels (blossom petals) and diamonds (sashing for joining blossoms). The entire project is hand-sewn via the English Paper Piecing method. "The what?" you say? Yes, it's a mouthful. This is the kind of thing that's easier to show than describe, so I have for you today.... a video!
Ok, now this is just little ole Rachel talking to nobody, so don't be surprised that I sound at times overly perky and strange. I've published this video to Youtube, so that's the reason for a formal introduction (and it may take a bit of time to load). Here goes...
Learn something? Maybe just a little? I know I moved a bit fast sometimes. You can use the pause button to freeze the screen, if desired. But, as you can see, English Paper Piecing is not difficult, just time-consuming. Basting is easy and quick. The resulting crisp shapes are oh-so-satisfying... so much so that you have to watch out that you don't make stacks of shapes and no finished projects!
After basting when you begin joining your shapes to make a design, the stitching is much slower. My friend Jodie at Tales of Cloth has a nice video for how to sew the basted shapes together. Do you know that I've sewn shapes together incorrectly before (like without right sides together - hey, I'm watching TV) and had a terrible time trying to un-sew them. All those tiny, tight whipstitches have a crazy strong way of hanging on!

If you'd like to make Star Blossoms, I suggest you join your basted hexagons and jewels into blossoms as you go to avoid having a whole ton of piecing to do at the end. Then, once you have a small stack of blossoms, start adding diamond shapes around a few to begin creating the finished fabric.
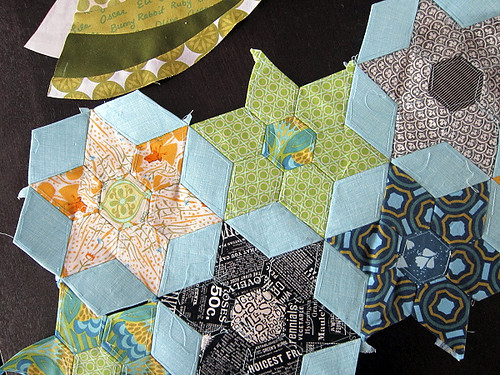
I found that once I was adding diamonds the work seemed to come together all of a sudden! Since then I've been adding star blossoms to get just the right length and planning for the little pieces to create a straight edge. My finished work is going to be 2 rows of blossoms wide and about 6 blossoms long, so as to fit the top of an entry table. I'll be sure to take notes on the finishing steps so that I can add that tutorial later on. If you're like me, I think you'll be best off planning for a small project like a pillow cover, table topper, or even stretched art rather than a whole quilt.

Supplies
Paper Pieces: These papers can be reused since they will be removed after you join the shapes and remove basting stitches. I've worked both with shapes cut out from printer paper and from sturdy papers purchased from PaperPieces.com. To me, buying heavy, already-cut papers was worth it. I used:
Needle & Thread: Really, any needle will do here. Maybe don't use your best for basting, since it will be dulled from piercing paper regularly. I recommend a fine weight thread for joining blocks so that it is less visible. By the way, I did try a Sewline fabric glue pen for basting, and much preferred needle and thread. The glue did not hold up to being handled and didn't really seem to save time.

Fabrics: I suggest limiting yourself to quilting cottons for English Paper Piecing. I've regretted using voile (slippery, dull points) and flannel (bulky). Cut your fabrics in advance so that you can stitch away when the mood strikes:
*for Hexagons cut 2.5" squares
*for Diamonds cut 2.25"strips and lay the papers on top to establish your cutting angle
*for Jewels cut 2.5" x 3.25" pieces
Ok, I think that does it! I can't wait to see what you make, and I'm looking forward to showing you the finished project soon.