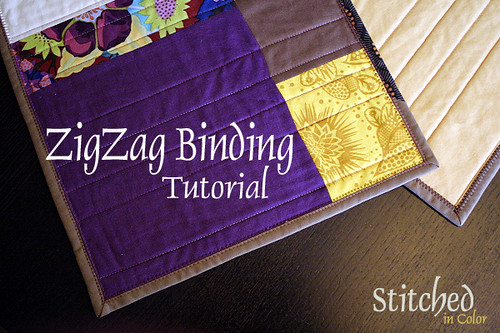
And long last, I have found a method of binding my quilts that is fast, secure and beautiful when viewed from the front and back. Dare I say, "Easy"? Yes, I dare! In fact, that was really the point. I hope you'll find this method easy too!!!
We're going to start from the beginning folks. If you're new to quilting, you can totally do this. In fact, this is the most user-friendly way to bind a quilt, in my opinion. Let's go!
Step 1: Cut Binding
Begin by cutting 2.5" strips, making each strip as long as possible. Since quilt edges are straight, not curvy, there is no reason to cut your binding strips on the bias. Take it easy and cut your fabric on grain, like you would when normally cutting any fabric. For a refresher on how to cut long strips of fabric, see this step in the Colorbrick Quilt-Along.
How much to cut? You need enough to go all the way around your quilt and then have about 15 inches extra. Rather than measuring my strips, I just lay them around the quilt as I cut them, keeping in mind that a fair bit will get eaten up in seam allowances when we piece the strips. Extra quilt binding can always be saved for a scrappy binding someday.
Step 2: Piece Strips
To join the binding strips, take two strips and lay them right sides together. To create a diagonal seam that is less bulky than a straight seam, you must lay them perpendicular to each other, like so.
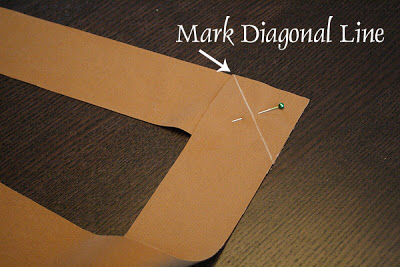
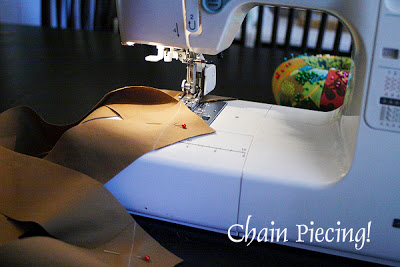
Make a pencil mark with a ruler from one edge to the other, as shown. Use a straight pin to stabilize things. Then, stitch along the line. You don't need to backstitch when you're piecing the strips. To save time, I like to chain piece, where I keep sewing without stopping through all the lines. After I pass all the binding pieces through the machine, I clip threads to separate. See here for step-by-step pictures of chain piecing.
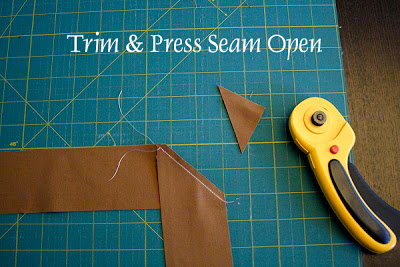
Now, trim off the excess, so that you have a 1/4" seam and press open. Voila - lovely diagonal seams!
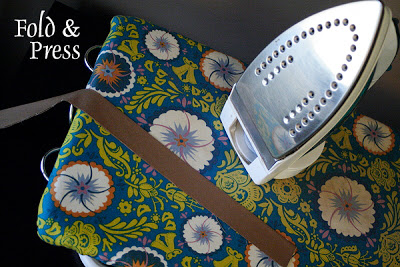
Step 3: Fold & Press
Oh, this is easy! Now, fold and press your entire strip of binding in half, longways. Take care to match the raw edges evenly so that your binding is a consistent width. You're ready to apply it to your quilt!
Step 4: Sew to Quilt Top
Make sure you're using a walking foot on your sewing machine! On this step take care to go slowly and make it really straight! Take a backstitch to secure your stitching every time you start and stop.
On the right side of your quilt, align the raw edges of your binding with the raw edges of the quilt. When you begin sewing, leave a 5-7" tail of unsewn binding. Don't start attaching your binding right at a corner - start on an edge. Carefully align the edges of the binding and quilt, sewing with a straight stitch at 3/8" from the raw edge. I use my "needle left" needle position to make sewing a 3/8" seam easy peasy. You could sew at 1/4" instead, but you'll have a little too much binding extending past the zigzag stitch on the back for my taste. I like a slightly wider binding than some, which is why I sew at 3/8" inch from the edge.
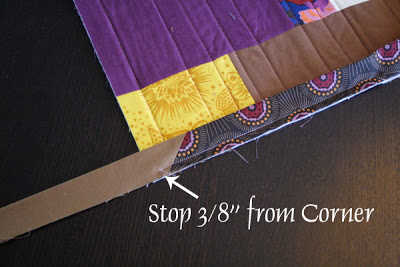
I started in the center of this side of my quilted runner and ended at this corner. Stop sewing at 3/8" from the corner. Remember to backstitch to secure that stitch line! Remove quilt from sewing machine and trim thread tails.
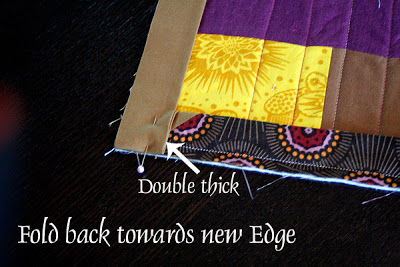
When you finish one edge and get to the corner, you need to fold the binding a special way to create a mitered corner. First fold the binding away from the quilt, until it looks like an extension of the next edge going out towards the table. You'll have made a little 45 degree fold in the binding.
Holding the 45 degree fold in place with one hand, fold the binding over to rest on the next edge of the quilt. Place a pin to hold that fold in place.
Start sewing again on the new edge, starting at 3/8" from the corner. Continue sewing the binding all the way around the quilt, mitering each corner. When you get back to the edge you started on, leave a 12" gap of the quilt unpinned.
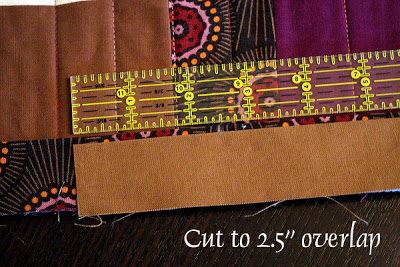
To join the two ends of your binding, you'll make a diagonal seam like those you made when piecing the binding strips. First, trim your binding so that you have just 2.5" of overlap. Make sure that this overlapped part is in the center of your unsewn gap. That will make things easier to maneuver.
Lay the binding with right sides together and perpendicular to each other. Pin. Draw your diagonal line and stitch along the line. Now test to make sure that the joined binding fits along the quilt edge. When it does, trim the excess binding off (the triangle part past the diagonal stitch line) to leave a 1/4" seam allowance and press seam open.
Pin and finish attaching binding to your quilt top with a 3/8" seam.
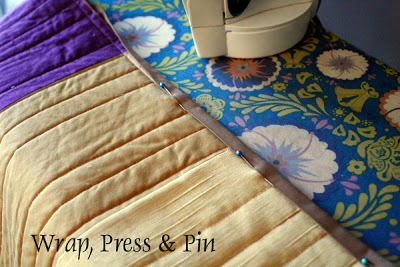
Step 5: Pin to Quilt Back
Lay your quilt on the ironing board with the quilt back facing up. Wrap the folded edge of your quilt binding around from the quilt top to the quilt back. Press it nicely and then pin to secure. It's more effective to pin longways through the binding, but make sure that the pin heads will be pointing towards you when you sew the binding on from the quilt top. You'll want to be able to remove the pins by grabbing the round head easily!
Take care to fold neatly, with even tension so that the binding is straight, not wavy on the back. Your binding should fall just past the stitch line you made with you attached the binding to the front of the quilt in the previous step. At the corners, you'll overlap the folds to make a mitered edge.
Step 6: Zigzag Stitch to Finish!
Now this is the fun part! Again, be sure to use a walking foot and a choose a thread that you'll be glad to have show. You can choose to use a wide or narrow zigzag stitch, keeping in mind that a wider stitch will look more "even", while a narrow stitch will not hide mistakes. I use a medium-width stitch that is suggested for the zigzag stitch by my sewing machine manual. Even though it will show slightly, do start and stop all stitching with backstitches to secure those threads.
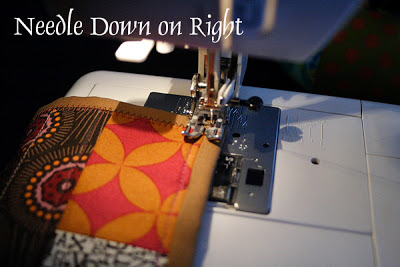
Begin stitching anywhere you like from the quilt top. Center your zigzag stitch over the seam where the binding meets the quilt top.
When you reach the corner, stop with the needle in the down position on the right side of a zigzag stitch. Lift your presser foot and turn the quilt to continue stitching uninterruptedly.
Pretty soon you'll be all done - and faster than ever before I hope! What I like most about this method is that my zigzags look as even on the front as on the back. See! And, I personally like the character of the zigzag stitch. It's very "me". If zigzags aren't your favorite, you might try another decorative stitch on your sewing machine that is fairly wide. It could have the same user-friendly effect.

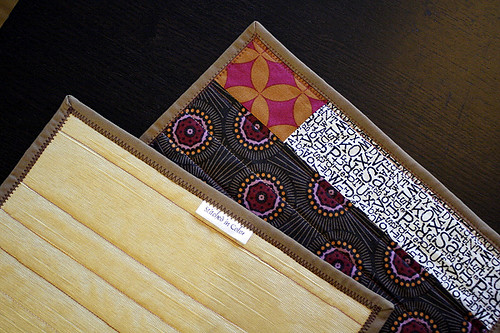
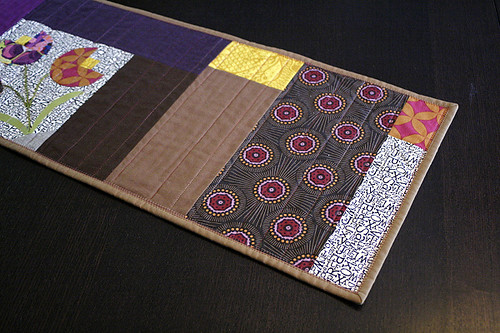
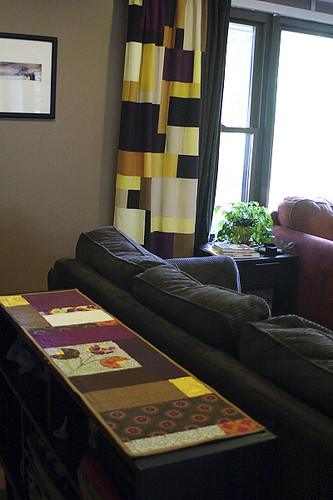
Would you like to see my finished project?

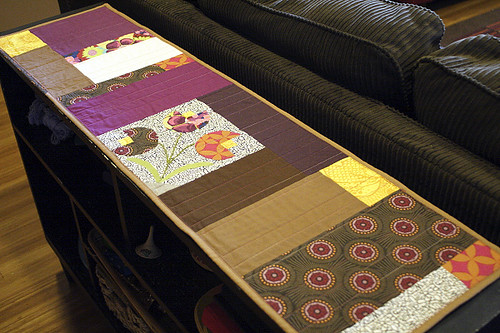
This a table runner (my first!) for a side table/toy shelf that lives behind our sofa. I featured that snowdrop block and worked in solid Kona cotton scraps to match my new living room curtains.

The kittens discovered it as a new soft spot to nap lickety split. But, they didn't stay there for long...

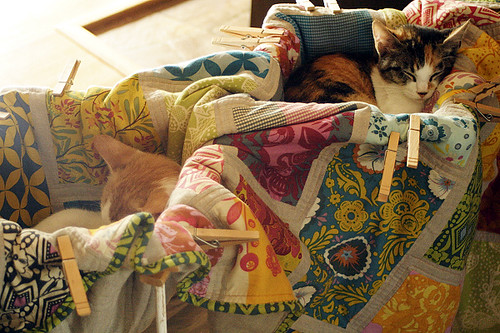
Aria and Liam built them a kitty hammock with my Colorbrick quilt and collapsible clothing drying rack. Yep, never a dull moment around here.

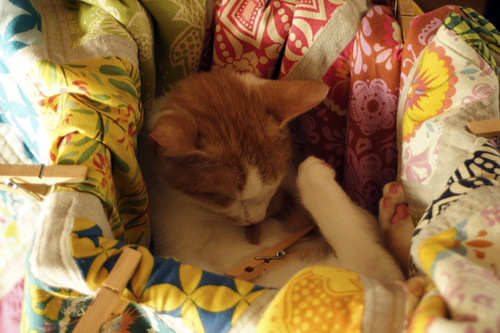
And never a shortage of Cuteness!!!
If you happen to like my Zigzag Binding tutorial and actually give it a whirl, I'd love to see your project pop up in the Stitched in Color flickr pool. It makes my day to see someone actually learning to quilt, or trying out one of my tutorials. Thank-you for visiting and for being a part of this community!


You do very nice tutorials - thanks! Your runner (your 1st!?) is beautiful & looks great in your room. Love your kitties & quilts too....
ReplyDeleteHi Rachel! Will you remind me where you got the lovely tulip block that you used in the table runner? I saw it the other day and can't remember where! It's lovely, BTW, in the table runner. Cheers!
ReplyDeleteThis is fantastic! Thanks for the clear and easy-to-follow tutorial. Think I'll give this a try :)
ReplyDeleteThanks for a great tutorial. I love your runner.
ReplyDeleteoooo- I think I may have to try the zig zag stitch. PS- Your runner is beautiful!
ReplyDeletevery nice rachel. very clear and concise directions also. i will be trying this out as soon as i finish the pile of quilts i have!
ReplyDeleteVery nice! I'll have to try this!
ReplyDeleteI'm always on the hunt for fast and easy bindings since I'm usually too short on time for a hand-stitched binding...I'm going to give this a whirl on a Christmas quilt that needs finishing. Thanks for the tut!!!
ReplyDeleteAbout to bind a quilt here in a few minutes and I think I might give this a try! I have to admit, I usually love hand sewing binding on things, but I'm in a bit of a hurry to get this particular quilt done. Thanks for sharing this! Your runner looks fabulous!! Goes so well with the whole room.
ReplyDeleteI'm making my first quilt - nowhere near ready to bind it but you fanastic tutorial will help me immensly when I get to that point. I had no ideas how to do it until now. Thank you!!
ReplyDeleteI have not one, not two, but THREE full-to-queen-sized quilts waiting to be bound, because the process is always pretty dreadful - this is the best tutorial I've seen yet for the process, and I can't wait to try it out! I'm not surprised that it comes from you, though - your tutes are always superb! :) This looks much easier than using the bias tape maker that I have, especially since I have so much to do.
ReplyDeleteI am going to try this out. Thank you for sharing the tutorial! I have hesitated machine binding because it isn't 'perfect' enough for me. The zig-zag, however, looks like it will be forgiving enough for me! Thank you so much!
ReplyDeleteI love the colors of your curtains and new table runner. Beautiful!
Your tires are fun and concise which is always great. Thanks for sharing that with us. I commented on your curtains when you posted that they are lovely and now with the table runner it really adds to the whole room. You do amazing things with scraps. Wish I had your foresight and could see what you see when you decide to put items together. I'm so structured that I'm afraid to step out of the box to try anything different. :/. Have a great day!
ReplyDeleteROFLOL!! Don't you just love when you hut send and realize you gave not reread what you wrote and auto correct has taken over and changed your words completely??!! NOT! LOL. Obviously "tires" was supposed to be "tutes" in my comment.
ReplyDeleteThat kitty hammock is ridiculously cute!!! I need one, with kitties in it :)
ReplyDeleteLovely toot!!! I have to know - did you make the curtains?? Luv them!!!!
ReplyDeleteso sorry, went back and reread - duh you did make then!! and I clicked the link, your amazing!!! Thanks!!!
ReplyDeleteAwesome tutorial! If I'm lucky, I'll be done quilting the quilt I've been working on in a day or two...I just might try this method of binding - I think it's pretty "me", too!
ReplyDeleteI tried this when you first mentioned it a while ago, and it is a-maz-ing. Thanks for putting together the tutorial. Zig zag really is the way to go!
ReplyDeleteI'm making my first quilt and just finished quilting it...getting ready to start on the bind. Great timing that your post was up today - the corners were never quite clear to me...till now. Thank you!
ReplyDeleteStill deciding on wether to handsew or machine sew the finish of the binding...
Hi, I recently did this - it's on my Amy's Creative Side Bloggers Quilt Festival Quilt - and I love it! It's a baby quilt and I just imagined it would be so much stronger for many many washings! :)
ReplyDeleteI really struggled with my corners on my first finished quilt, so this is extra helpful! I have a mini Christmas Quilt idea that I am definitely going to try this on! Thanks Rachel!!!
ReplyDeleteBesides the binding, your runner is fab! I love that it brings a few touches of new colors into your room!
I love this zig zag binding. What a great idea. And your table runner looks wonderful, as do the kitties.
ReplyDeleteHI Rachel
ReplyDeleteI have tried machine binding before and was not so happy when it was less than perfect in a couple of places. I had seen decorative stitches used for binding but machine doesn't have any so this will be perfect. I really like the look it gives so I will definitely try this on my next quilt. Ahem, says she who hasn't touched the sewing machine since July!!!! :-O
dxx
As always, great tutorial! I am doing my first machine binding right now on my bottled rainbows. I did it as a QAYG project and I am having to bind each block!
ReplyDeleteI suck at this and am greatly looking forward to pulling up your tutorial next time I'm finishing up a quilt which I'm happy with, only to finish it less than beautifully. Cheers to you and all the beautiful work you continue to share here.
ReplyDeleteThis is great! I actually tried to attach binding to my table runner that I'm making using the decorative stitching...It was an epic fail, so I'm glad you posted this tutorial, I'll try it again with zig zag this time :)
ReplyDeleteWhat a great tutorial. Thanks!
ReplyDeleteI used this method (because you had posted about it before, just no step by step) with last months entry into Celebrate Color, I did it on my Halloween table runner (my first table runner!) It worked out perfectly, and I love the look!
ReplyDeleteThat looks awesome and gives some definition to the trim. I love the runner you made and it appears the kitties love your snuggly quilts too!
ReplyDeleteThanks for this tutorial. I am a beginner and I intend on trying this when I get to that point. Thanks again.
ReplyDeleteAnd your runner is beautiful! Such warm, rich colours!
You read my mind hun! This is just what I was looking for as I get ready to bind Harper's quilt! Fab! Love the zig zag look too!
ReplyDeletelove this! thanks for sharing.
ReplyDeleteThat's exactly how I do my binding too. I'm in a great group of women who are ever so knowledgeable about quilting and one of them showed me this method. It works really great.
ReplyDeleteThanks for the refresher!
Timely. This tutorial is quite timely. I am working on a thank-you quilt wall hanging for our play director. Once I have the last piece for the back I'll be able to sandwich and quilt. But, then the binding.... You just made an arduous job - dare I say - easy! Thanks!
ReplyDeleteSorry, forgot to comment yesterday as the phone rang. Thanks for a great tutorial, and there must have been hundreds of desperate people out there needing to know how to bind, as it's been repinned from my pin 12 times and like 3 times already!
ReplyDeleteFor some reason, I love the binding stage of quilting. (Maybe because it means you're finished!?)
ReplyDeleteI usually hand stitch because I'm not too great at machine stitching binding. But the zigzag seems easier and neater.
I zigzagged the binding of my Colorbrick Quilt, and it was a very gooood idea! Besides being easier, it looks great!
ReplyDeleteI cannot wait to try this technique, thank you for sharing!!!!!!
ReplyDeleteI just tried this! I like it. :) I usually do a 1/4" SA with bindings, and usually sew it on the back and then wrap it around the front, but I did it on the front with the 3/8" SA.... It was a little weird doing something different (I am totally one of those people who eats the same cereal every morning and the same PB&J for lunch everyday.) :) After a few inches I think it turned out pretty good! I do like the thicker boarder on the front, but there are two spots where it didn't catch on the back - it was a little tight wrapping it around and covering up the seam. I think it must have just been my learning curve because the rest of it turned out great!. I really do love how the zigzags look! :) Thank you so much for sharing! It's always fun to try something new! :)
ReplyDeleteI'll post a picture of it later... it's for a secret swap and I don't want to give it away. ;)
Thanks for this note, Diane! Yes, sometimes I have 1-2 places that don't catch on the back, but now that I've been doing it for awhile that doesn't usually happen. I just like the way the back is "just" caught so that there is no binding hanging past the stitch line. That would be impossible to do reliably with a straight stitch - yeah zigzags! For anyone who wants to avoid the learning curve, you can sew the binding on the quilt top with a 1/4" seam, but you'll have extra binding on the back, extending past the zigzag. Keep that in mind!
ReplyDeleteGreat tute! Thanks for sharing. Love your table runner, curtains, and kitty!
ReplyDeleteThank you, thank you, thank you!!! I have been wanting to try my hand at quilting, but am scared of the binding part...now there is nothing to fear! I just pinned your tutorial to Pinterest too! What a find!
ReplyDeleteYou do your binding almost the way I usually do it. I use the zigzag stitch that sews small stitches as it makes the zigzag, rather than just one big stitch back and forth. I figured it might make it more secure this way. I haven't tried to center the zigzag over the edge of the fabric. I always try to not get the zigzag onto the quilt, to just stay on the binding, at the very edge. Just so many different ways to attach the binding. Just recently began to use a straight stitch to attach the binding. Gives it a little cleaner look, more like hand stitched binding. I love me some variety. Great tutorial.
ReplyDeleteCongratulations is very good idea , thanks
ReplyDeletehttp://tearpiaocupacional.blogspot.com/
Wow. I am a beginner quilter, and have been mystified by bindings. Your tutorial is wonderful. The pictures are clear and beautiful, and your directions are concise and easy to follow. I am so excited to try this now! Thank you so much!!
ReplyDeleteA great tutorial - thank you for sharing the photos with us, too. I look forward to practicing with the zig-zag stitch but will also try another stitch that is more "me".
ReplyDeleteGreat tutorial! I've been trying machine quilting the binding for so long but just couldn't get it until I found this - thanks so much. I blogged about finally being able to do it and linked to you. http://plumandjune.blogspot.com/2012/03/try-something-new.html
ReplyDeleteBeautiful job on the tutorial. Only thing I would disagree with is cutting strips on the grain instead of the bias. If the piece is going to be used as a bed quilt and you want it to become an heirlom, cut the strips on the bias folded fabric wears much much better when the fold is bias than cross cut. The bias tradition has nothing to do with curved edges and every thing to do with improved wear.
ReplyDeleteNo one has said anything about the pins getting caught in the feed dogs. The pins are underneath on the wrong side - aren't they hard to get out when stitching from the right side?
ReplyDeleteI must not have made that very clear in my tutorial. Sorry! I remove the pins as I go, by feeling for the bumps as they make their way towards the machine. I have to be careful not to miss them, but so long as you put the pins in so that the ball is facing you as they feed into the machine, it is easy enough to get them out.
DeleteThis didn't really work for a baby quilt I tried it on. Perhaps it was the batting (a very thin one!) that added just enough thickness so that I couldn't easily pin the binding to the back side. Perhaps with no batting it would work? As well, the 3/8" size of the finished binding just looked way to small for the size of the quilt. Would work fine with wider binding strips ... the corners are certainly nice.
ReplyDeleteJust did this on a smaller project I made. Loved it, especially since the kitchen mat I made was scrappy and the zig zag just adds to that scrappy feel. Also, when I pin the binding to the back I just carefully pin from the front that way it's easier to see the pins and remove them. Thanks for the tutorial!
ReplyDeleteI have tried and tried to make the ties come out right. I end up sewing it straight across. Wish I could master this part of the quilt because I dread the end of the binding. I will give yours a try too. Thank you so much.
ReplyDeleteThis looks so much easier than my usual binding! I tried zig-zagging on one side on my last quilt and thought not perfect it looks pretty good and better than straight/not-very-straight stitching on previous ones. I will try your DIY non-bias binding on the next one and see how it fares! Thanks!
ReplyDeleteThanks so much for this tutorial, Rachel. This is brilliant. I've always been a stickler for hand quilting a binding, but this may be my new favorite method. I used in on a whole cloth quilt (and blogged about it here - http://www.stitched-together.com/2013/01/christmas-sewing-part-one.html) I have since used it on two other projects. It's the best! Thanks again!
ReplyDeleteThis is a great look I need to try. Just need a new project!
ReplyDeleteAll that time I've spent hand-sewing the binding down...
I just found your blog through Dashael sews, I want to thank you for this fantastic tutorial. I hope you do not mind, I pinned this tutorial in my sewing board of Pinterest, I just want to have it as a reference because it is excellent.
ReplyDeleteI invite you to visit my blog, here is the link;
http://passionetcouture.blogspot.ca/
Have a nice day!!!
Marisa
You know I just dread dealing with the sewing of the 'tails' but I keep trying. Your tutorial looks easy so i will certainly try it. I haven't been measureing the tails like you ao that may be the problem. I am so thankful for your tutorials for us newer quilters. Bless you Rachel.
ReplyDelete