Hand Quilting tutorial

Loulouthi Tiles is a quilt pattern designed to showcase large-scale prints. There are several sizes available from baby to queen. I'm using Anna Maria Horner's new Loulouthi collection, but you can use any fabrics!
Here's what has been posted so far:
2. Fabric
3. Cutting
4. Piecing
Today: Hand Quilting!
Now that you're armed with basic hand quilting supplies let's make some stitches, shall we? I designed Loulouthi Tiles to have 3 rows of hand quilting around each large picture frame tile. To get started, you'll want to choose three colors of pearl cotton for each picture frame tile. Take your time, try a few options and enjoy this part! Here's what I chose:

pearl cottons for Summer Totem in Tart

pearl cottons for Clippings
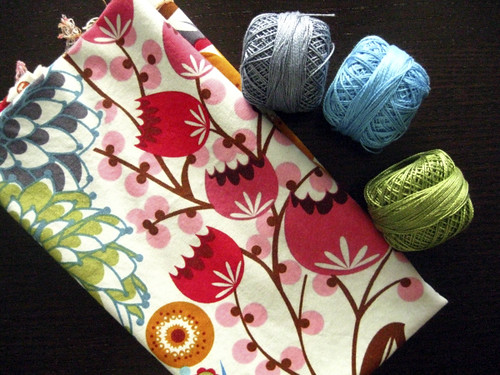
pearl cotton for Summer Totem in Streudel
All of these pearl cottons (except the yellow) are pulled from Anna Maria Horner's boxed sets of threads, which are due to be available in quilt shops any day now. They're running late! We thought that the threads would be available by the time I started hand quilting. So sorry about that! In the meantime, you might try finding pearl cotton sold separately at your local quilt shop, yarn shop or needleworks shop. If you know of a great online source for Anchor or DMC pearl cotton size 8, please let us know. So far, the websites I've found have had poor presentation that doesn't inspire my business.
Before walking you through how to hand quilt, let's talk about where. Make your first, outermost line of quilting (shown in brown stitches below) along the seam that joins the picture frame tile sashing to the thinner, continuous sashing that runs throughout the quilt. If you quilt exactly in the seam, your stitches will sink into the ditch. I quilted just beside the seam, on the side closer to the picture frame tile. No need to draw a guideline for this!
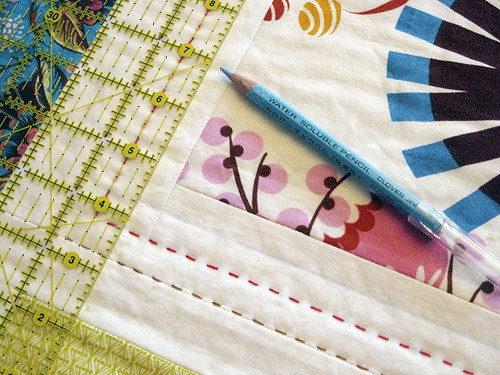
The next 2 rows of quilting are spaced evenly between the outermost line and the picture frame tile. Mark quilting lines at 1/2" intervals. Here I'm using my quilting ruler and water soluble pencil.
In addition, I plan to quilt through all the sashing paths in this quilt. I tentatively plan to do some in hand quilting and some in machine quilting, but we'll see! My intention is to thoroughly enjoy this project without rushing, which may lead to hand-quilting it all. Oh, and I also realize that more quilting is needed to really secure this project. I may add quilting inside the picture frame tiles in geometric grids or following Anna Maria's motifs. Not sure yet! I like to let quilting evolve as I go, in part to leave room for new ideas.
By the by, my quilt is basted with 505 basting spray. Works like a dream and no pesky pins. Love that!
Hand Quilting Tutorial
Step 1: Thread, Knot & Insert Needle
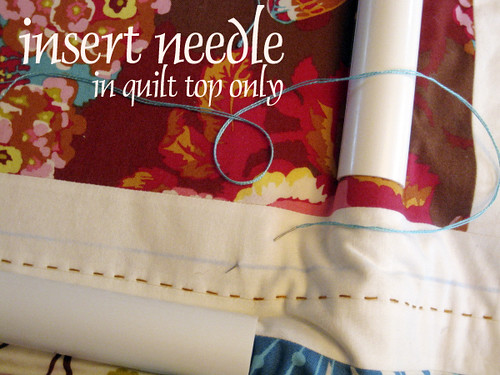
Cut a pretty long length of pearl cotton and thread your needle. Knot the long end as usual. Now, insert the needle through the quilt top only about 1 inch from where the needle will come up. Make the needle come up precisely on your quilting line. Remember, you're only going through the quilt top at this time.
This next part feels scary. Be brave.
Step 2: Tug Knot Through

Pull the thread through until the knot catches at the insertion point. Now grasp the thread near where it exits the quilt top and tug HARD until that knot pops through to the underside of the quilt top. Pearl cotton is strong, as is your fabric. I've only had my thread break once (my knot was huge, oops). Broken thread is no deterrent. You will win.
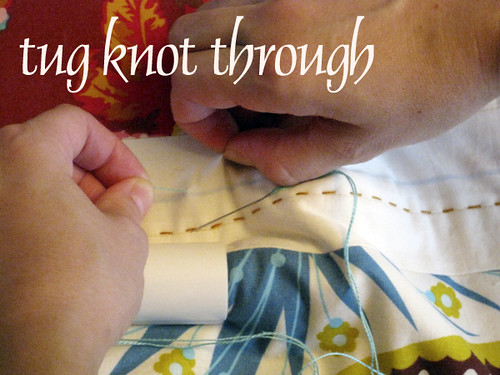
To protect my fabric, I like to pinch the fabric near the knot and hold it up like so. It seems to give way to the knot more easily when I do. Once the knot is under, pull gently so that it catches at the thread exit point along your quilting line. Now you are ready to hand quilt.
Step 3: Insert Needle Vertically
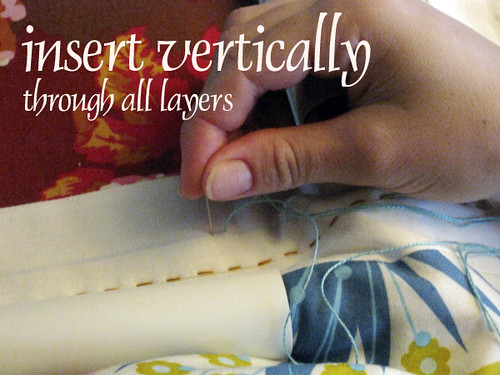
To begin quilting, insert the needle vertically through all layers of your quilt sandwhich. Decide now how you will space your stitches for an even stitch pattern. I like to aim to make my stitch length on the quilt top the same length as the space between stitches, just because it's easy on my brain.
Step 4: Bring Needle Up
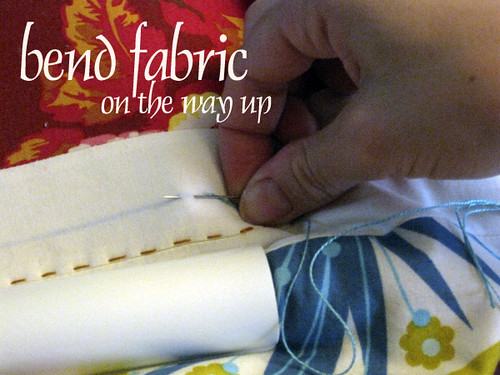
Once the needle pokes through to the quilt back, angle it sharply to come up again to the quilt top. Your quilt should not be held rigidly taut by your quilting frame. A little give is necessary so that you can bend the fabric a bit as you bring the needle up. Bending the fabric allows you to maintain the length of the under stitch. Your goal is for the needle to enter the quilt back somewhat vertically. That's pretty hard to do, but practice, practice. Most of us (raising hand here) have shorter stitches on the back of our quilt than the front. I say, don't sweat it. Let's just keep quilting!
Step 5: Load Another Stitch
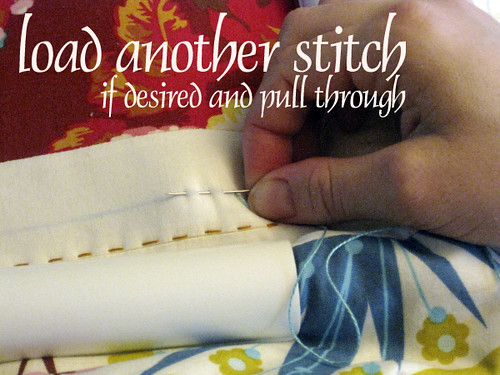
After you've gotten the hang of things, try loading another stitch on your needle at this point before proceeding to the next step. My needle is short, so I can only do 2. You'll repeat steps 3 & 4 to load another stitch.
Step 6: Pull Through
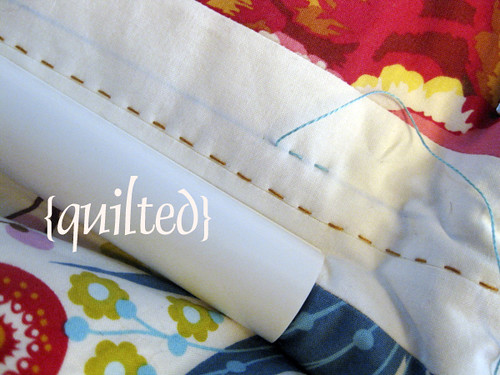
When you're ready, pull the needle out of the quilt sandwhich on the top side of the quilt. To see your stitches, pull the thread all the way through as shown. However, to save your arm and to save time, it's smart to make a few sets of stitches (each set is steps 3-5) before pulling the thread all the way through. Continue in this way until you run out of thread or finish your quilting line.
Step 7: Finishing
To stop hand quilting, you'll repeat steps 1 & 2 with a few modifications. First pull your thread all the way through, so that only smooth stitches lie in your wake and the thread exits on the quilt top. Now, make a knot a distance from your quilt top that is equal to the length of your stitches. For example, if my stitches are 1/4" long, I'll make a knot only 1/4" from my quilt top.
I know, this is weird.
Next, insert yourneedle to make the next stitch as usual, only this time only poke through the quilt top. Make your needle exit the quilt top about 1" from your last stitch. Now tug until your knot pops through to the underside of the quilt. See! Just trim off the thread very close to the quilt top where it exits. The thread tail will drop to the underside of the quilt. Hurray!
Questions? I'm here for you. Let me have them!