Cutting Sashing
This post is part of a series {Colorbrick} a Beginner’s Quilt-Along. Please see this page for links to all posts!
I'm glad to hear that you all found cutting those bricks so easy (if time consuming)! Let's push through this last session of cutting so we can get on to piecing our quilt top. We're almost there!
If you bought the solid fabric for your sashing and backing as one big piece (like I did) you have a big hunk of fabric to work with for this next step. Cutting yardage is always more challenging for me than cutting small pieces. If this is your first time cutting yardage, give yourself a break! Do plan on cutting all your strips in one go as repositioning that big piece of fabric for a second session would be annoying.
Again, I will be demonstrating on a 18 x 12" cutting mat. This smallish mat will force me to fold my fabric twice for cutting in order to make it all fit on the mat. If you have a larger mat (or smaller fabric - mine is that extra wide linen I recommended) you may not have to fold your fabric twice. I'll have some tips for you large mat people at the very end.
If you can, clear off a large table to use as your work surface. If that's not possible, it's best to cut on the floor where you can spread out your fabric.
Step 1: Match Selvedges
The selvedge is a tightly woven clean edge produced in the fabric factory. Often designer fabrics are printed with the name of the fabric designer and collection along the selvedge. My linen has a plain, pale cream selvedge, and Kona cottons have an unprinted selvedge with a slight uniform fray. Any given cut of fabric will have 4 sides - 2 selvedges and 2 cut edges.
Before you get started, measure and note the width of your prewashed fabric from selvedge to selvedge for later use.

Holding your fabric in the air, fold your fabric longways, matching the selvedges together. If you are working with over 1.5 yards of fabric, you will need a partner to help you match up the selvedges all the way along the fabric, while still holding the fabric in the air. Just do your best!
Step 2: Shift & Slide

Wondering why your fabric must be in the air? This is the critical part. Keeping the selvedges aligned, shift the fabric as necessary so that there are no pull lines and the fabric hangs flat. This shifting is similar to how sliding doors move on a track. Depending on how straight the fabric store cut your fabric, you may need to shift just a little or a lot. Here's where having help is critical with a large length of fabric.
Step 3: Lay Out

Lay your flat, folded yardage on your work surface, careful to keep the selvedges together. The right side of your yardage should lie over your cutting mat.
Step 4: fold Again (if necessary)
Now, does your fabric fit on your mat? If you're cutting on a small 18 x 12" mat, you'll need to fold your fabric again.
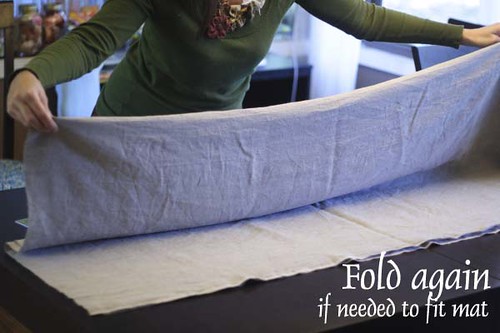
Be very careful when you fold! Every fold introduces an opportunity for wavey edges. Try to keep the fabric that remains on the table very still and match up the first fold to the selvedges carefully.

How do you tell if the edges are really matched since the fold is not crisp? I press down with my hand as I run along the edge to see where the fabric will lie when I place the ruler flat over it.

Step 5: Align Bottom Fold
The last step before you're ready to cut is to align your bottom folded edge with a horizontal line on the cutting mat.

Try to disturb the fabric as little as possible. Depending on your situation it may work well to pull the fabric down towards a horizontal line or instead to move the cutting mat under your fabric to align. As shown in the previous step, use your hand to press down on the crease to see where the fold will hit the cutting mat when the ruler is placed over your fabric.
Step 6: Trim for a Straight Edge
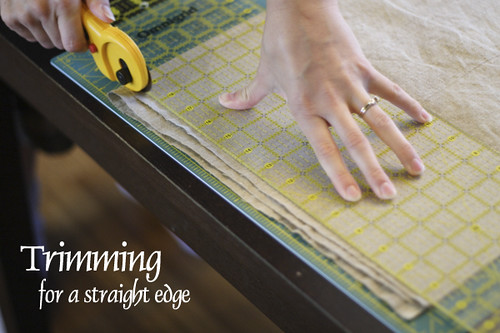
Place your ruler over the right edge of your fabric and trim off whatever is necessary to make an even edge.
Step 7: Cut 1.5 Inch Strips

Whew! Now you are positioned to cut those strips! But before you do, dig up that measurement you made earlier of your fabric selvedge to selvedge. You'll need it for a little figuring...
::Time out for a Little Math::
How many strips?
You need 12 strips that measure 1.5 x 53". These are the long sashing strips that go above and below rows of bricks.
You also need 55 strips that measure 1.5 x 5.5". These are the short sashing strips that will be pieced to one side of each brick. Right now you want to cut enough 1.5" strips to eventually become the long and short sashing. We'll work on getting the 1.5" strips to the right sizes later on.
Now, my prewashed linen measured 56" from selvedge to selvedge. That means I need 12 strips to make all my long sashing - easy. A little math shows that if I cut 10 additional strips, that will be enough length to make the 55 strips I need for my short sashing. If your fabric measured 53" or wider from selvedge to selvedge, follow my plan to cut 22 strips total.
But what about if your fabric measures less than 53" from selvedge to selvedge (as it will if you are using Kona cotton)? In that case, you have a little more work. SORRY!
After trimming for a straight edge (Step 6), measure along the length of your fabric until you reach 55 inches. (I'm giving you some wiggle room). Make a straight cut at 55 inches wide.
Unfold your fabric and refold this time matching cut edge to cut edge instead of selvedge to selvedge.
Follow the directions above (Steps 3-5) until you are ready to cut again. Now that you are folding a wider section of fabric, it is more likely that you'll need to fold twice to fit it all on your cutting mat. Technically, you should not have to trim for a straight edge, but you may find that after all that folding, your edge is not straight. In that case, do trim for a straight edge.
Now proceed to cut 12 strips (each at 1.5") for your long sashing and 10 more strips (each at 1.5") for your short sashing.

Cutting through layers of fabric takes more pressure on the blade than you might expect. Remember to check for a clean cut before moving your ruler. If you need to, make another swipe to cut all those little fibers.
Step 8: Position Strips
The hard part is behind you. Now you have only to cut your strips down to size.

Turn your cutting mat so that you have the greatest possible horizontal length. Position one or more strips along a horizontal line of your cutting mat, as shown. I only set out one strip in this example. When you are feeling ready, try cutting two or three strips at once, either by stacking them on each other or setting them out parallel, each aligned with a horizontal line on your cutting mat.
Step 9: Trim for a Straight Edge

Trim off the selvedge or trim for a straight edge and discard.
Step 10: Cut Strips to Size

Cut all 55 strips to measure 1.5 x 5.5 inches. Be sure to reserve 12 full-length strips for your long sashing strips. Trim these remaining 12 strips to measure 1.5 x 53 inches.

When cutting your 5.5" strips, work across the mat. Rather than repositioning your fabric after each cut, work from right to left on your mat until you have cut all the fabric on the mat.
Tips for Cutting on a Large Mat
If you are blessed to be using a large mat, you may only have to fold your fabric once. This will allow for greater ease and accuracy!
In my case, my folded fabric was larger than my ruler. The trouble here is that I cannot align the ruler with lines on the cutting mat both above and below the fabric, which effect cutting accuracy. So, I change my approach when cutting on a wide expanse of fabric.

I have moved around my table to approach my fabric from the opposite side, with the length of the fabric extending to my right. I place my ruler on top of the fabric with only 1.5" overlapping. This allows me to align the grid on the ruler with the exposed lines on my cutting mat along the side of the fabric.

Notice that I am using the corner of my table. As I make the long cut, I move alongside the edge of the table to maintain control of my cut. I cut as far as my ruler allows, then slide the ruler along and match the grid on the cutting mat again so that I can complete my cut.
That's all folks. Next is piecing our Colorbrick Quilt!