Chain Piecing
This post is part of a series {Colorbrick} a Beginner’s Quilt-Along. Please see this page for links to all posts!
Hurray, it's time to start sewing. Finally, right? This step is so much easier than the last - and way more rewarding. Let's go!
Step 1: Prepare

For the Colorbrick quilt, gather all your bricks, all your short sashing pieces, thread-snipping scissors and quality cotton thread. I've put some natural Gutermann thread in my machine.
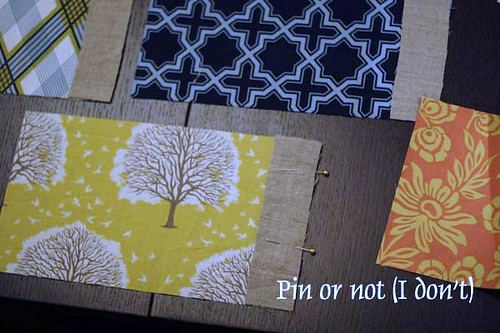
Alrighty. Now lay your short sashing strips over the bricks with right sides together, aligning the right edge just so. When sewing these short 5.5" strips, I don't find pinning necessary. I just hold the edges of the fabrics together as I sew. If you'd like to use pins, be my guest. Please note that we are sewing a short sashing strip to the RIGHT of every brick only.
Step 2: Stitch a 1/4" Seam

Keeping the edges aligned as nicely as possible, stitch a 1/4" seam. If you don't know how to do this on your machine, you should do some experimenting first. There may be a spot on your machine foot that has a line denoting a 1/4" seam. If not, you can place a piece of colored tape on your machine that will help you stitch at 1/4" exactly. If you're new to this, measure your finished stitching to see if the seam is actually measuring correctly. While the 1/4" seam allowance does not matter much on this project, it is quite important for other quilt piecing. Might as well get in the habit of sewing a 1/4" seam as well as you can!
You do NOT have to backstitch when piecing patchwork. In fact, backstitching will often cause your machine to "eat" the edge of the fabric.
Step 3: Don't Stop! (or how to Chain Piece)
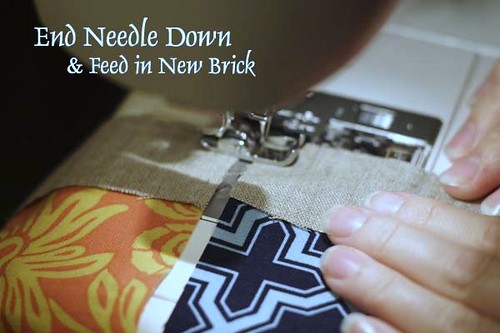
Now you're going to "chain piece", which is a fancy way of saying that you aren't going to stop sewing when you finish one brick and start the next. If your machine has a "needle down" setting, turn that on so that your needle stops in the down position whenever you stop sewing. As you get to the end of your edge, stop with the needle down and raise the presser foot. Feed the next brick under the presser foot and continue sewing. You should leave a small gap between bricks so that you can cut the thread to un-chain them later.

I was shocked to learn that it's OK to run the machine with no fabric in there. Yep, it doesn't hurt anything -just makes a nice little thread chain! Chain piecing is faster than stop-and-go piecing, plus it saves thread!
Step 4: Snip and Press

After sewing as many bricks and sashing pieces as you'd like, stop sewing (remember, no need to backstitch). Snip the thread chains that link your bricks. Feels good, doesn't it?

While many quilters press their seams to one side, I like to press seams open. Pressing seams open results in a flatter (to me more attractive) seam from the right side. And, flatter seams make for easier quilting in general.
Try to "press" not iron. Pressing refers to a lift and set down motion, while ironing refers to moving the iron across the fabric. Ironing can stretch and distort your piecing, so aim for a "press" technique. I am known to iron anyways, cause I'm lazy.
Note: If you've been following the Colorbrick Quilt-Along directions exactly, you cut 5 more bricks than needed. You onlyneed 55 bricks (and you only cut 55 pieces of sashing). So, as you go, you can start to lay out bricks to see what prints are easy-to-place or look the best and which prints you don't mind having less of. When I made Colorbrick last time, I found that some prints went with anything (yah!) and others I had to place more carefully so that they didn't "clash" with their neighbors. Try to think ahead as your stitching to guess which 5 bricks you'll exclude. If you change your mind, you can always rip a seam or cut some more sashing.
I'll be back on Tuesday with our next step in the quilt-along. Until then... sew, sew sew!